Seth Thomas Jewel Counts
Jewel Counts in Seth Thomas Model 1 Pocket Watches
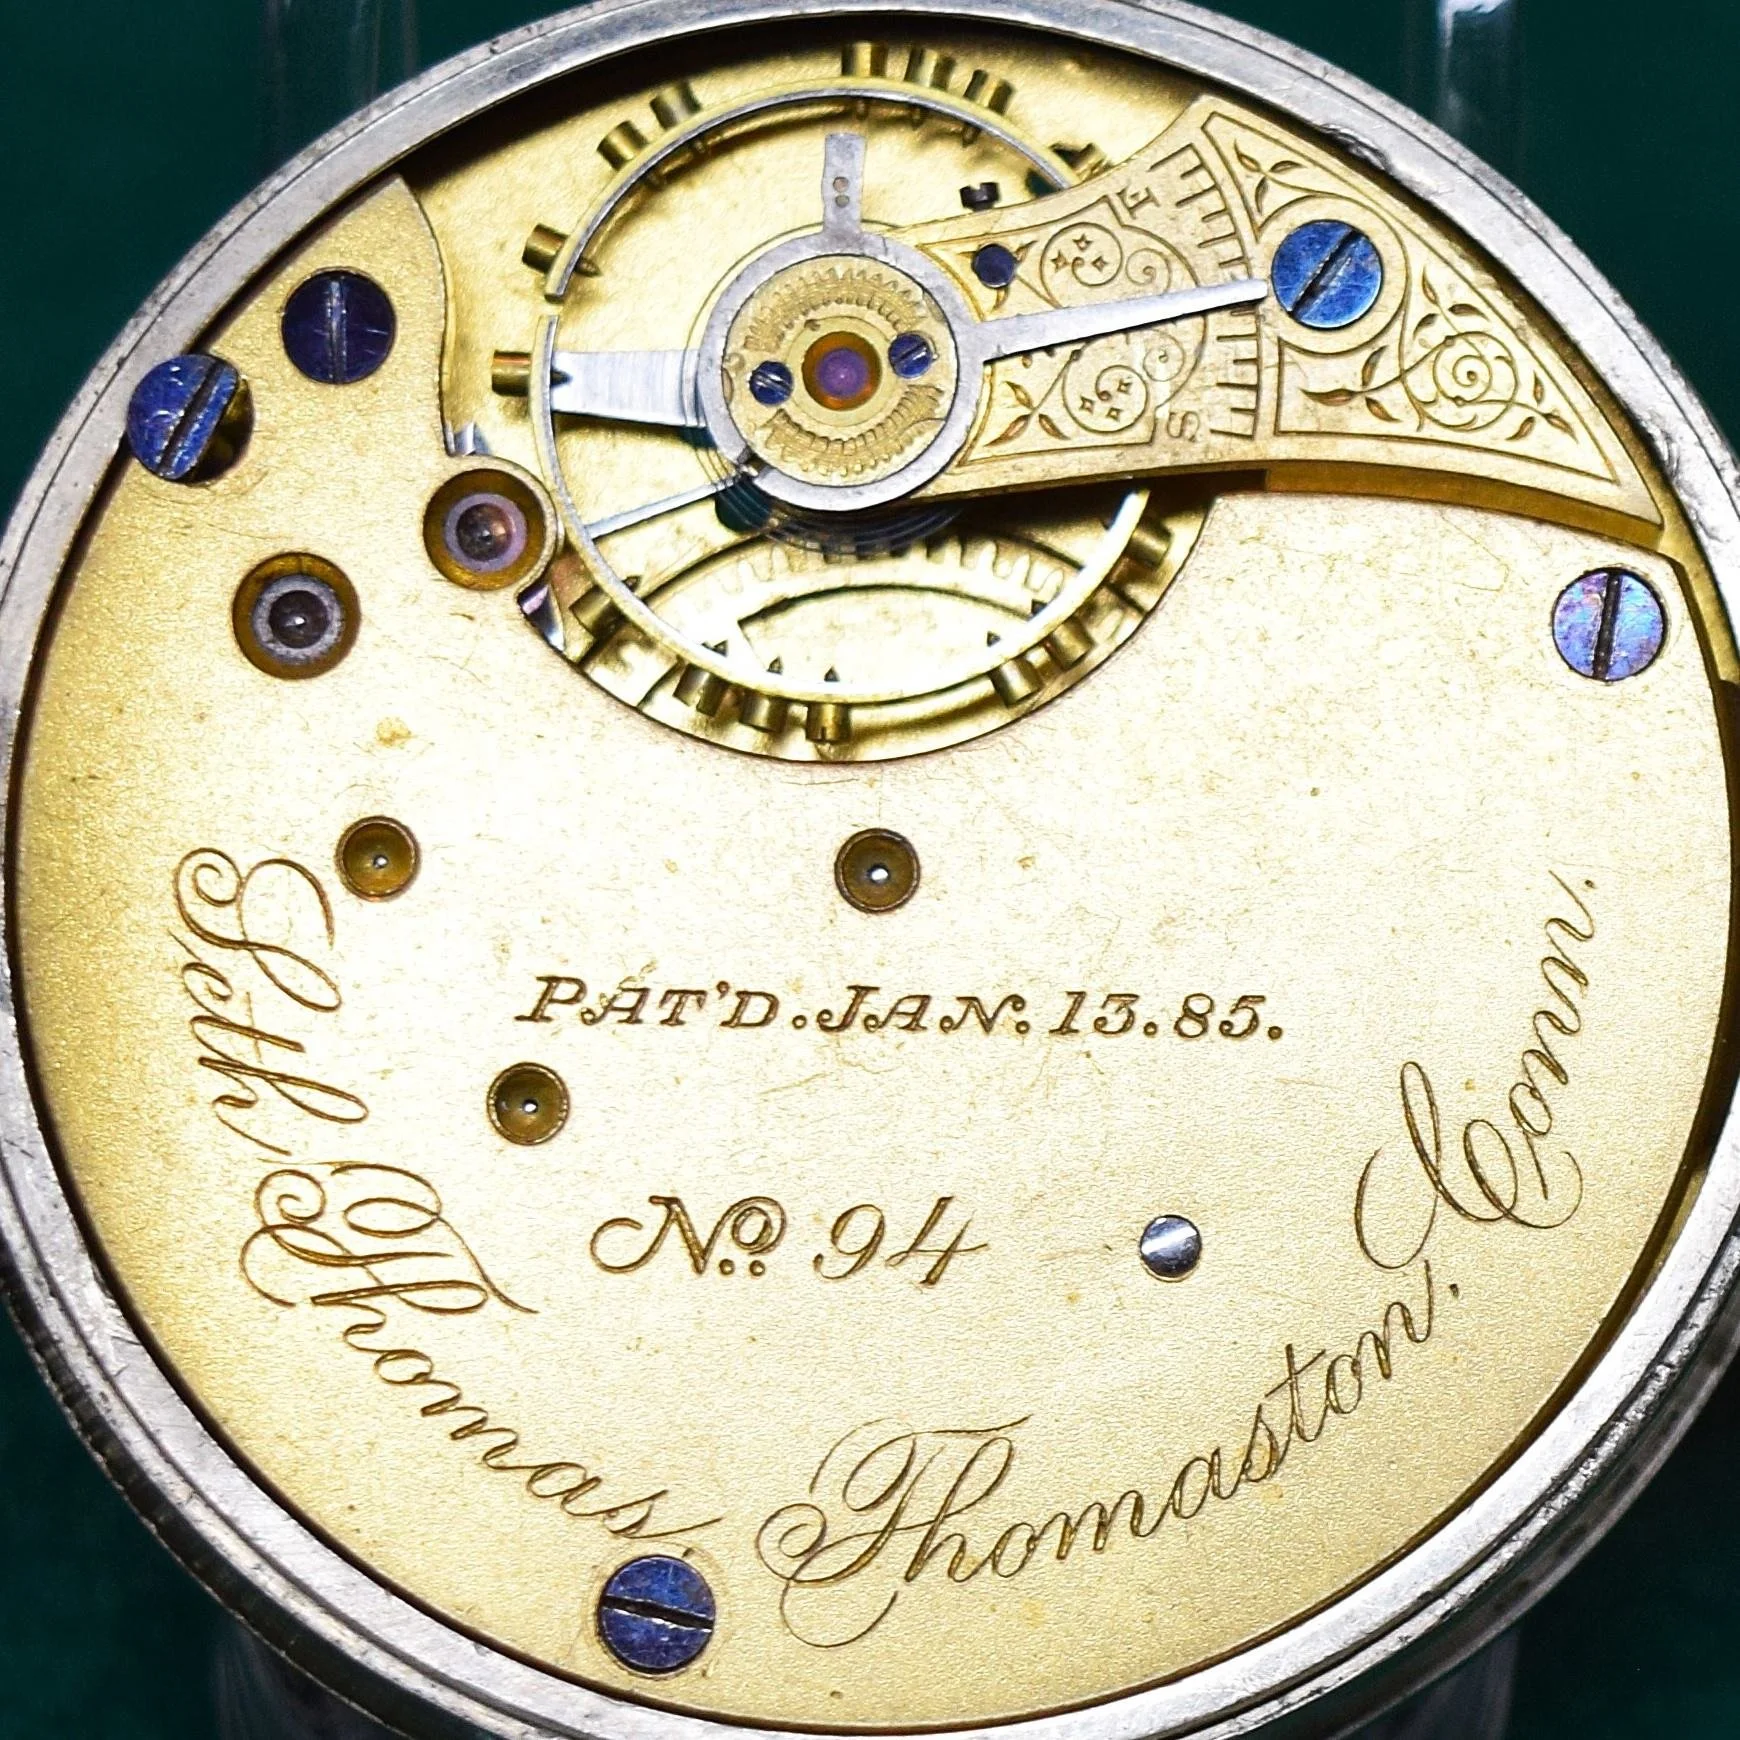
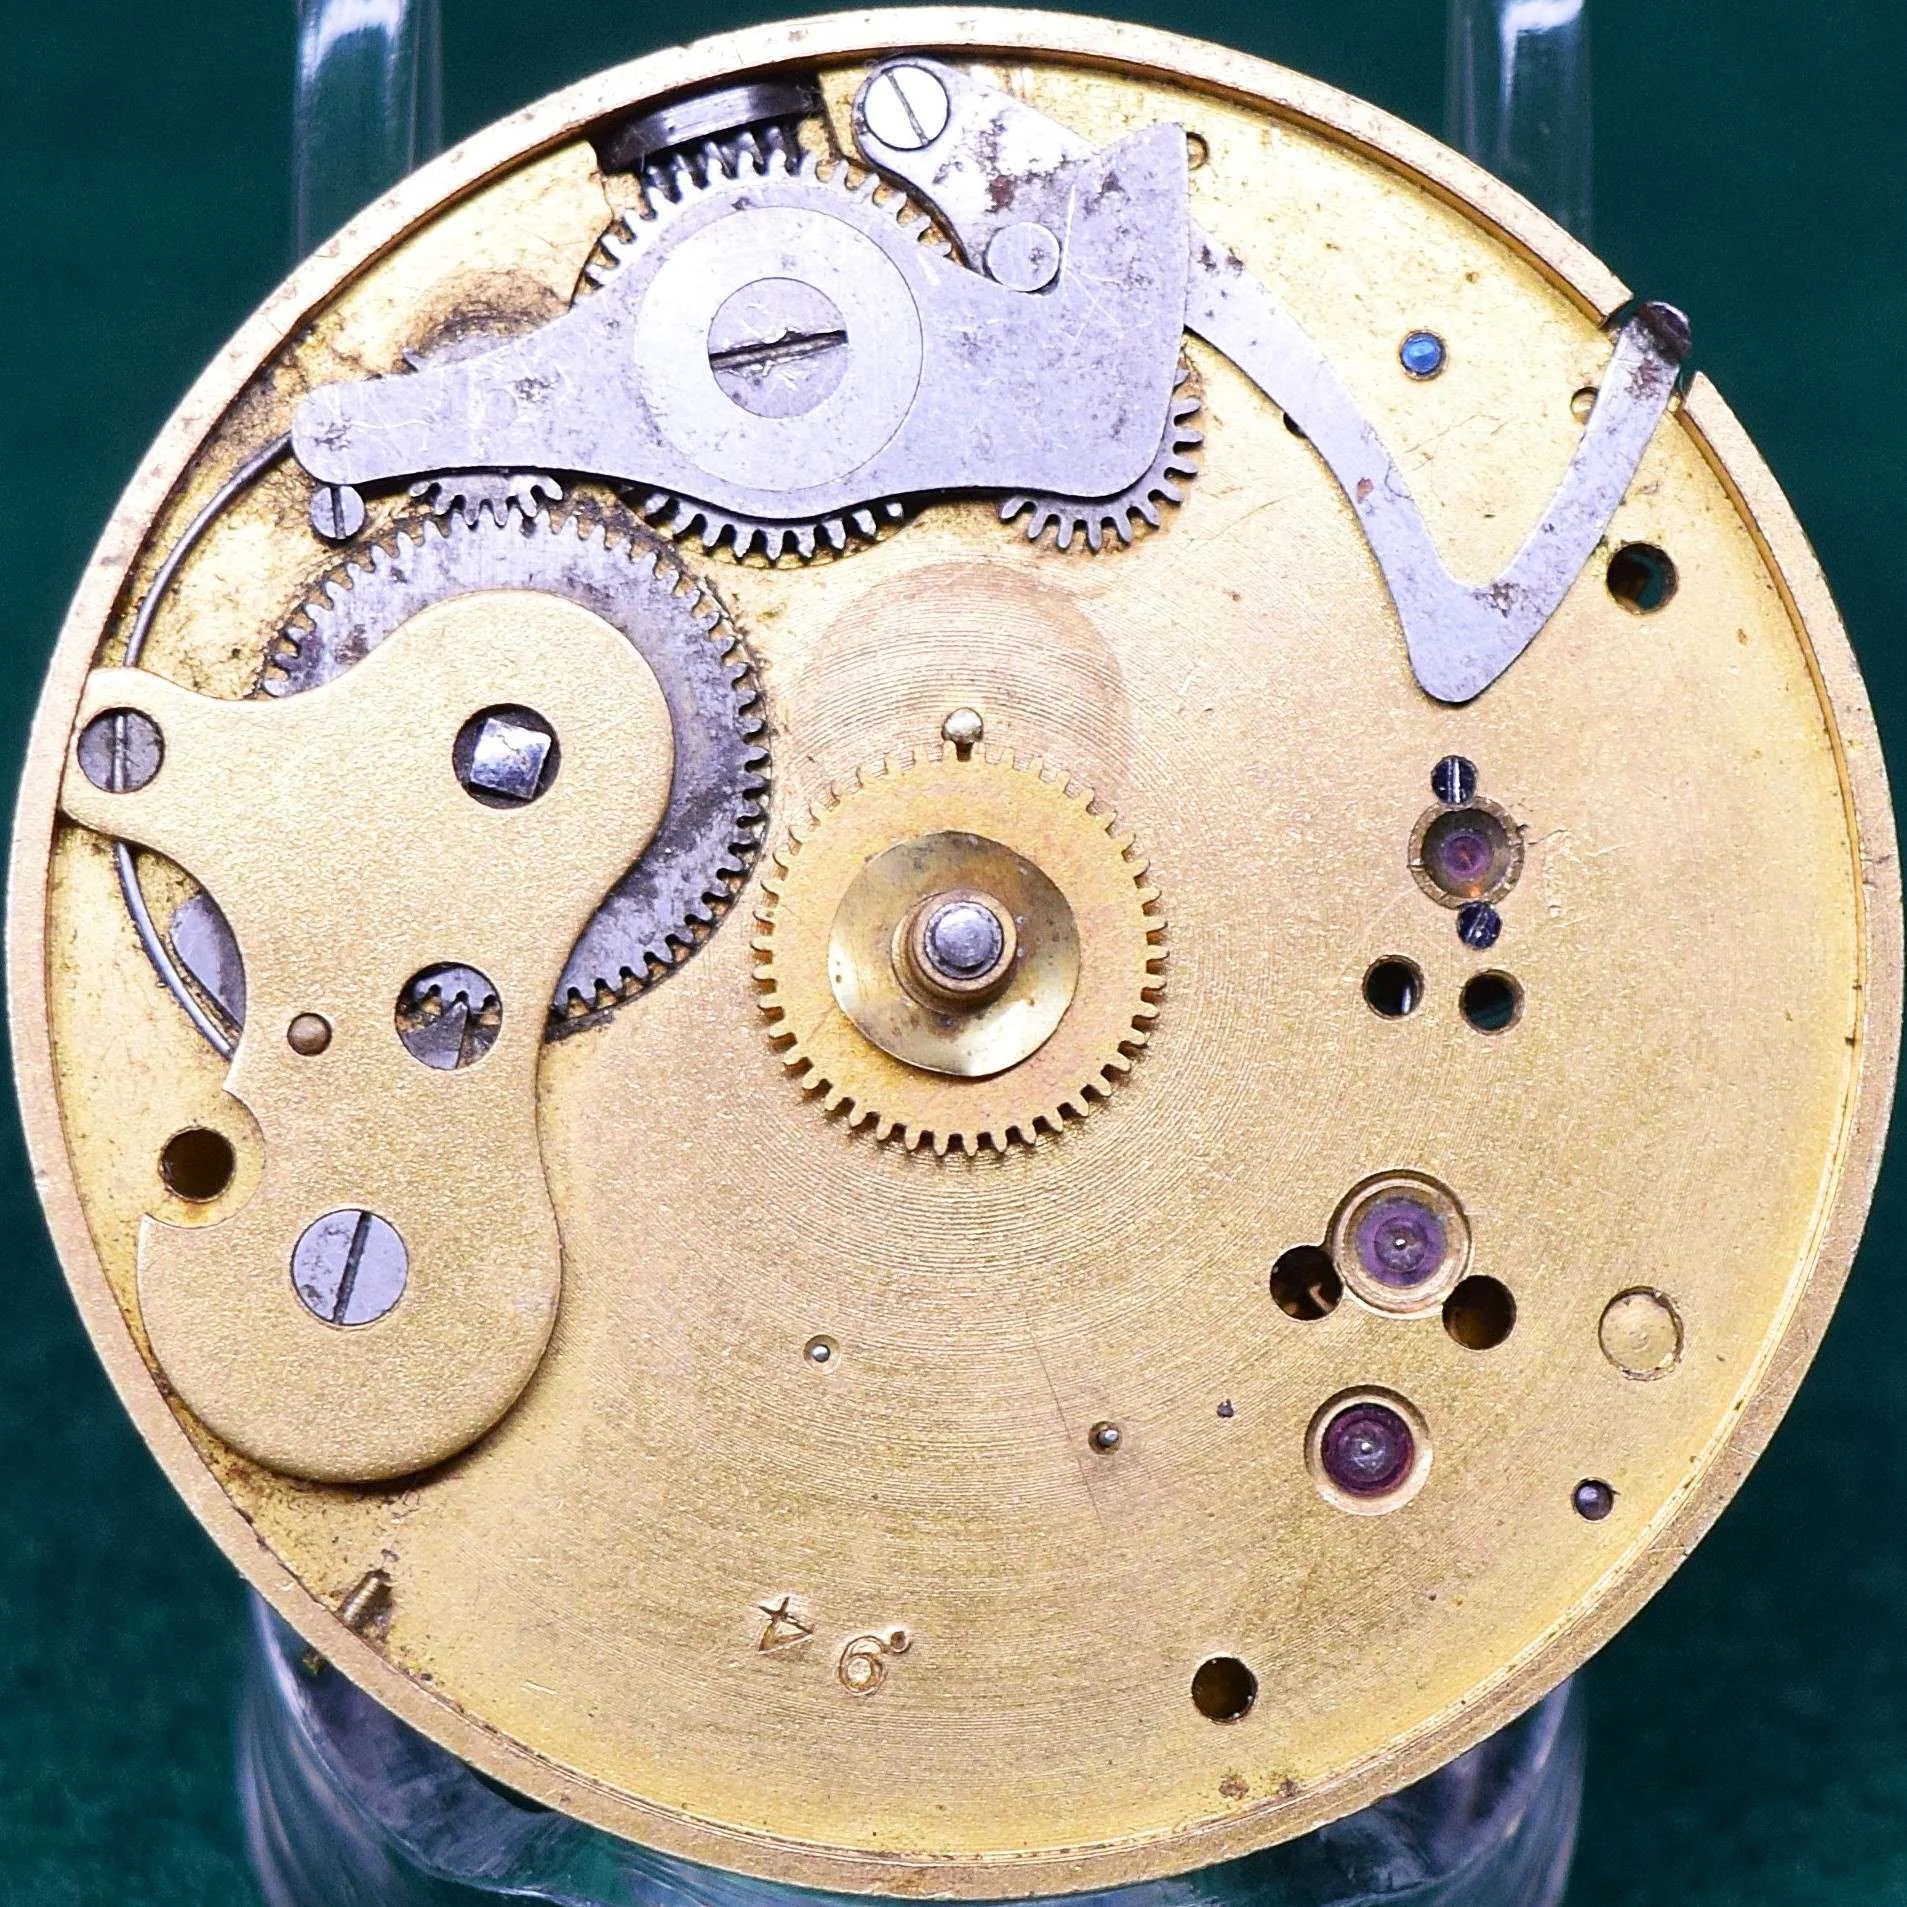


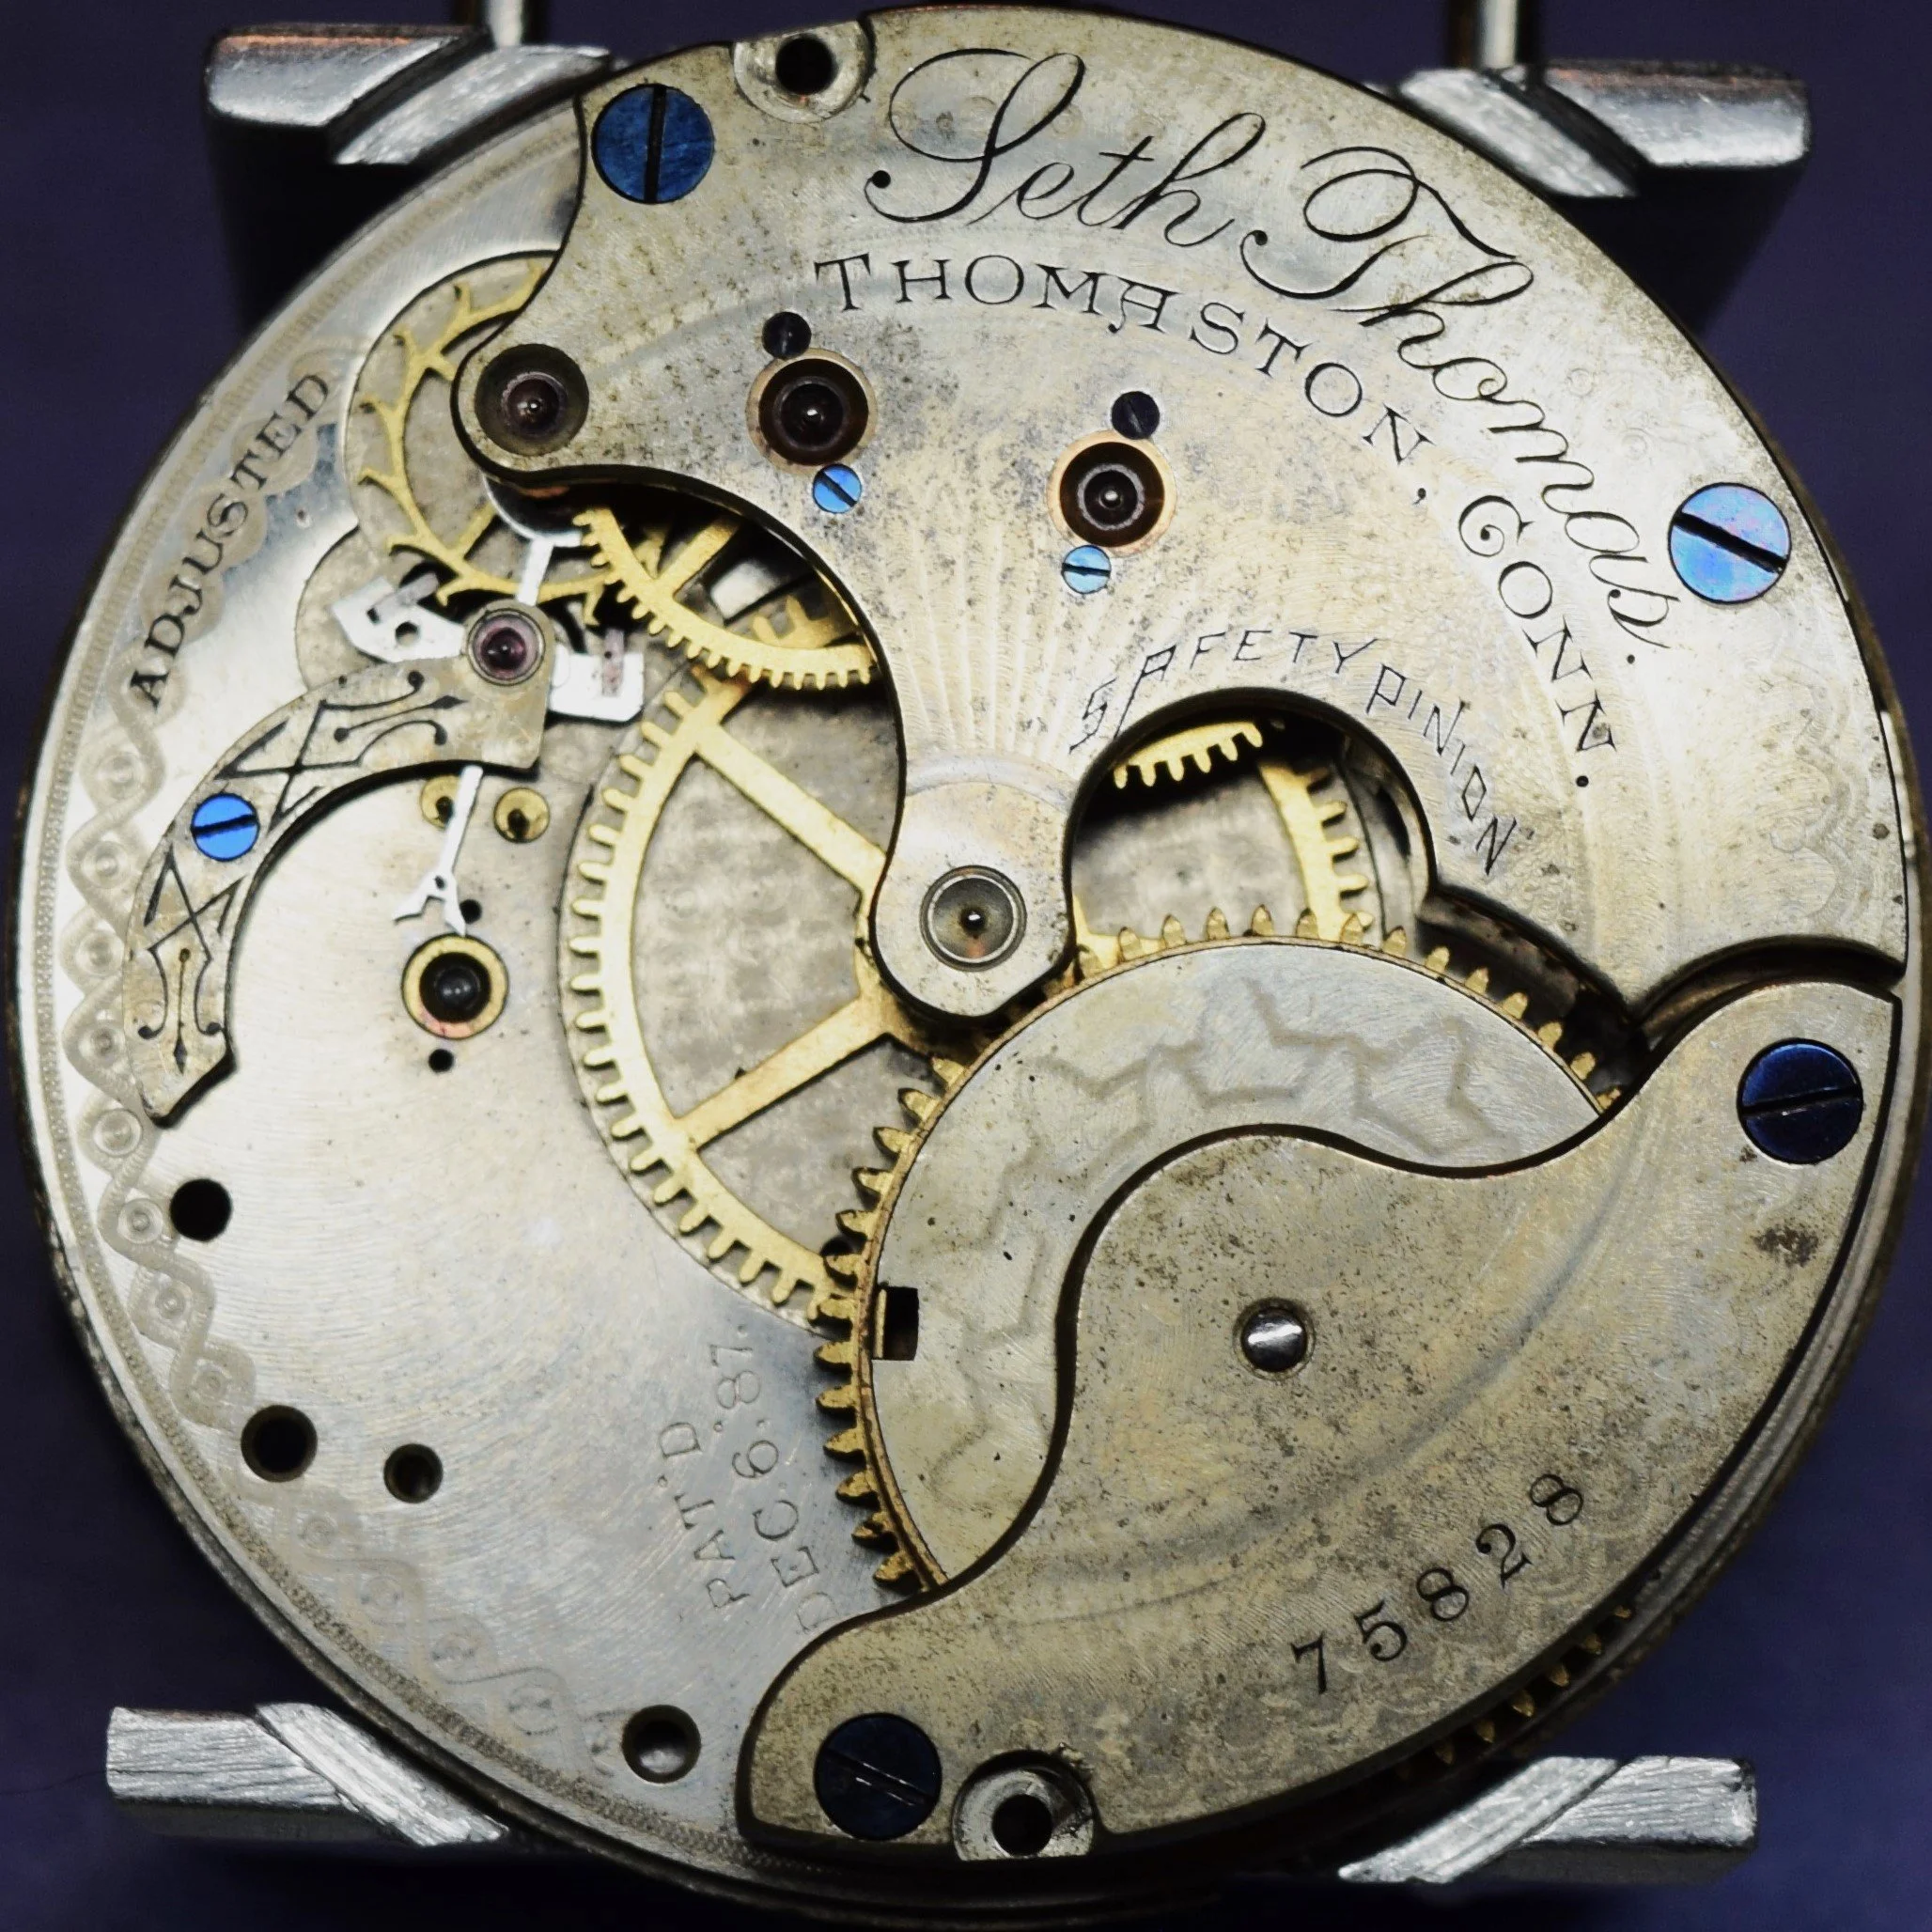
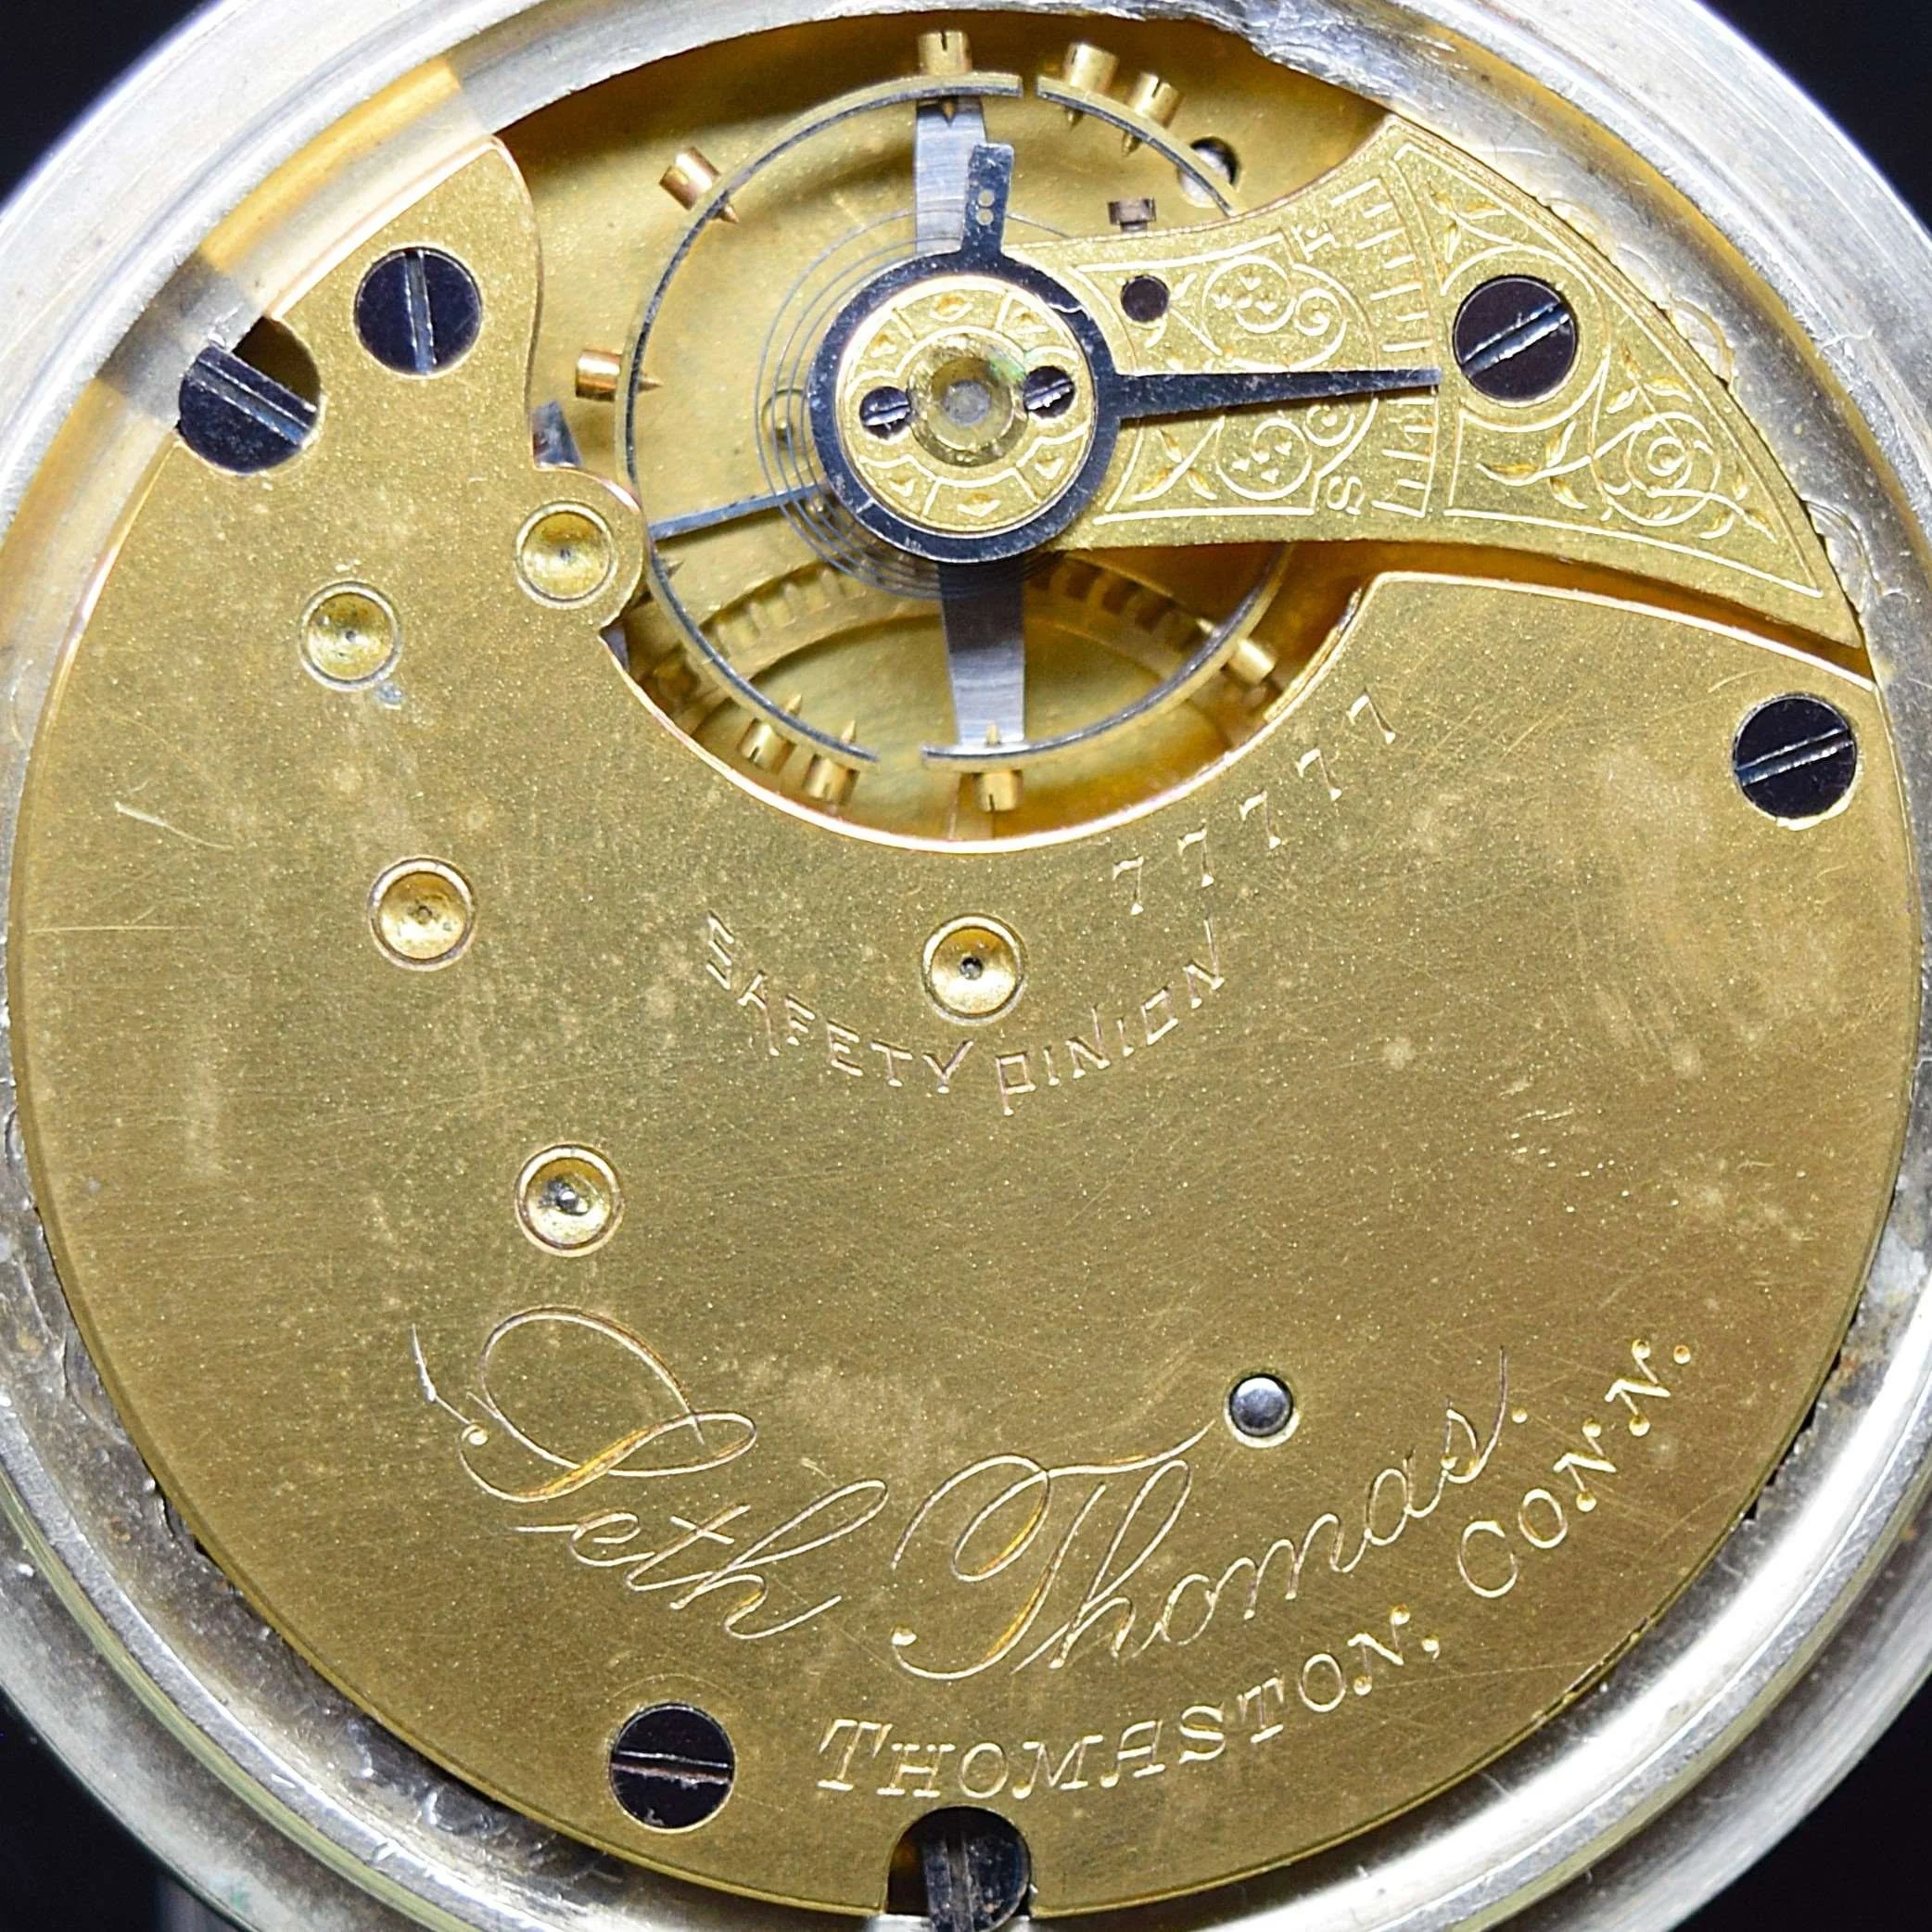
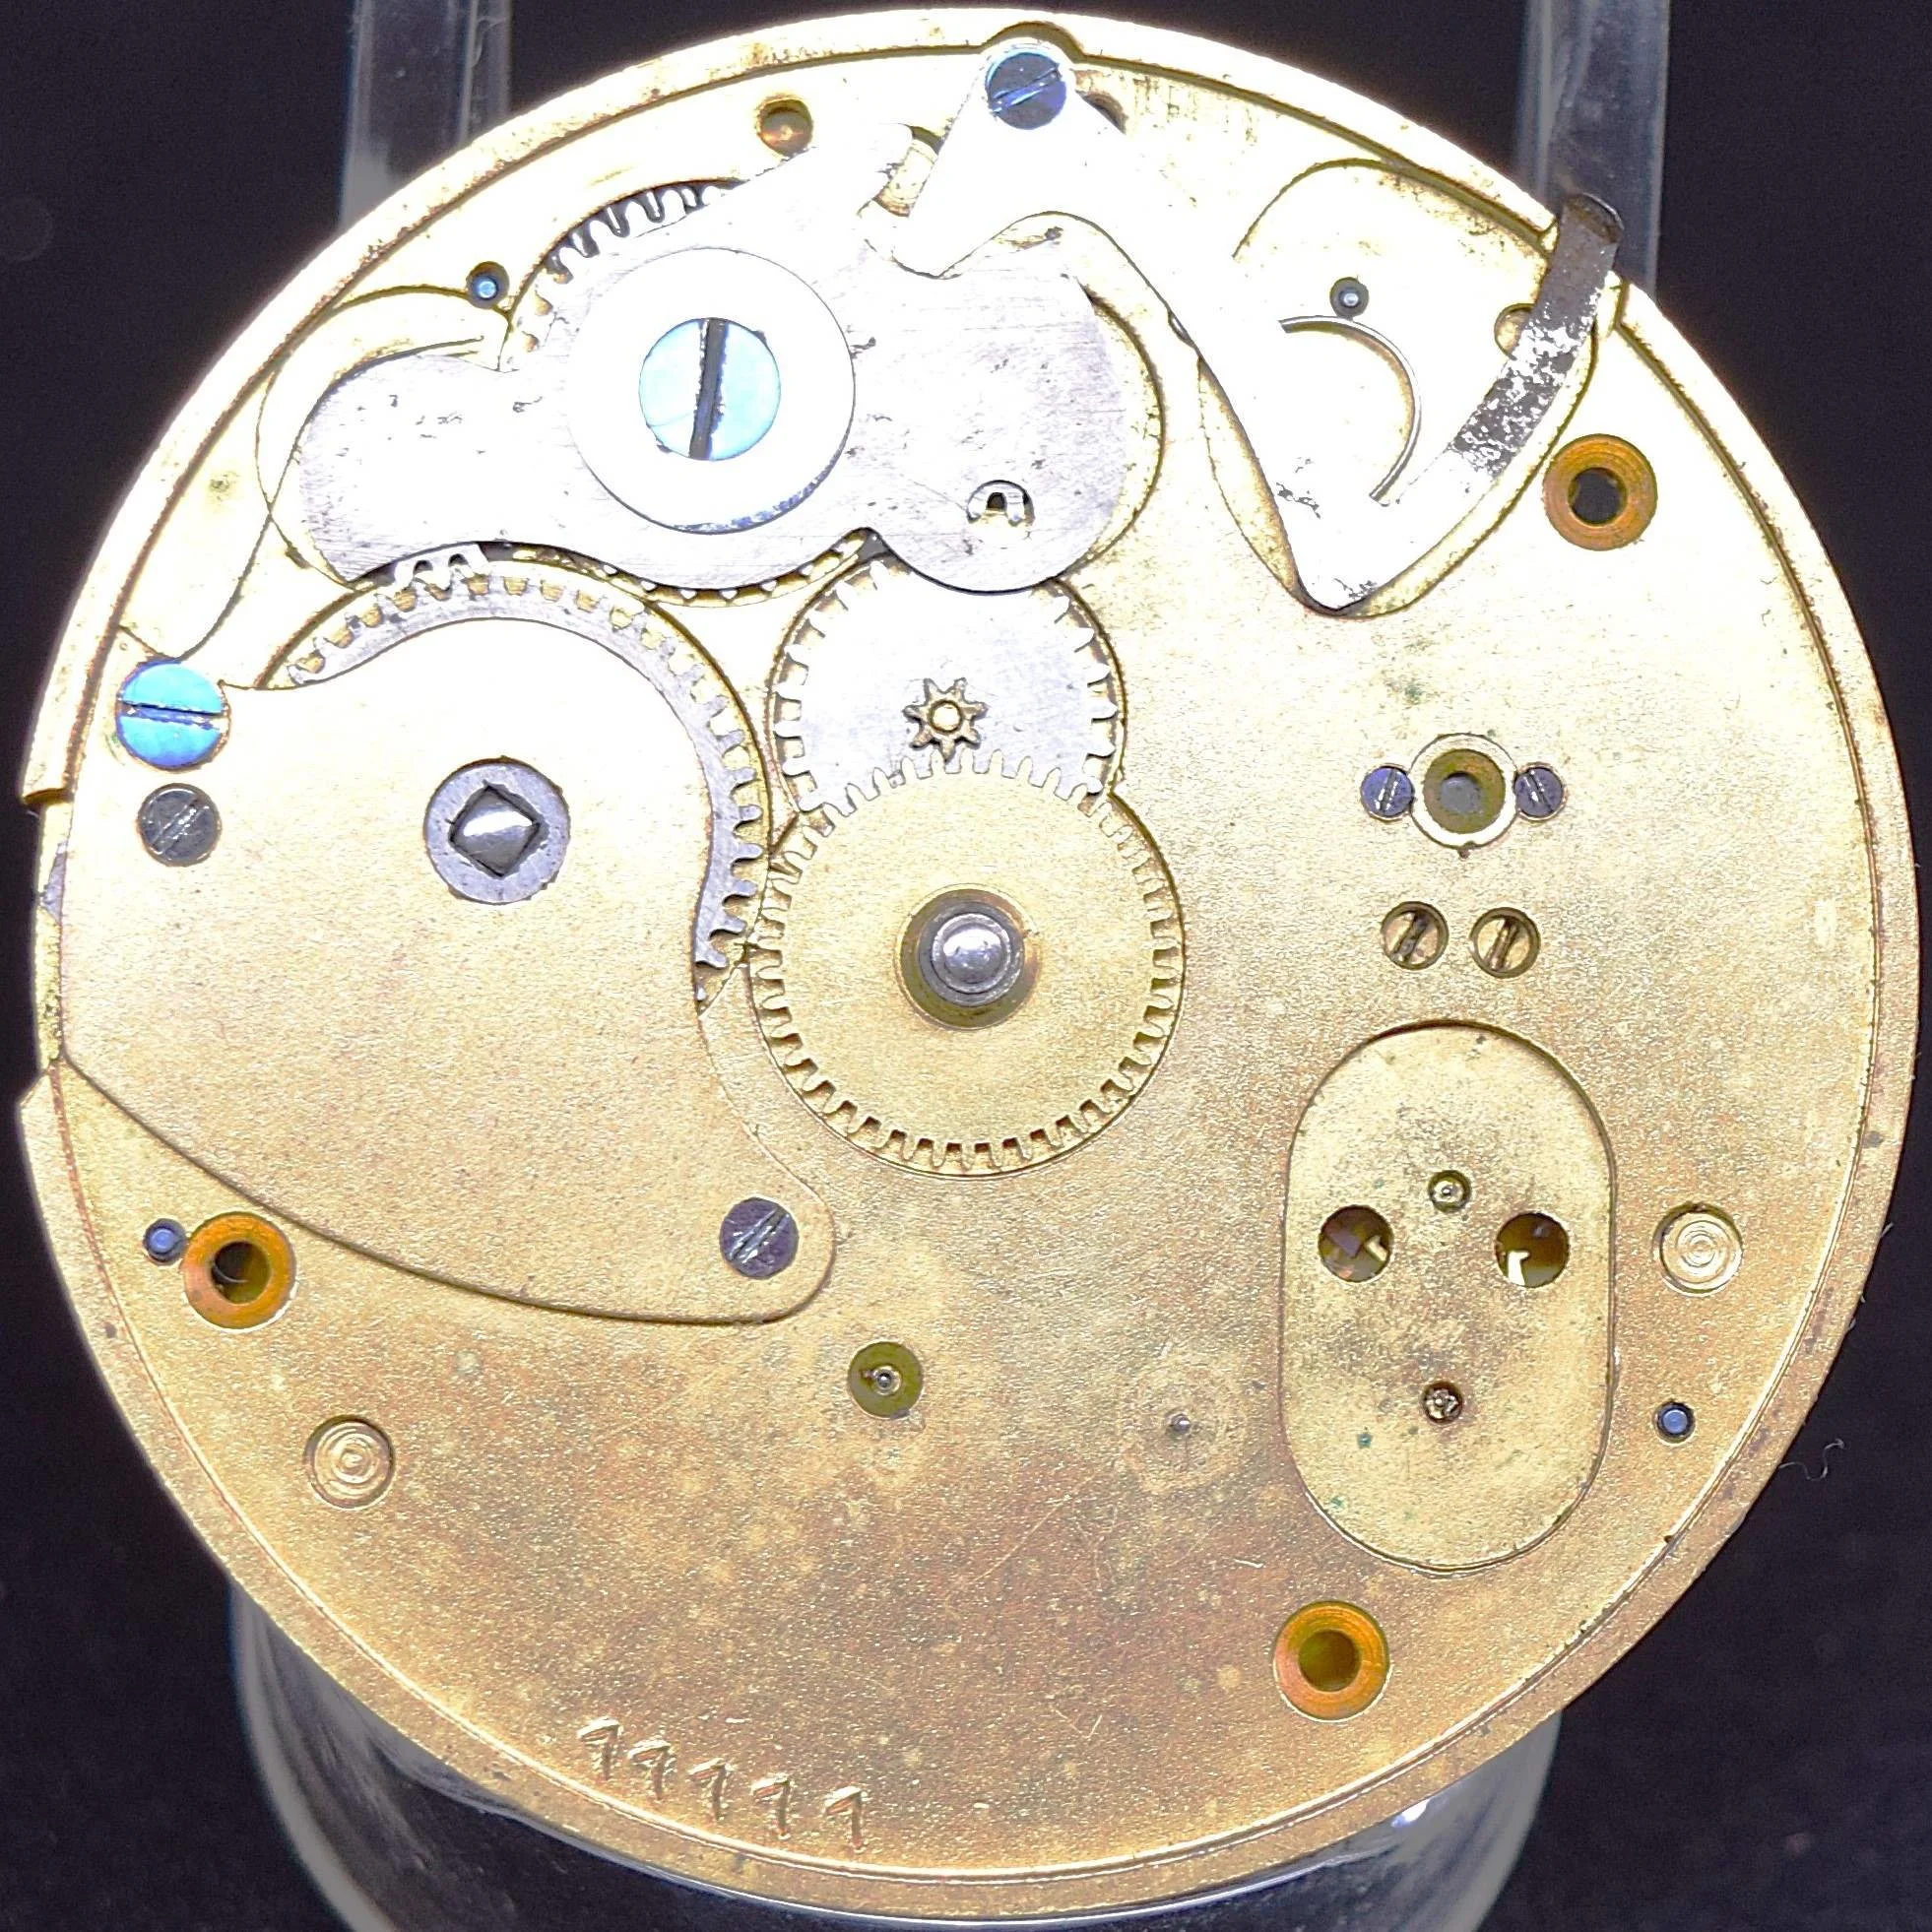
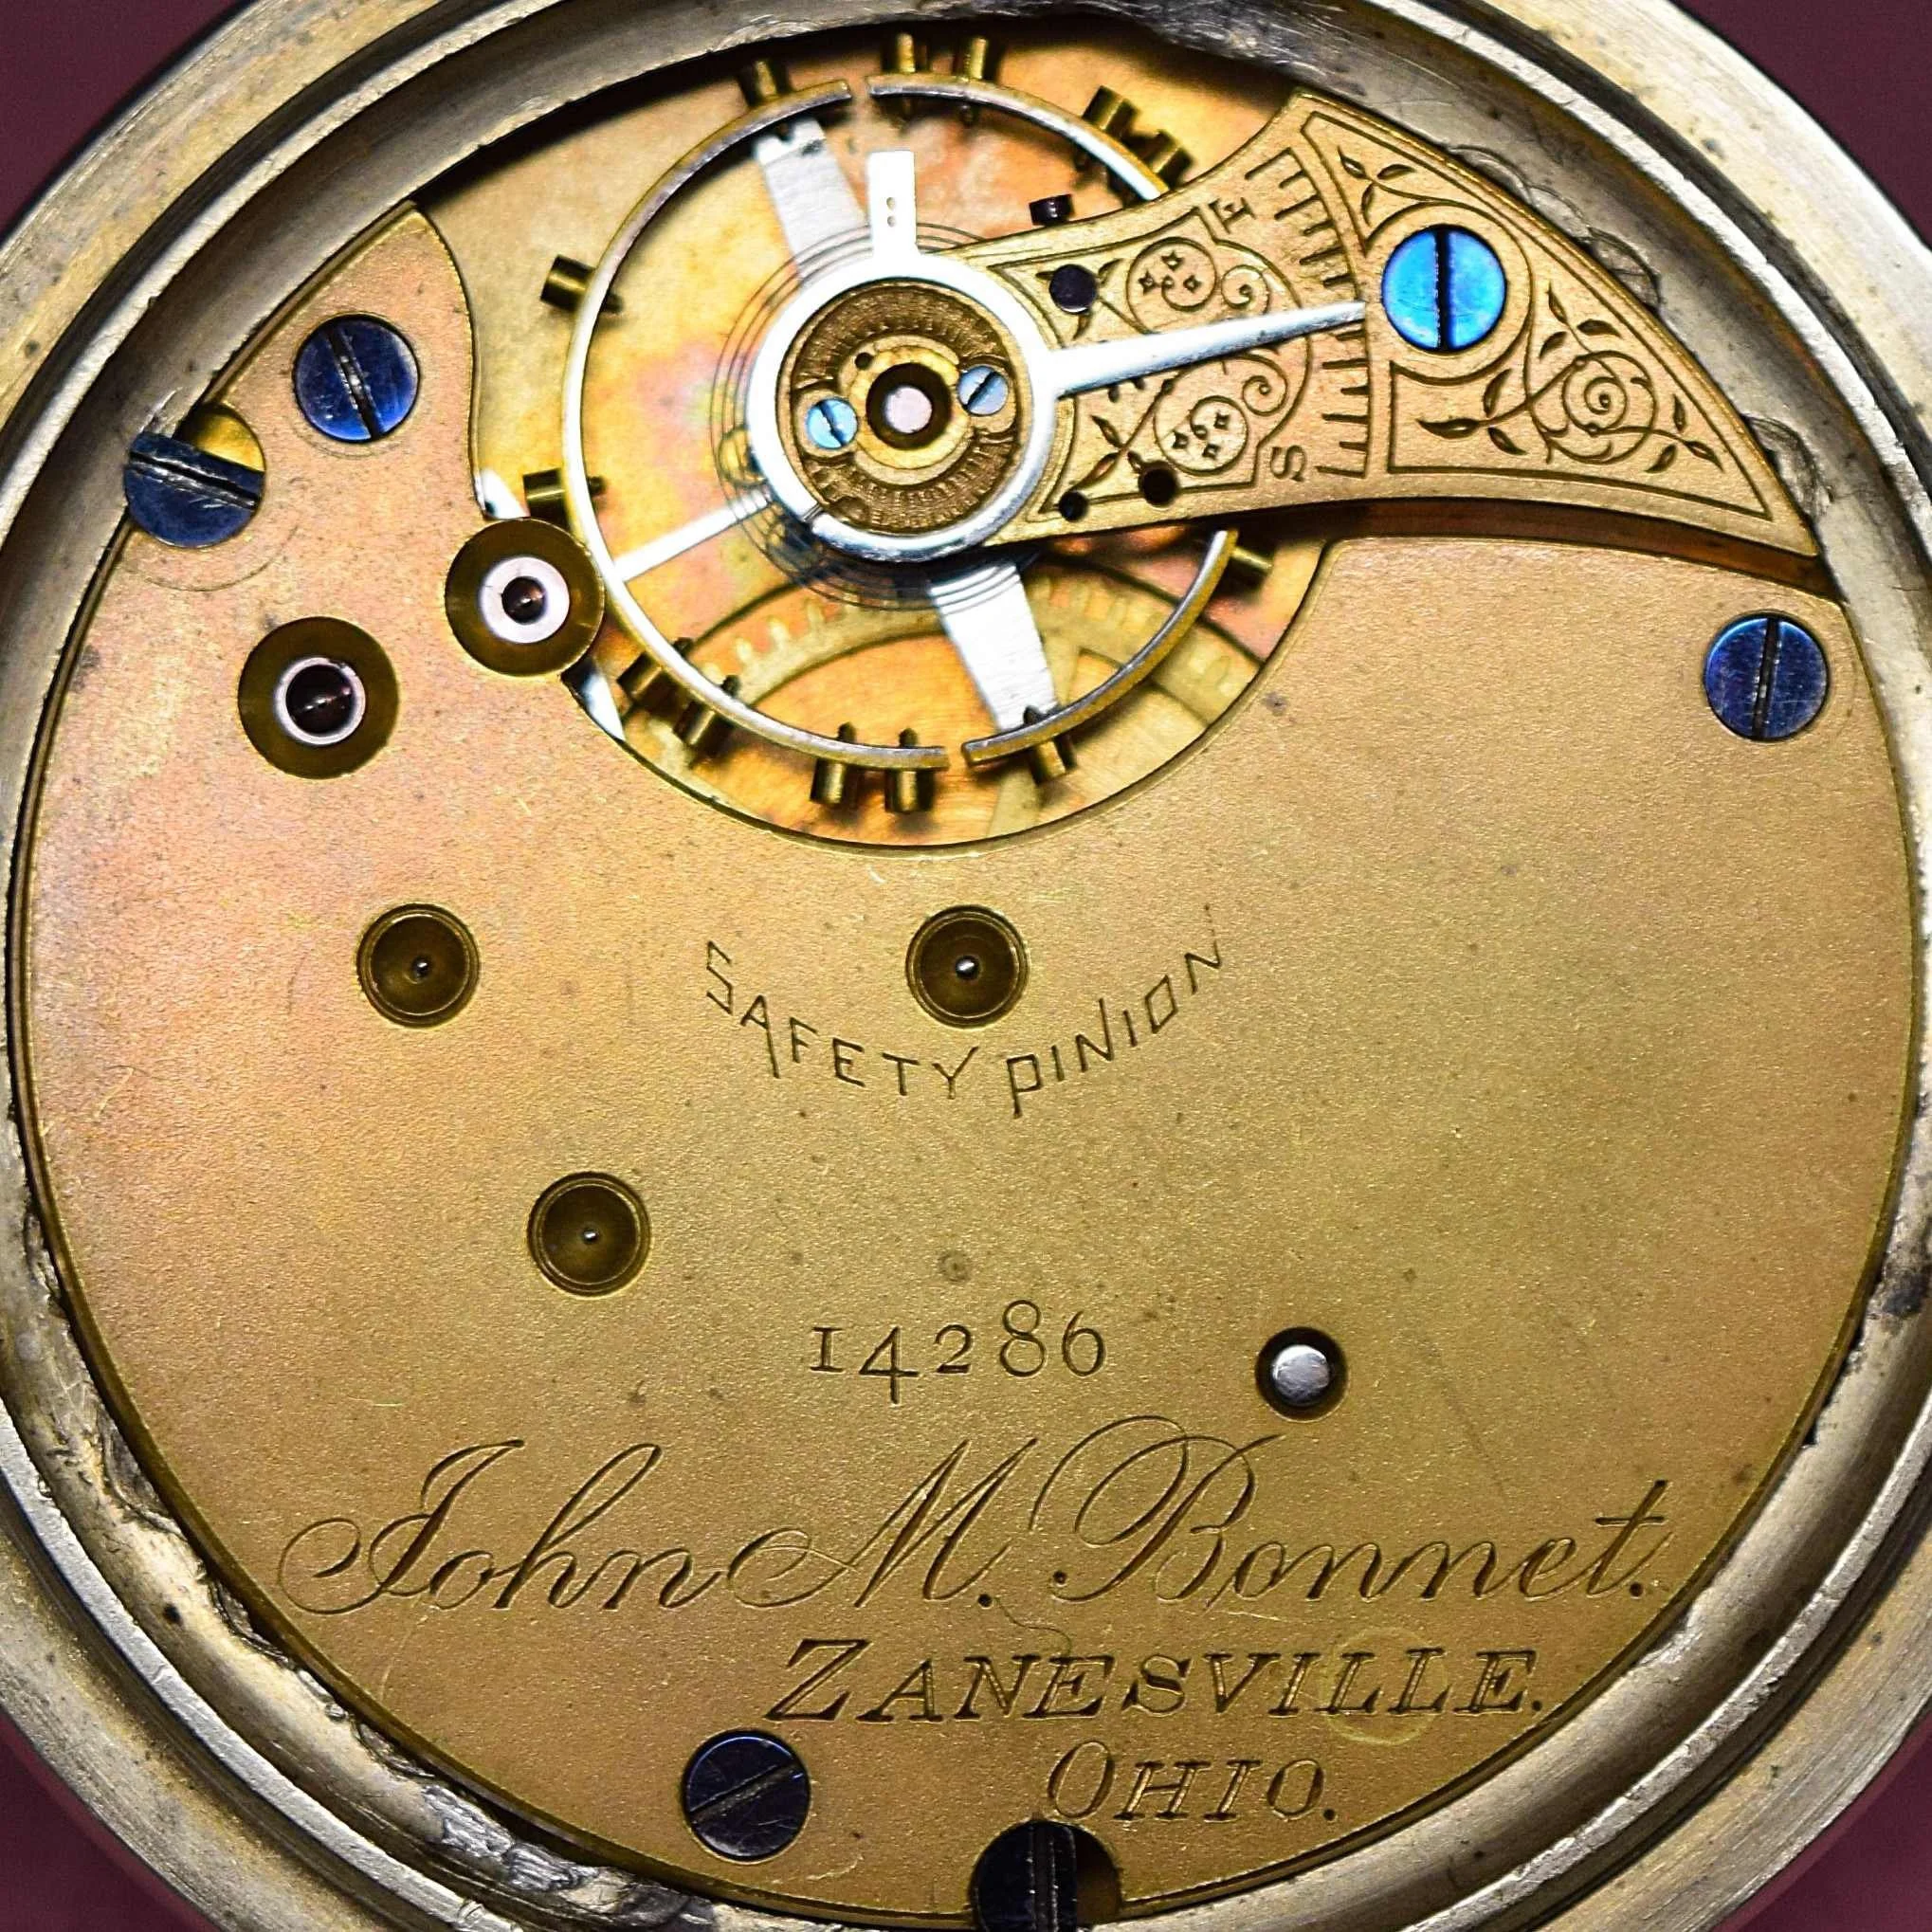
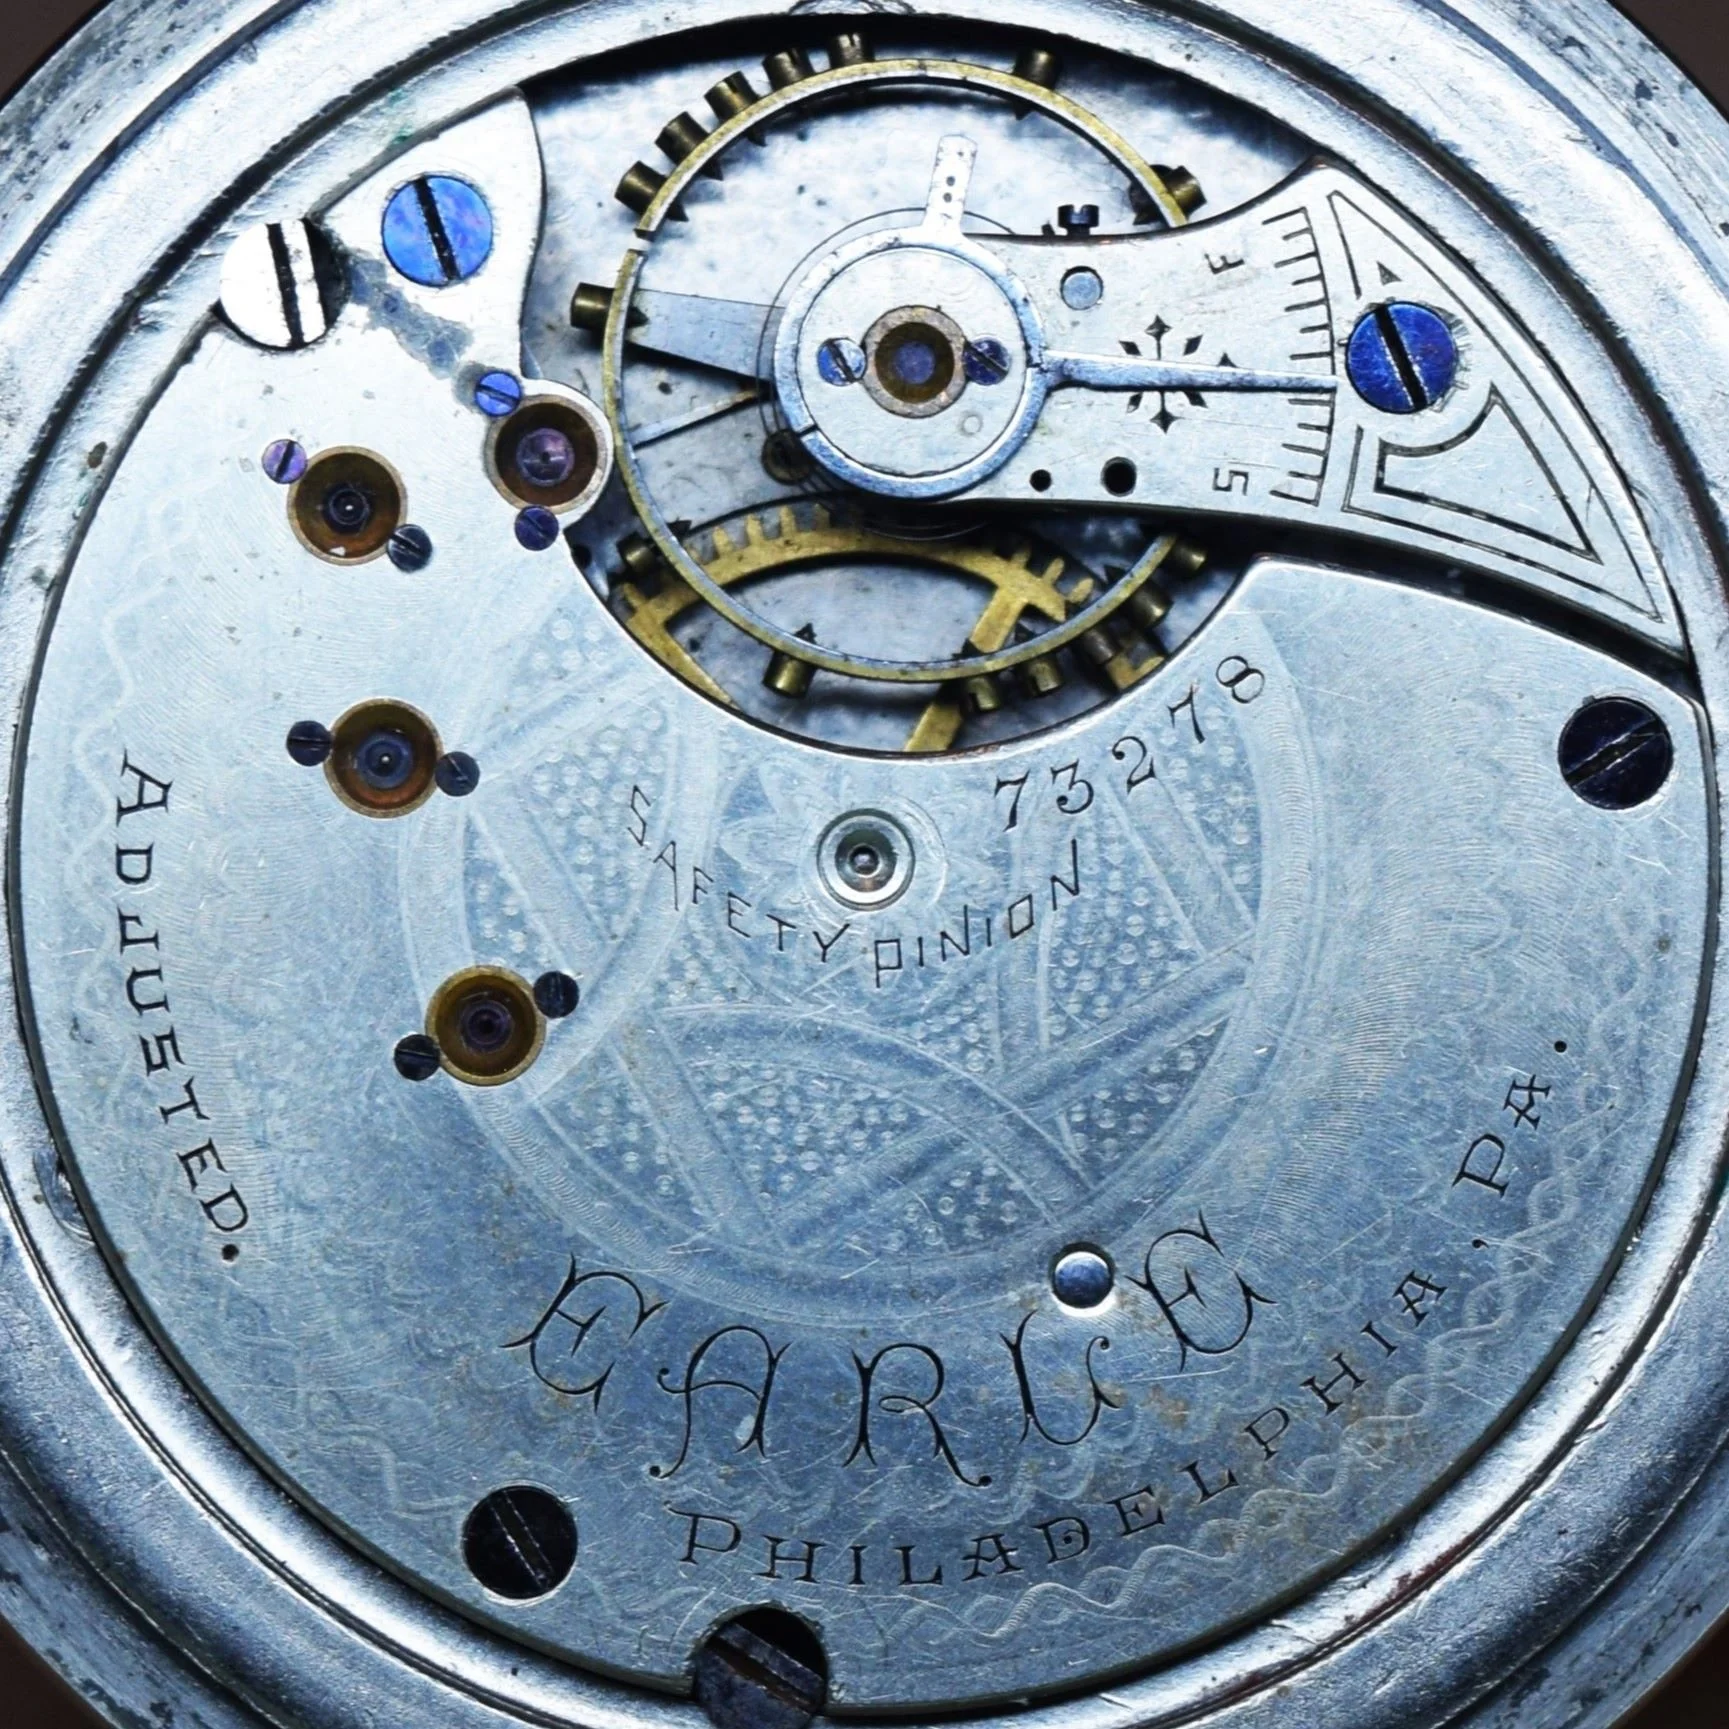
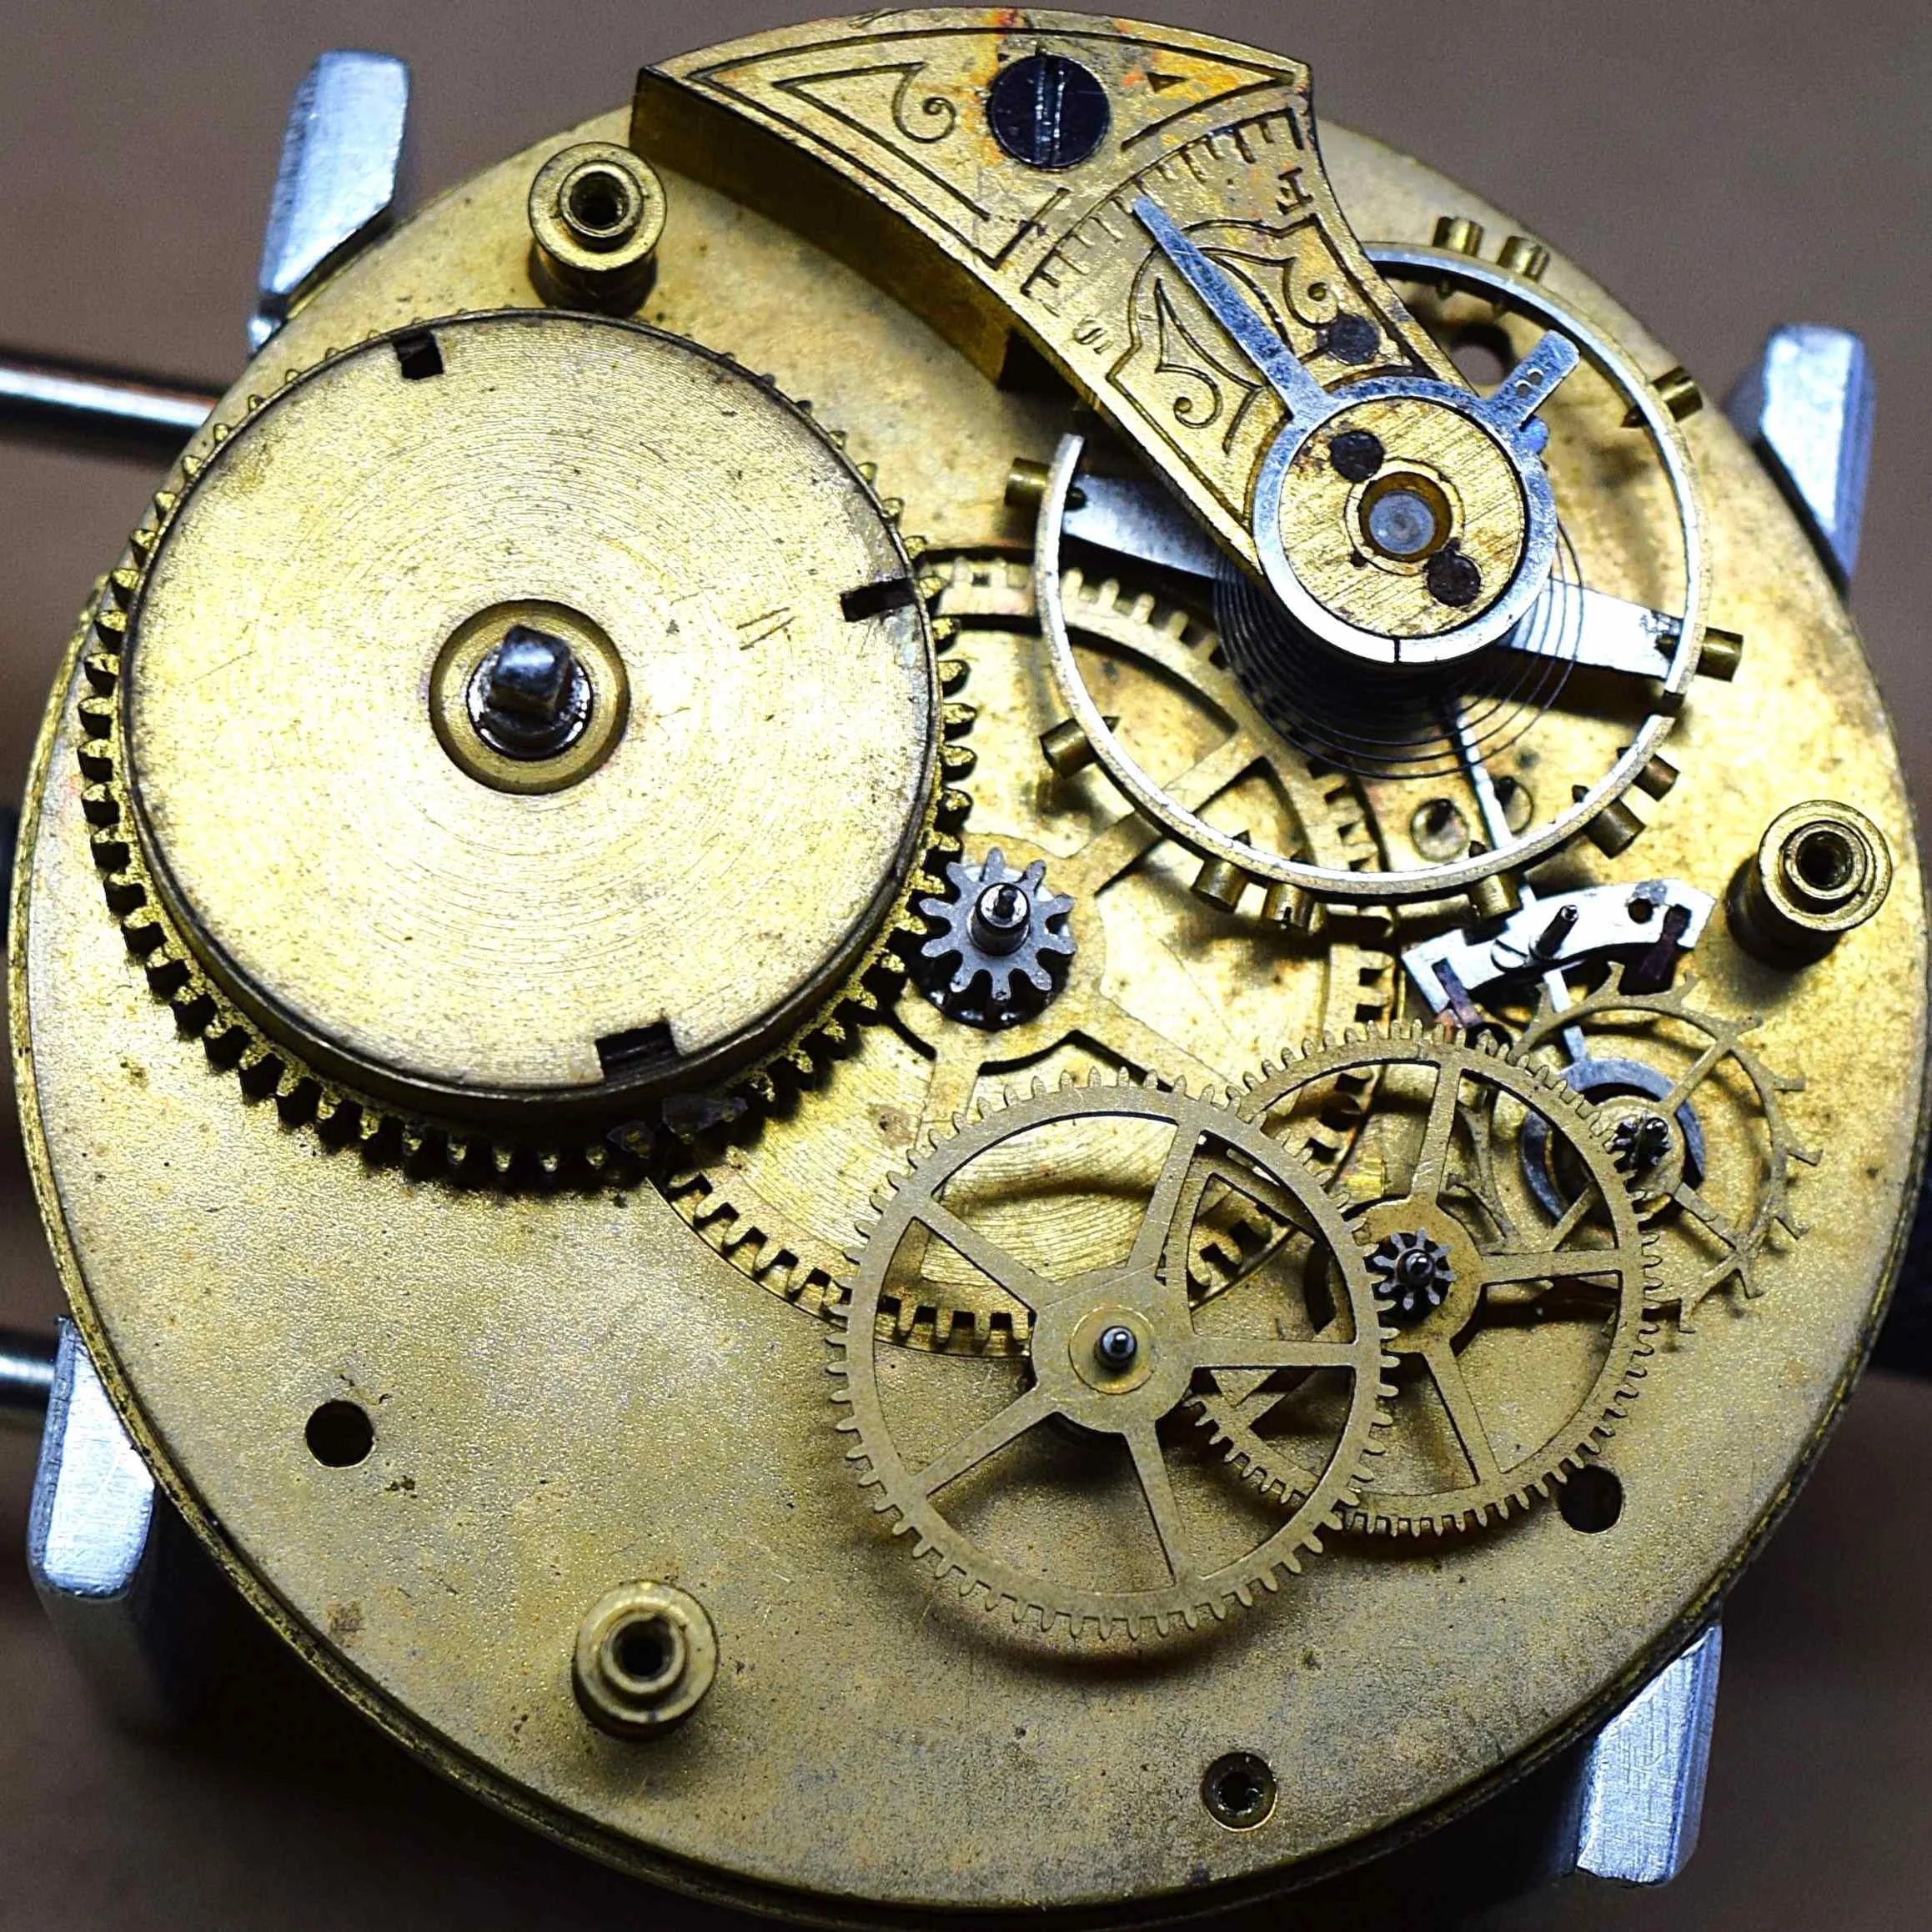
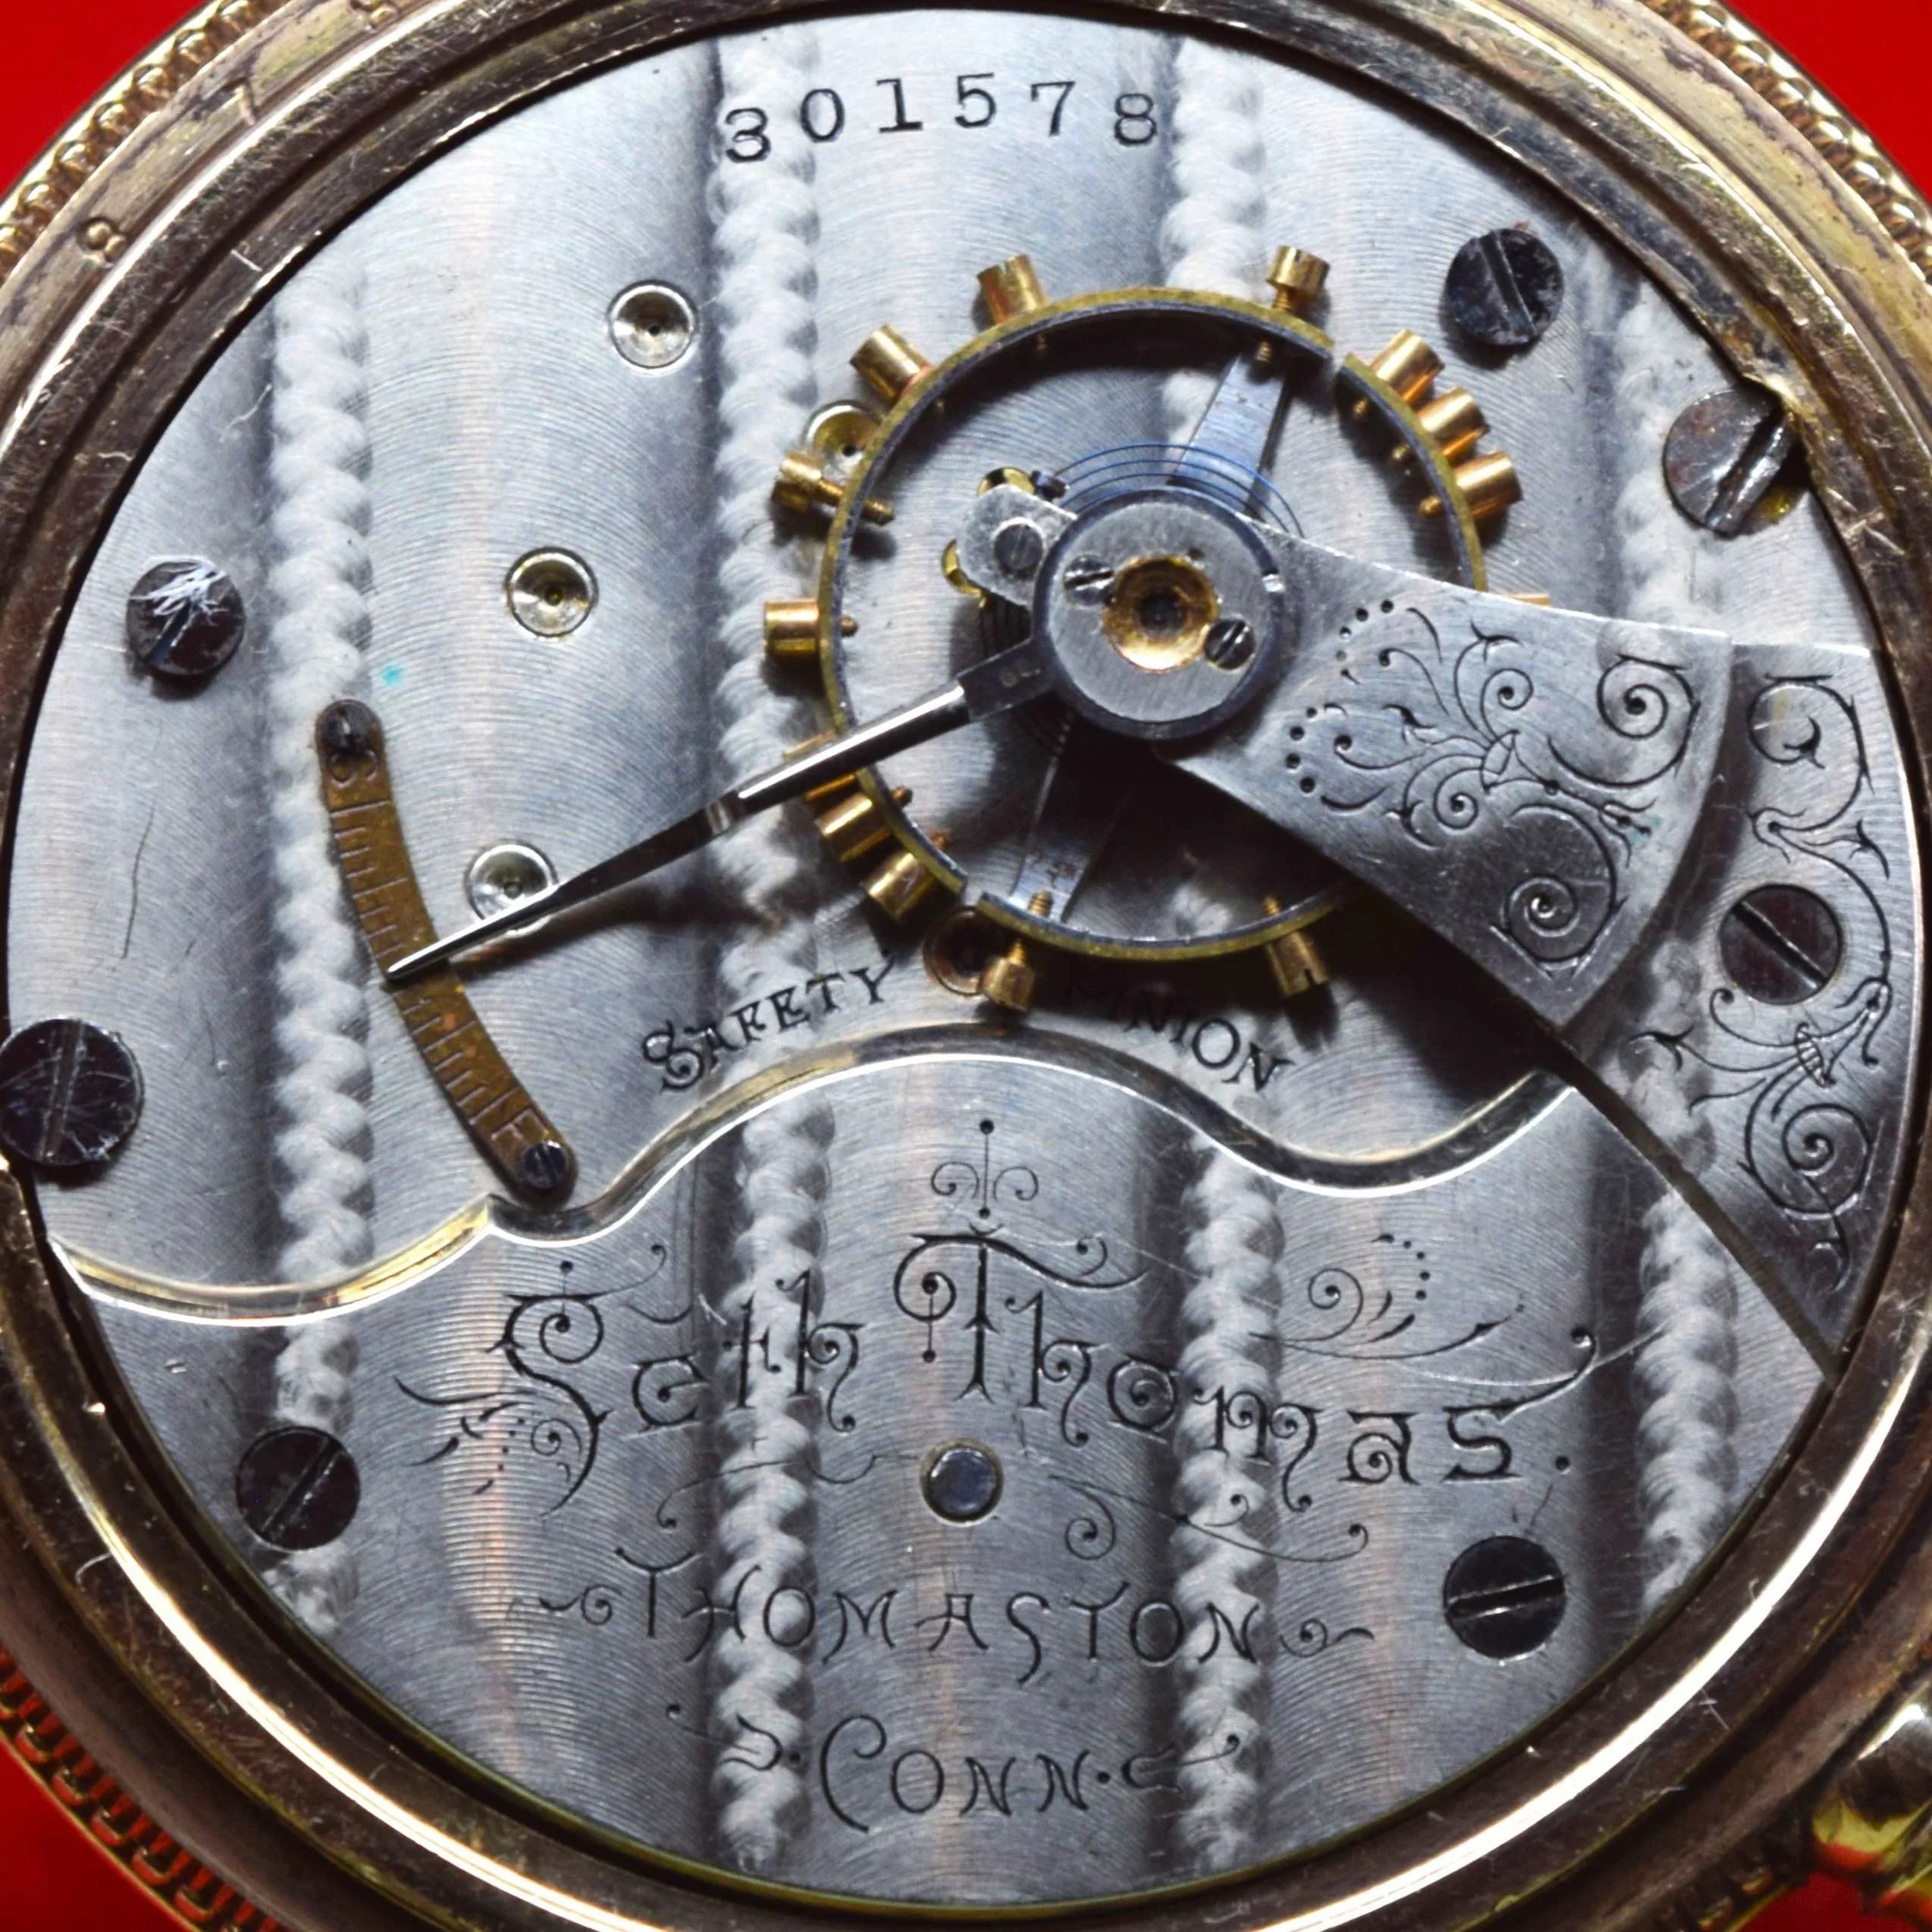
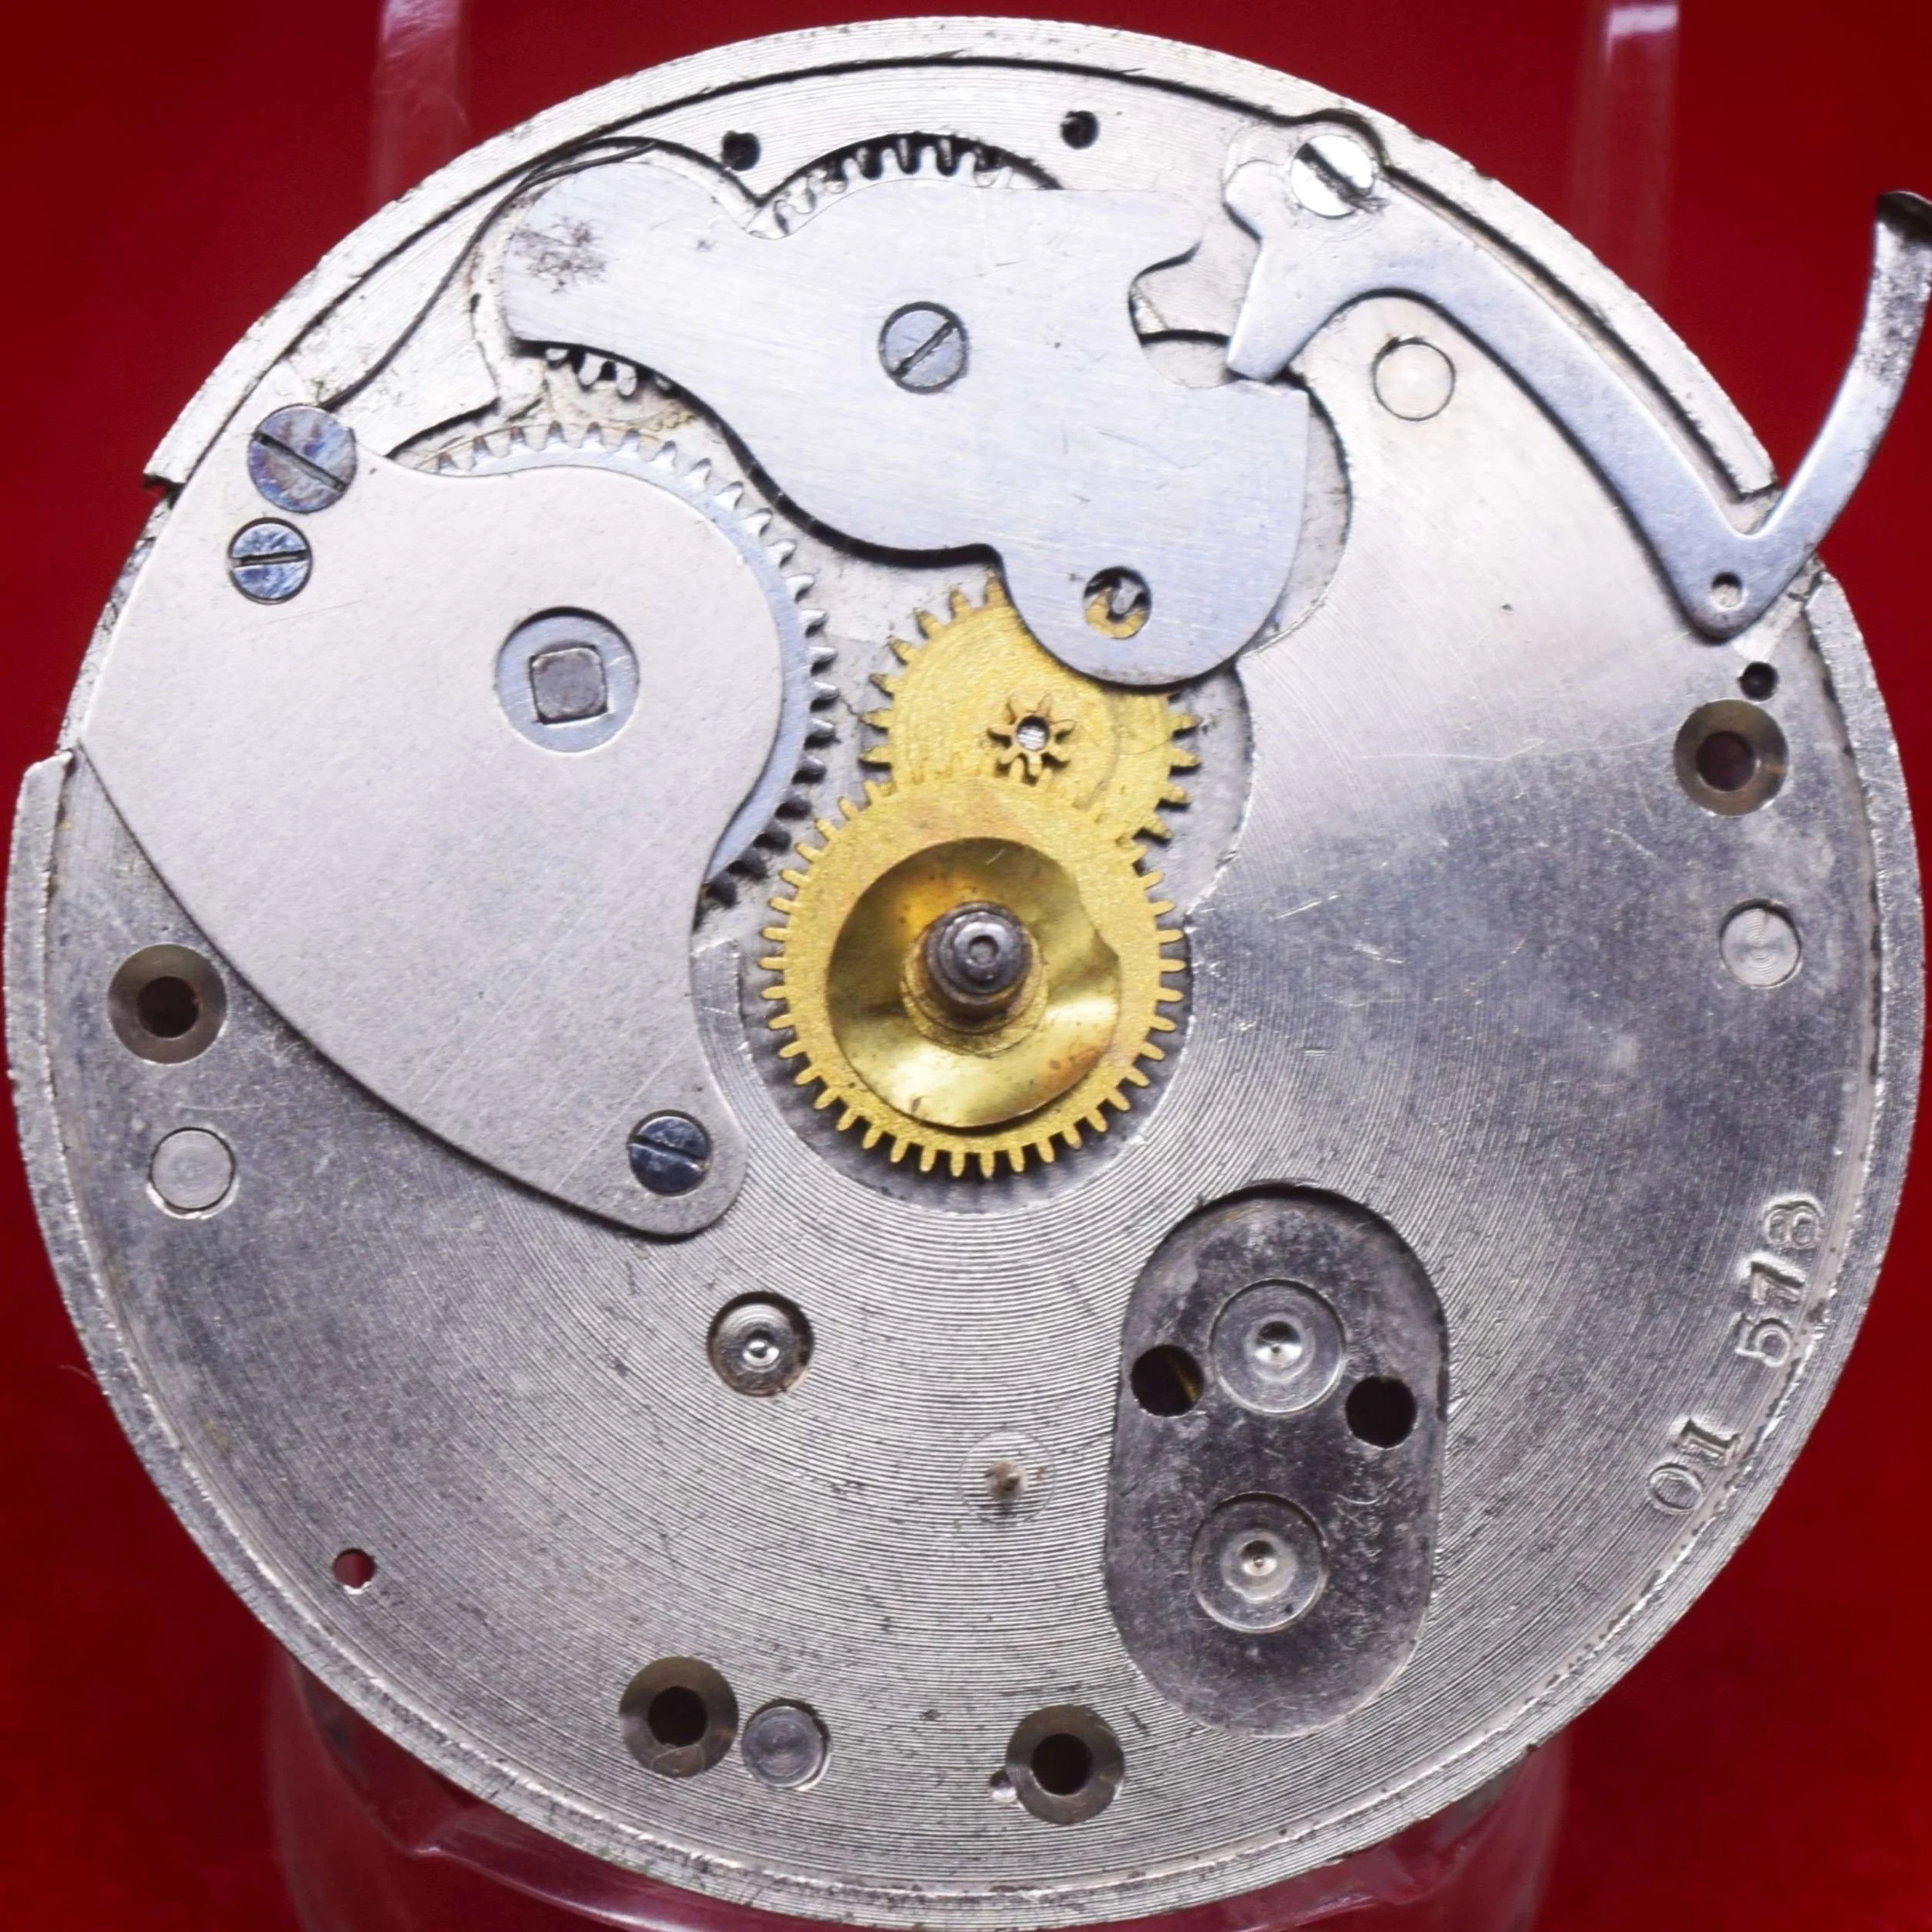
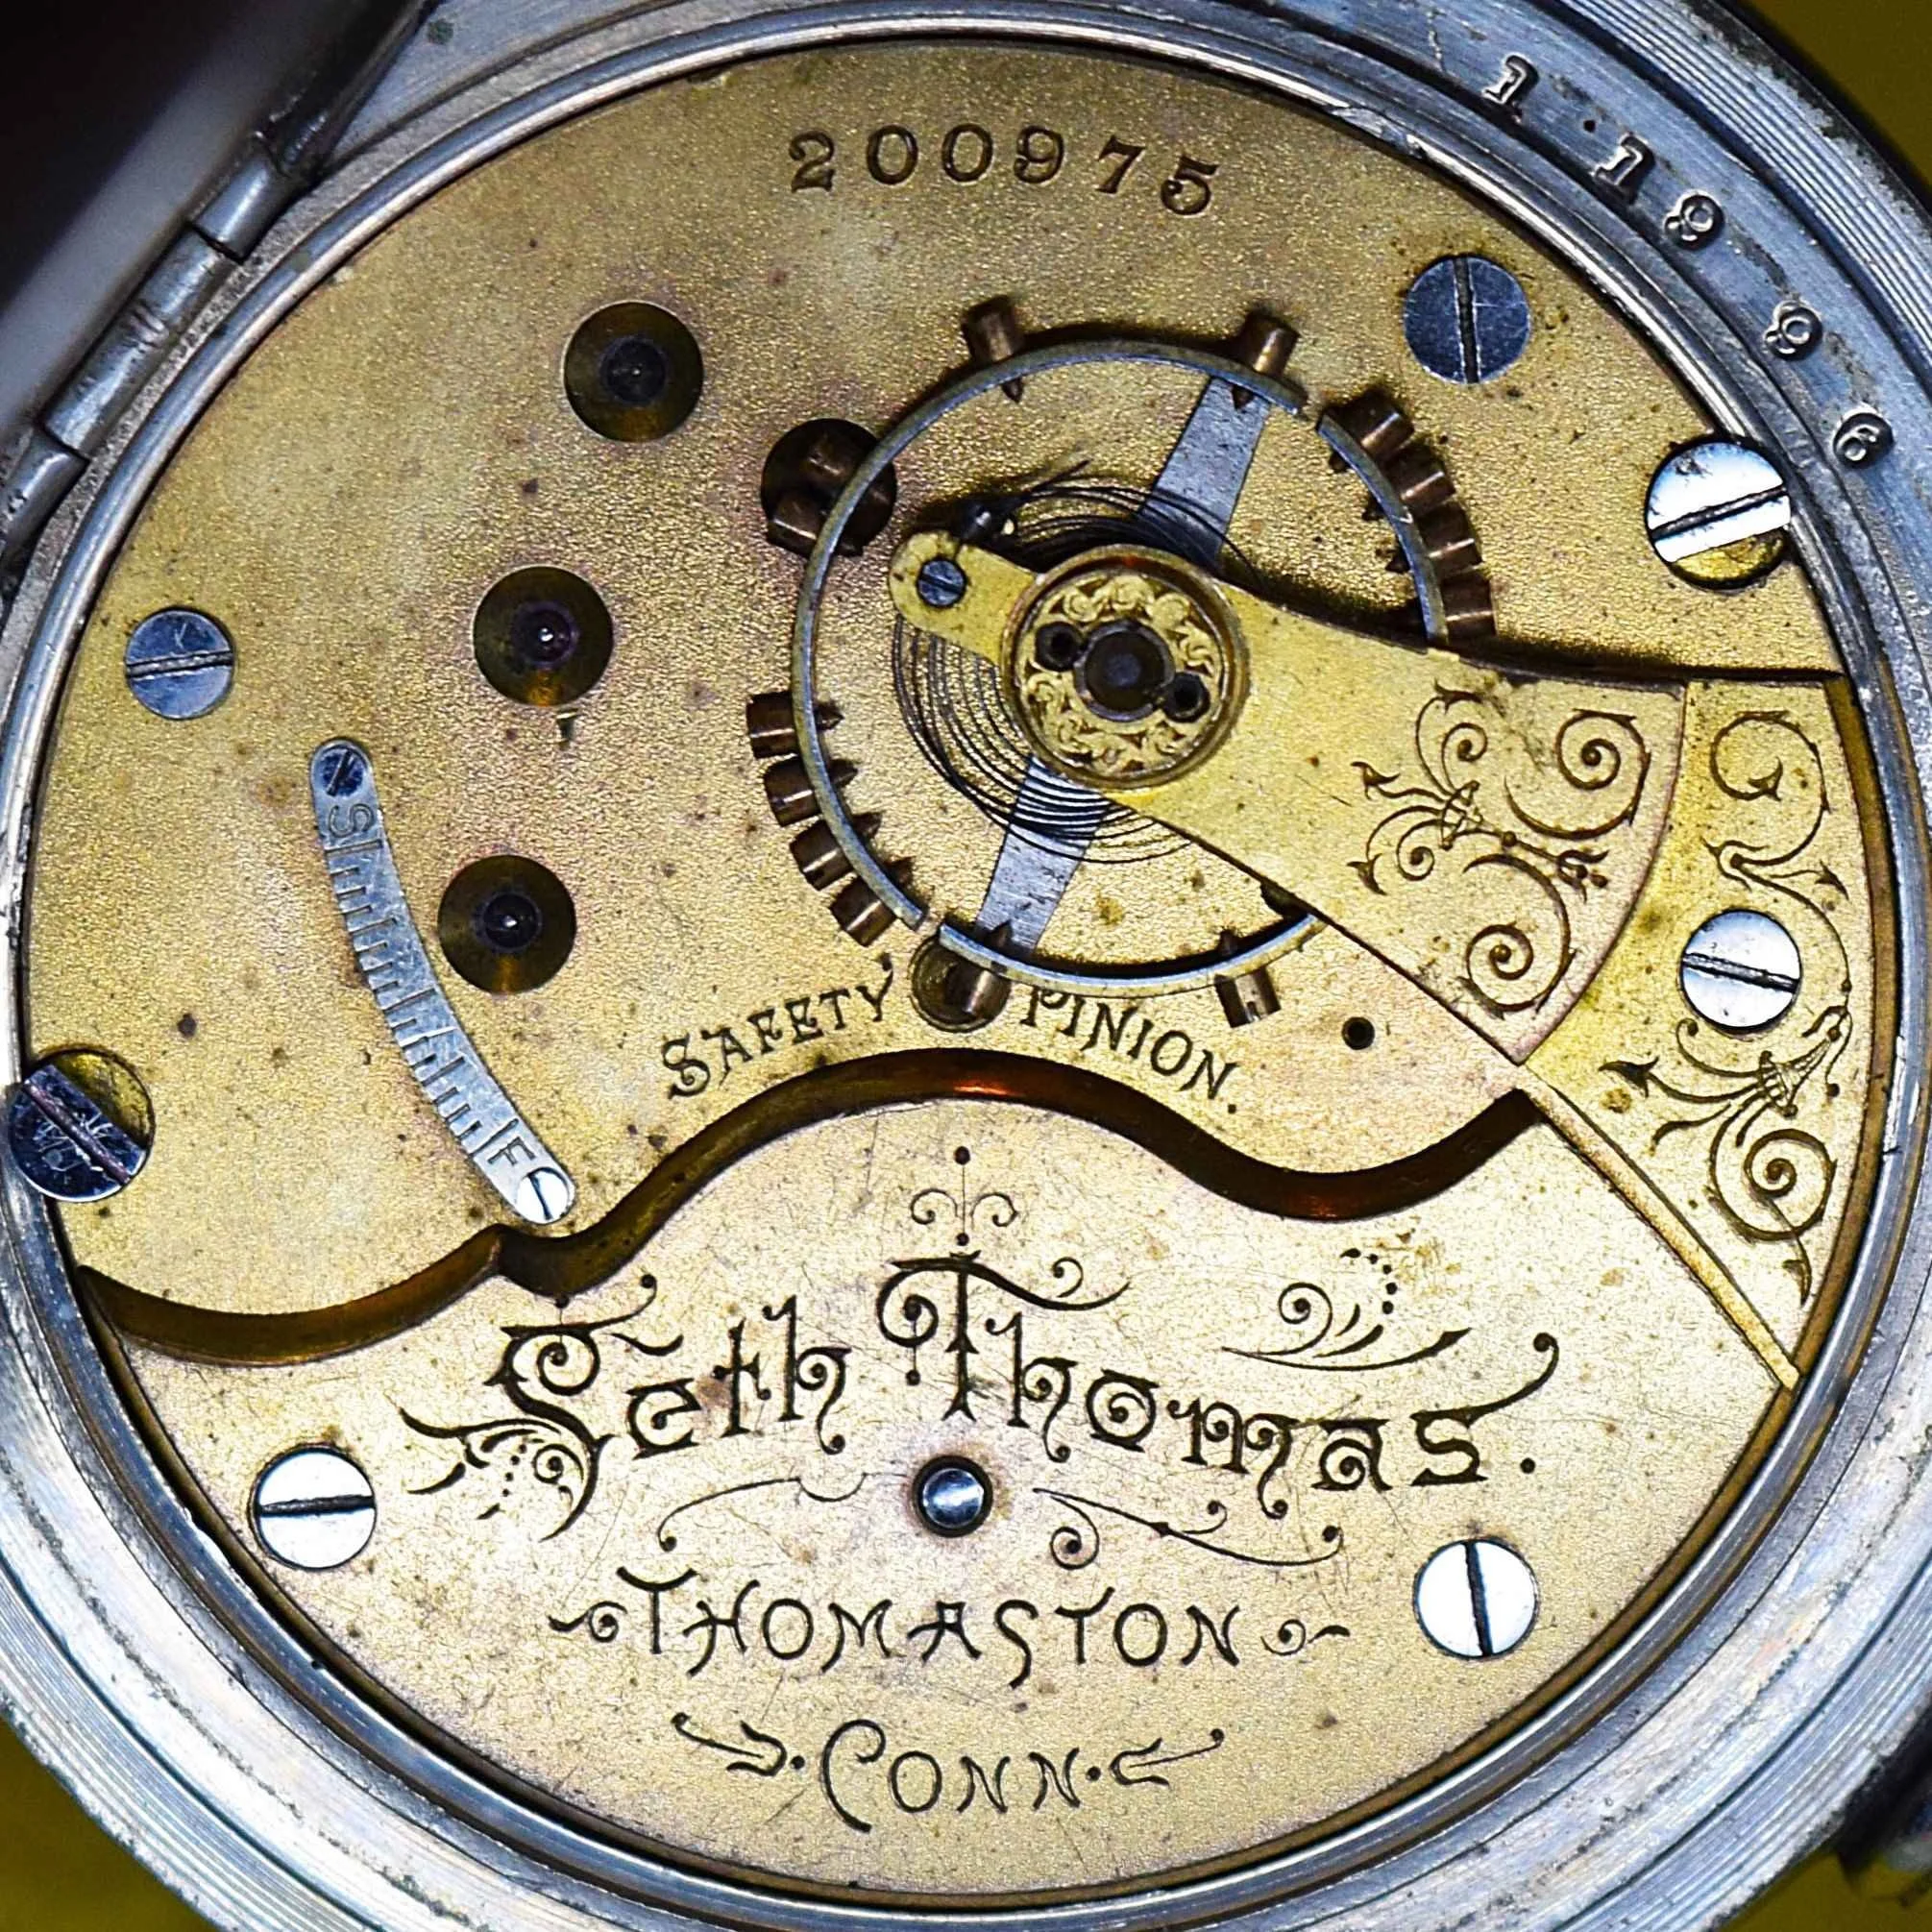
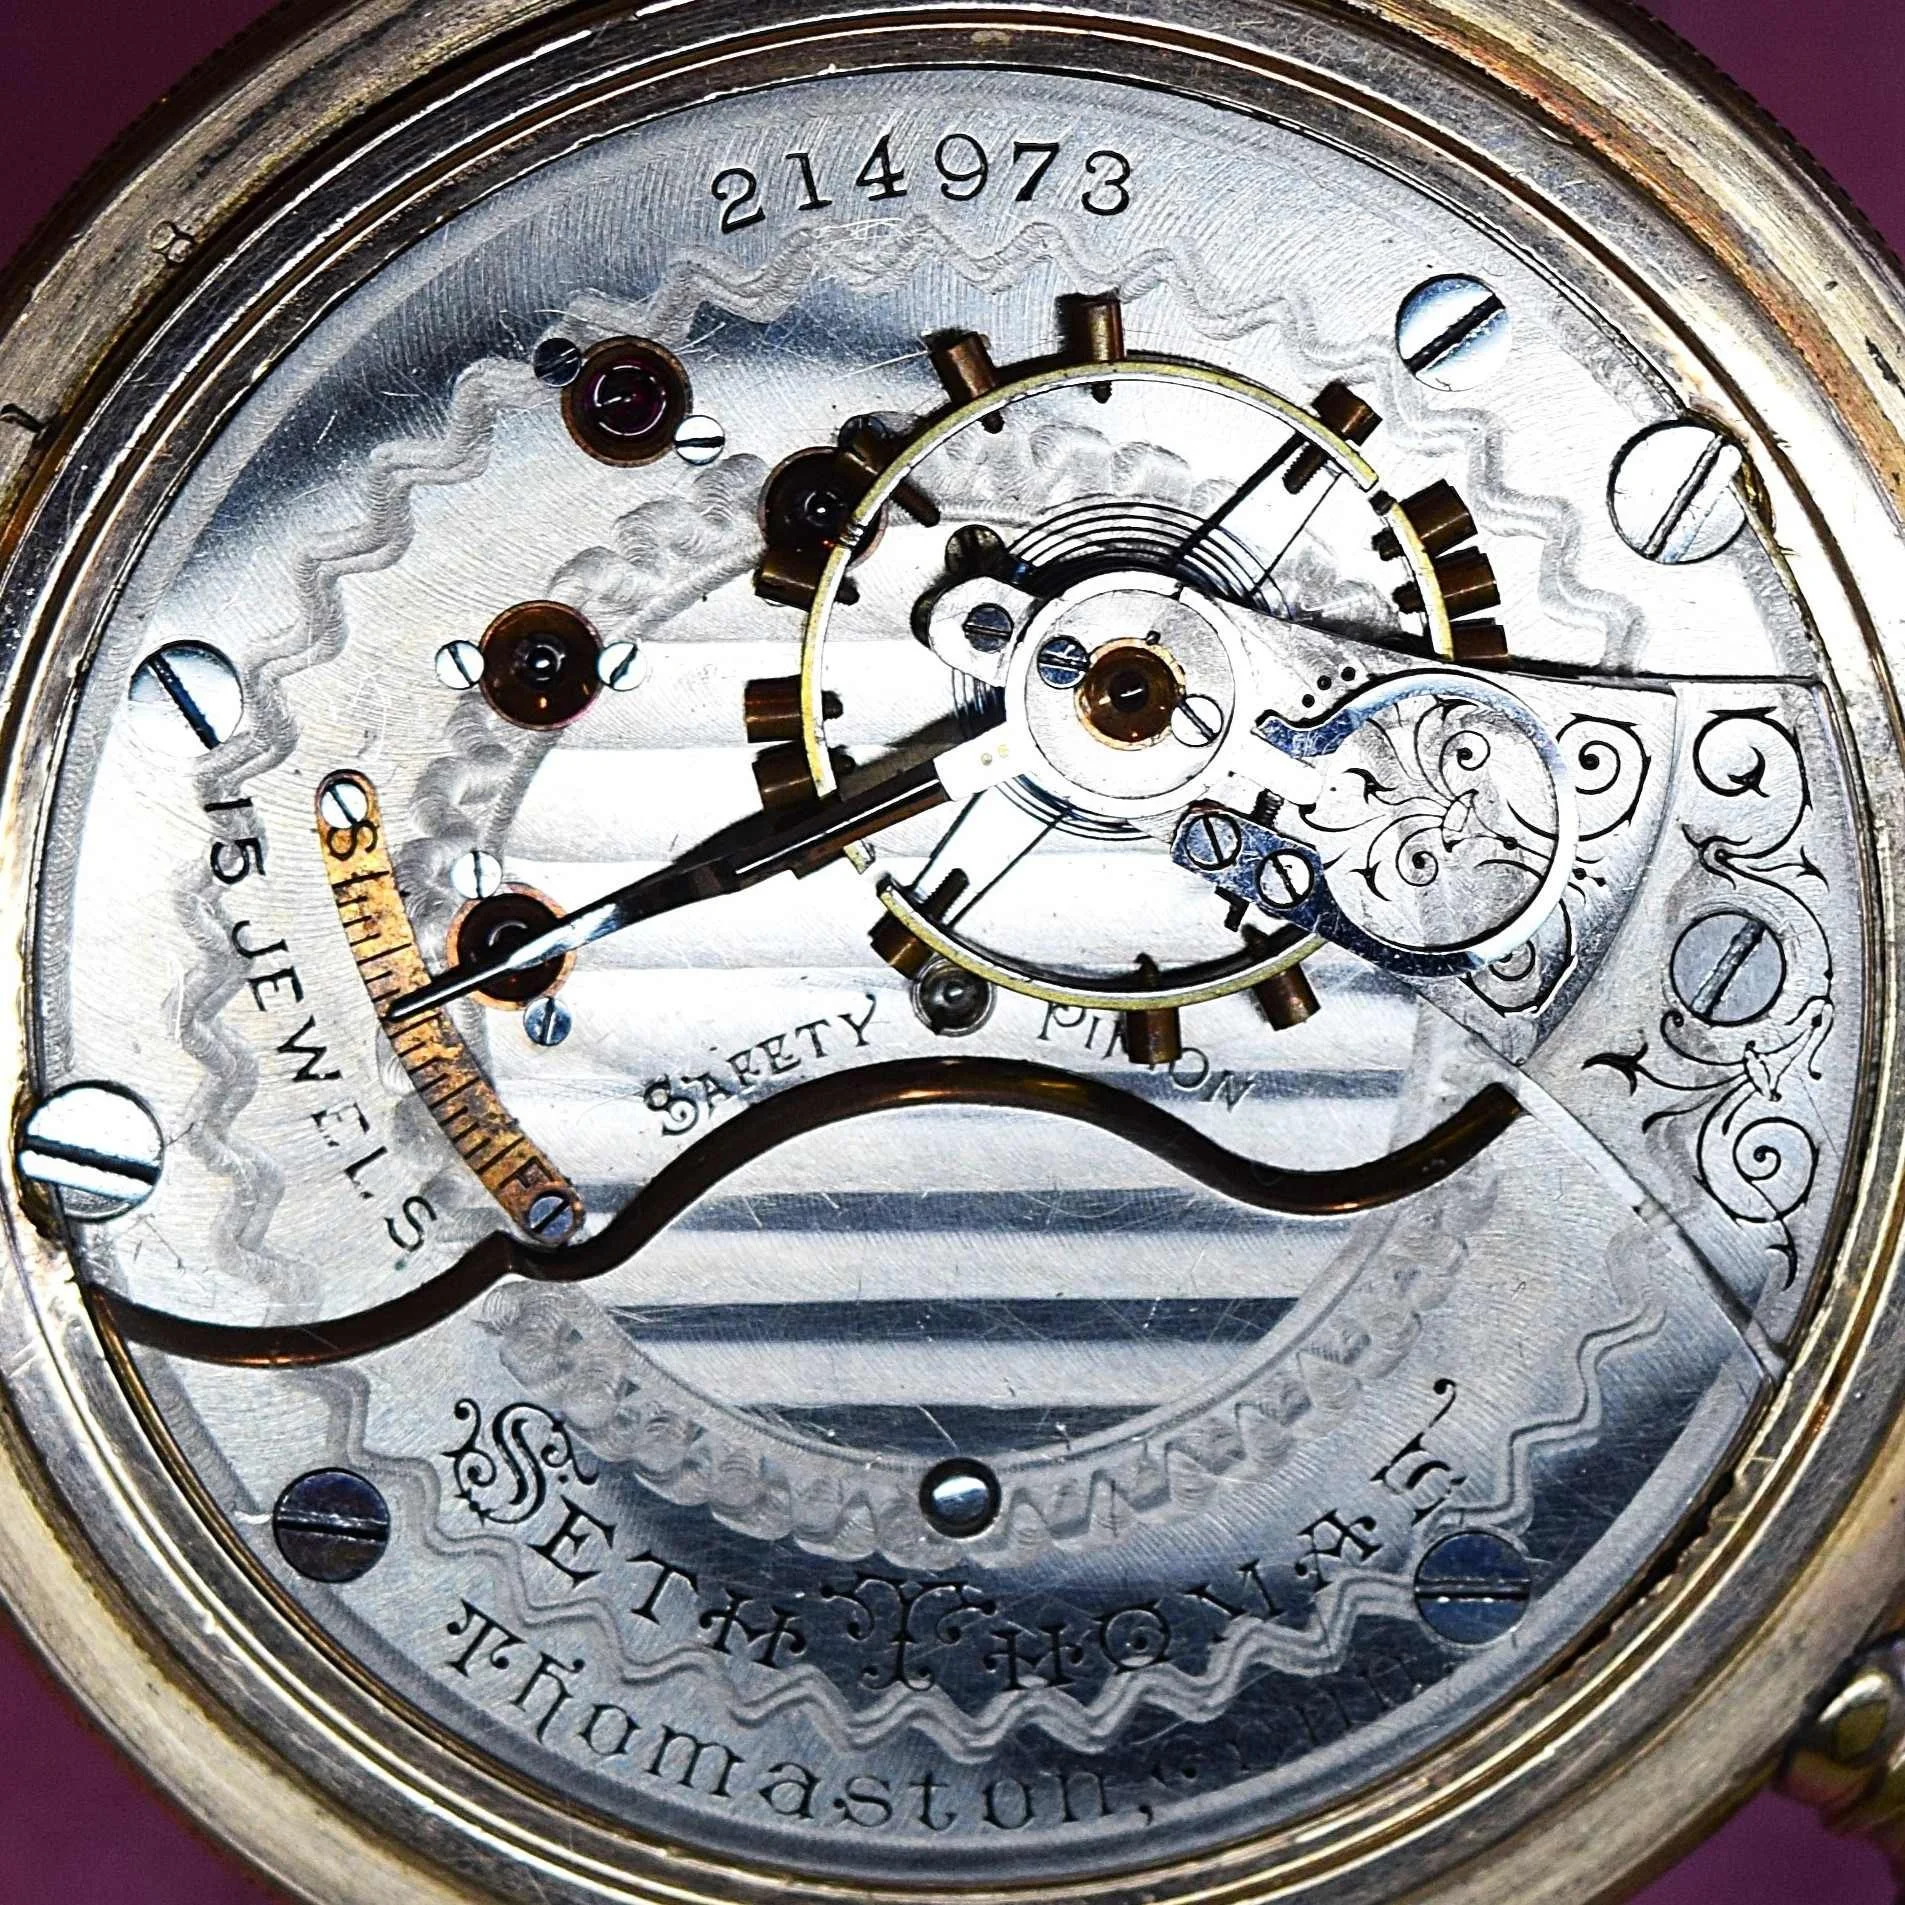
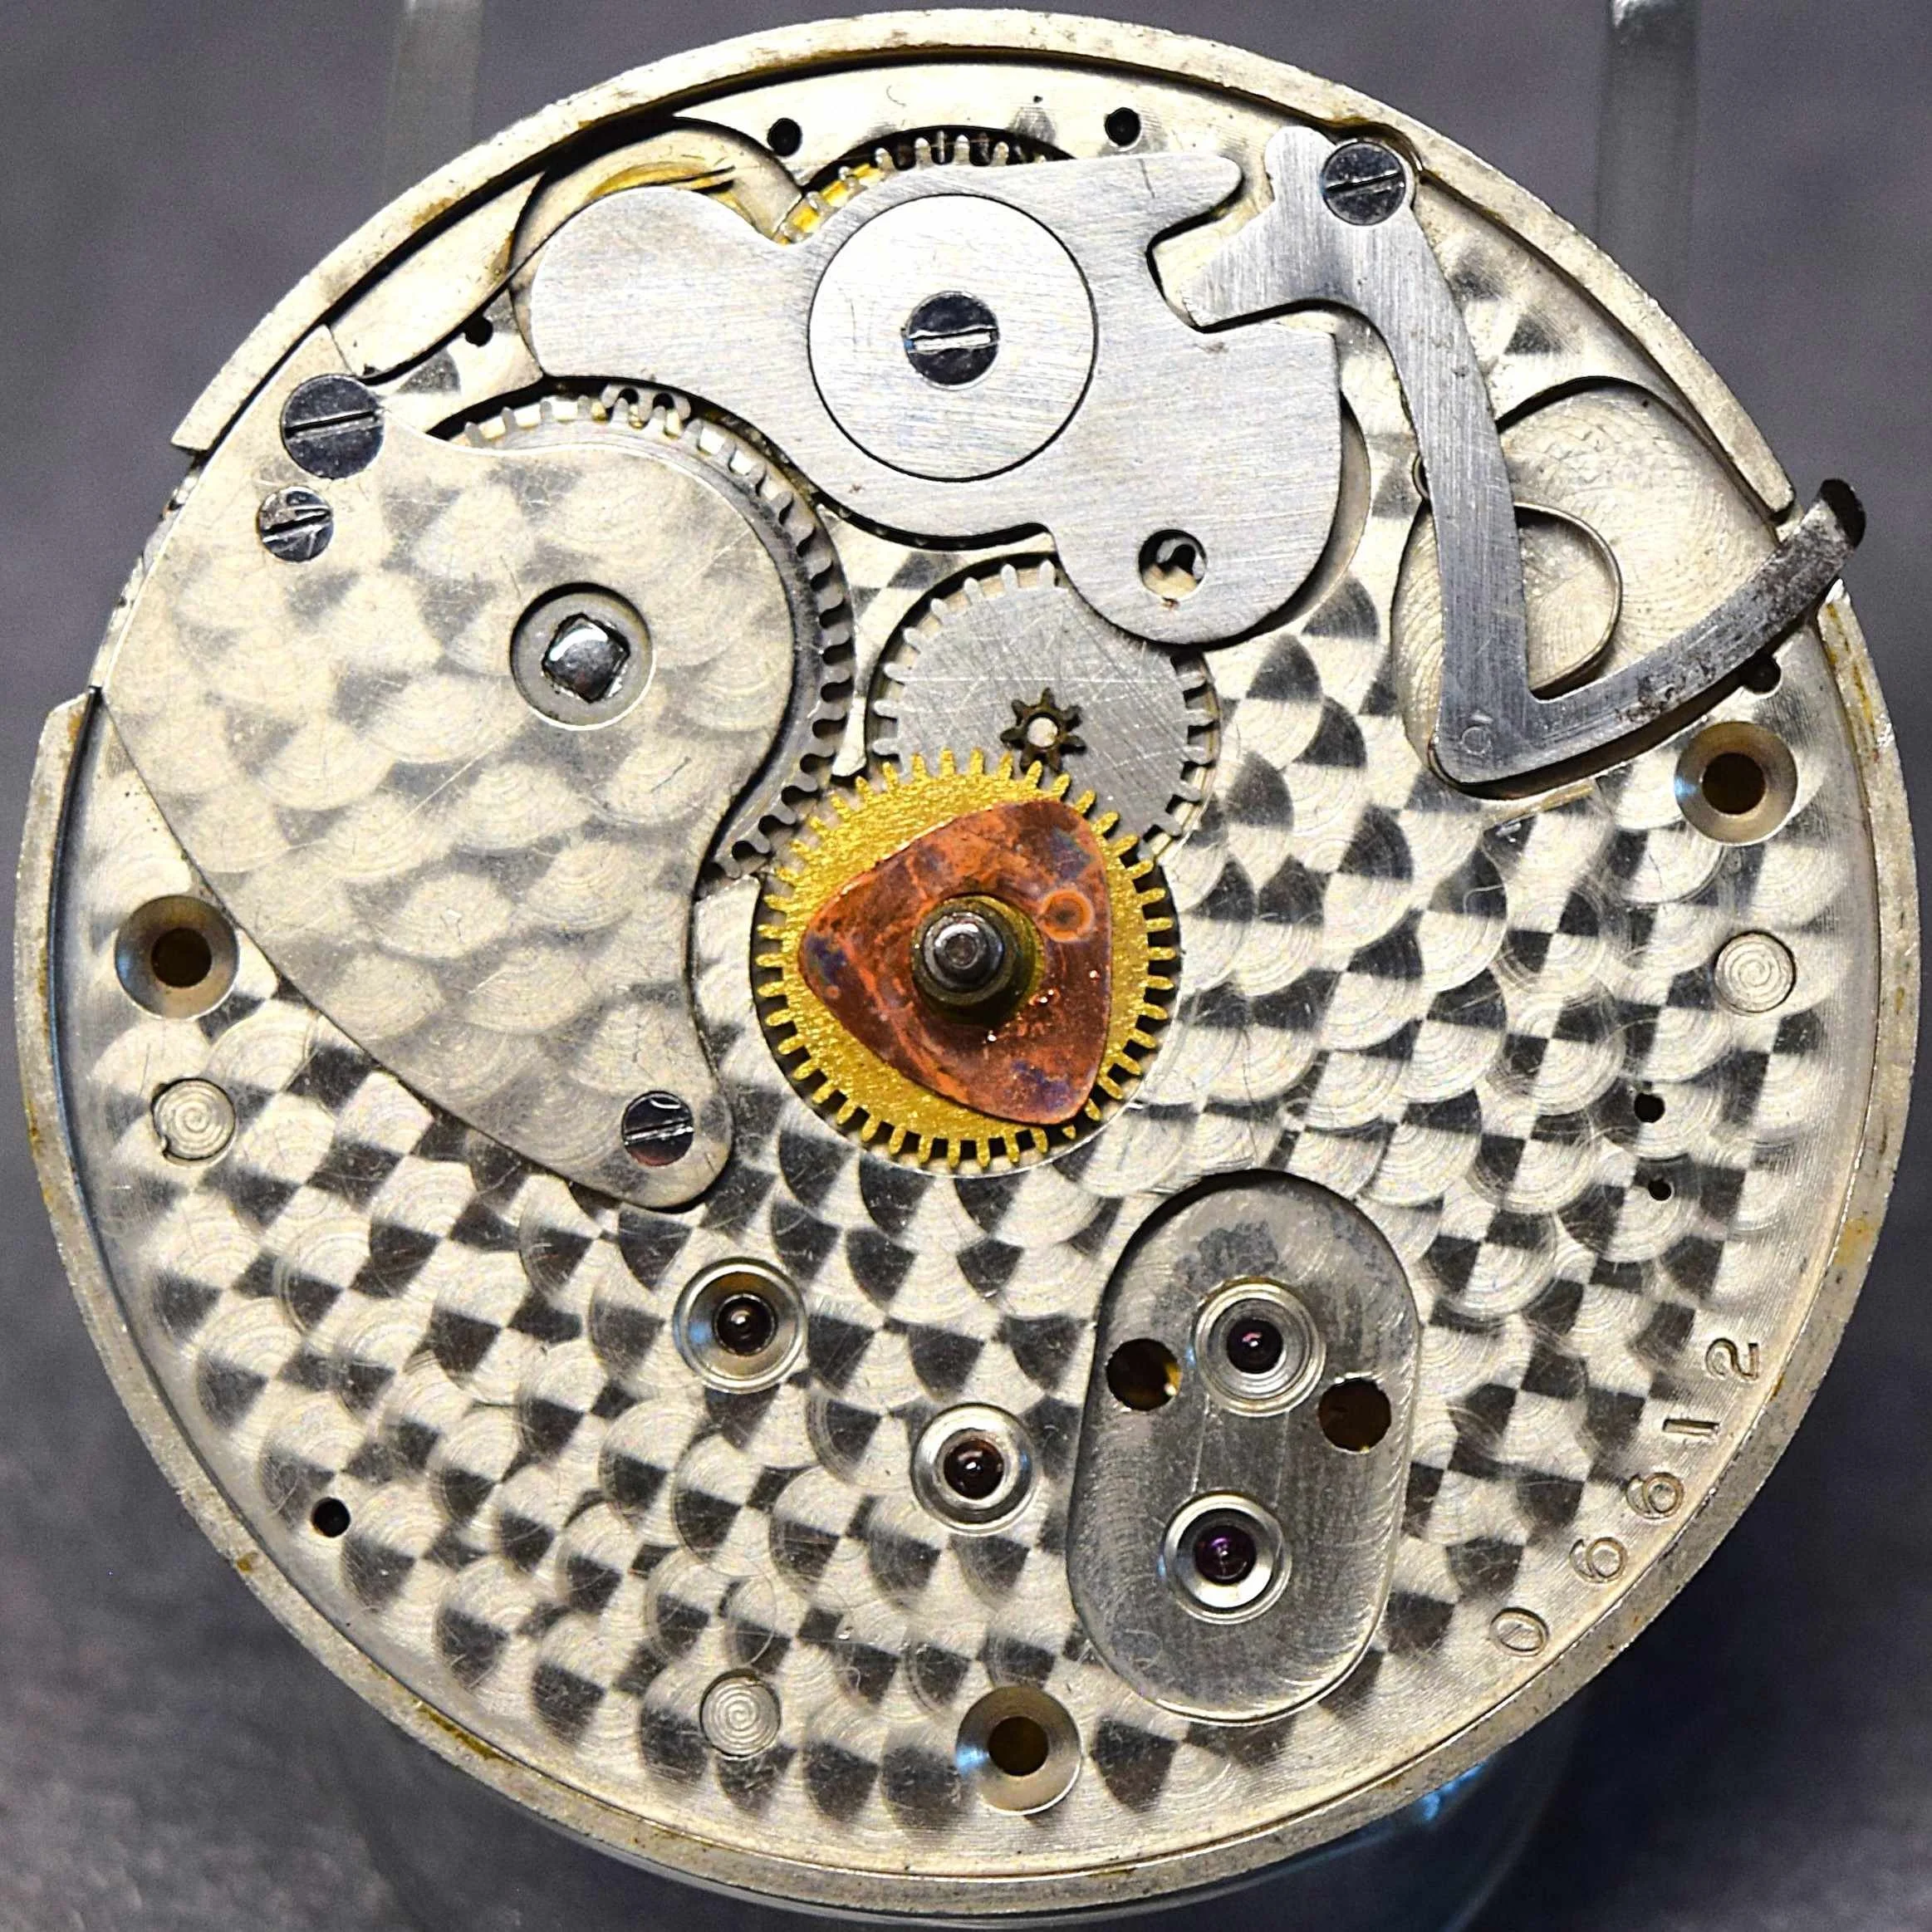
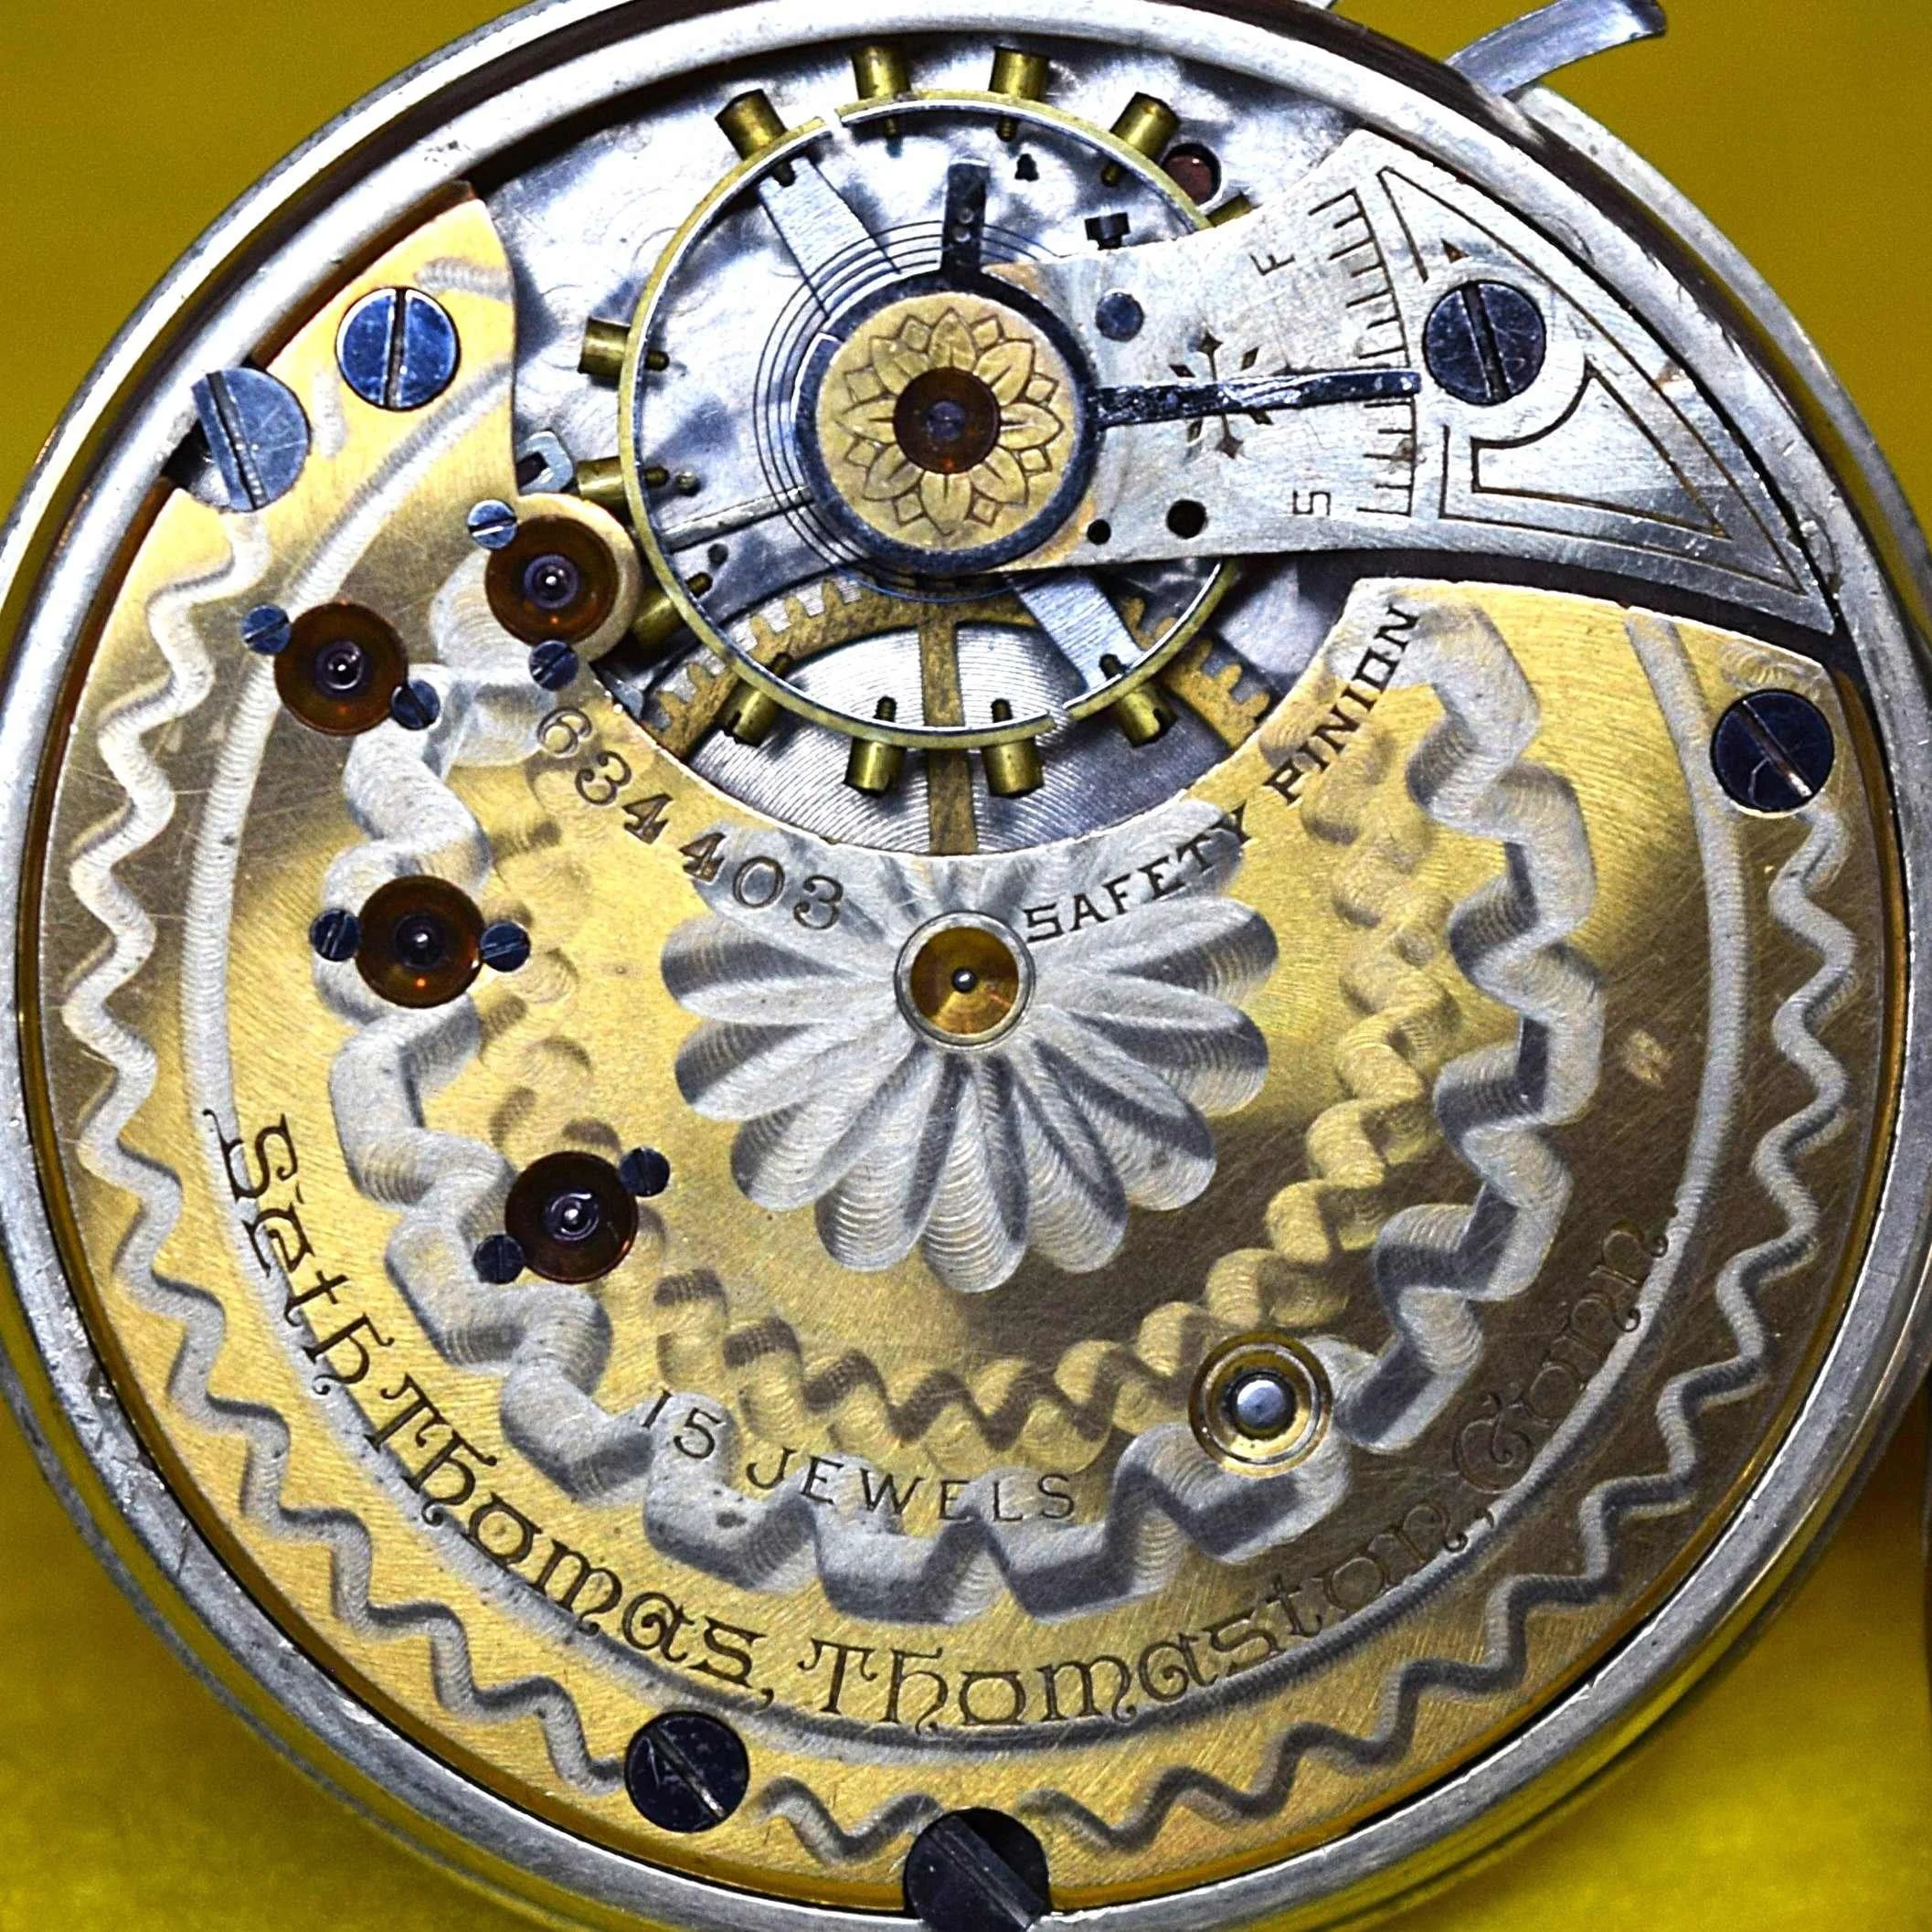
The four most common Seth Thomas pocket watch jewel counts are 7 jewels, 11 jewels, 15 jewels, and 17 jewels. There are no known examples of Seth Thomas Model 1 pocket watches with 7 jewels or with 17 jewels. Seth Thomas Model 1 mechanisms with 11 jewels and 15 jewels are shown above. The top row shows the “Top Plate”, and the bottom row shows the “Pillar Plate”, which is usually covered by the dial.
7-Jewel Movements in Model 1
There have been no reported examples of a Seth Thomas Model 1 pocket watch movement with 7 Jewels.
11-Jewel Movements in Model 1
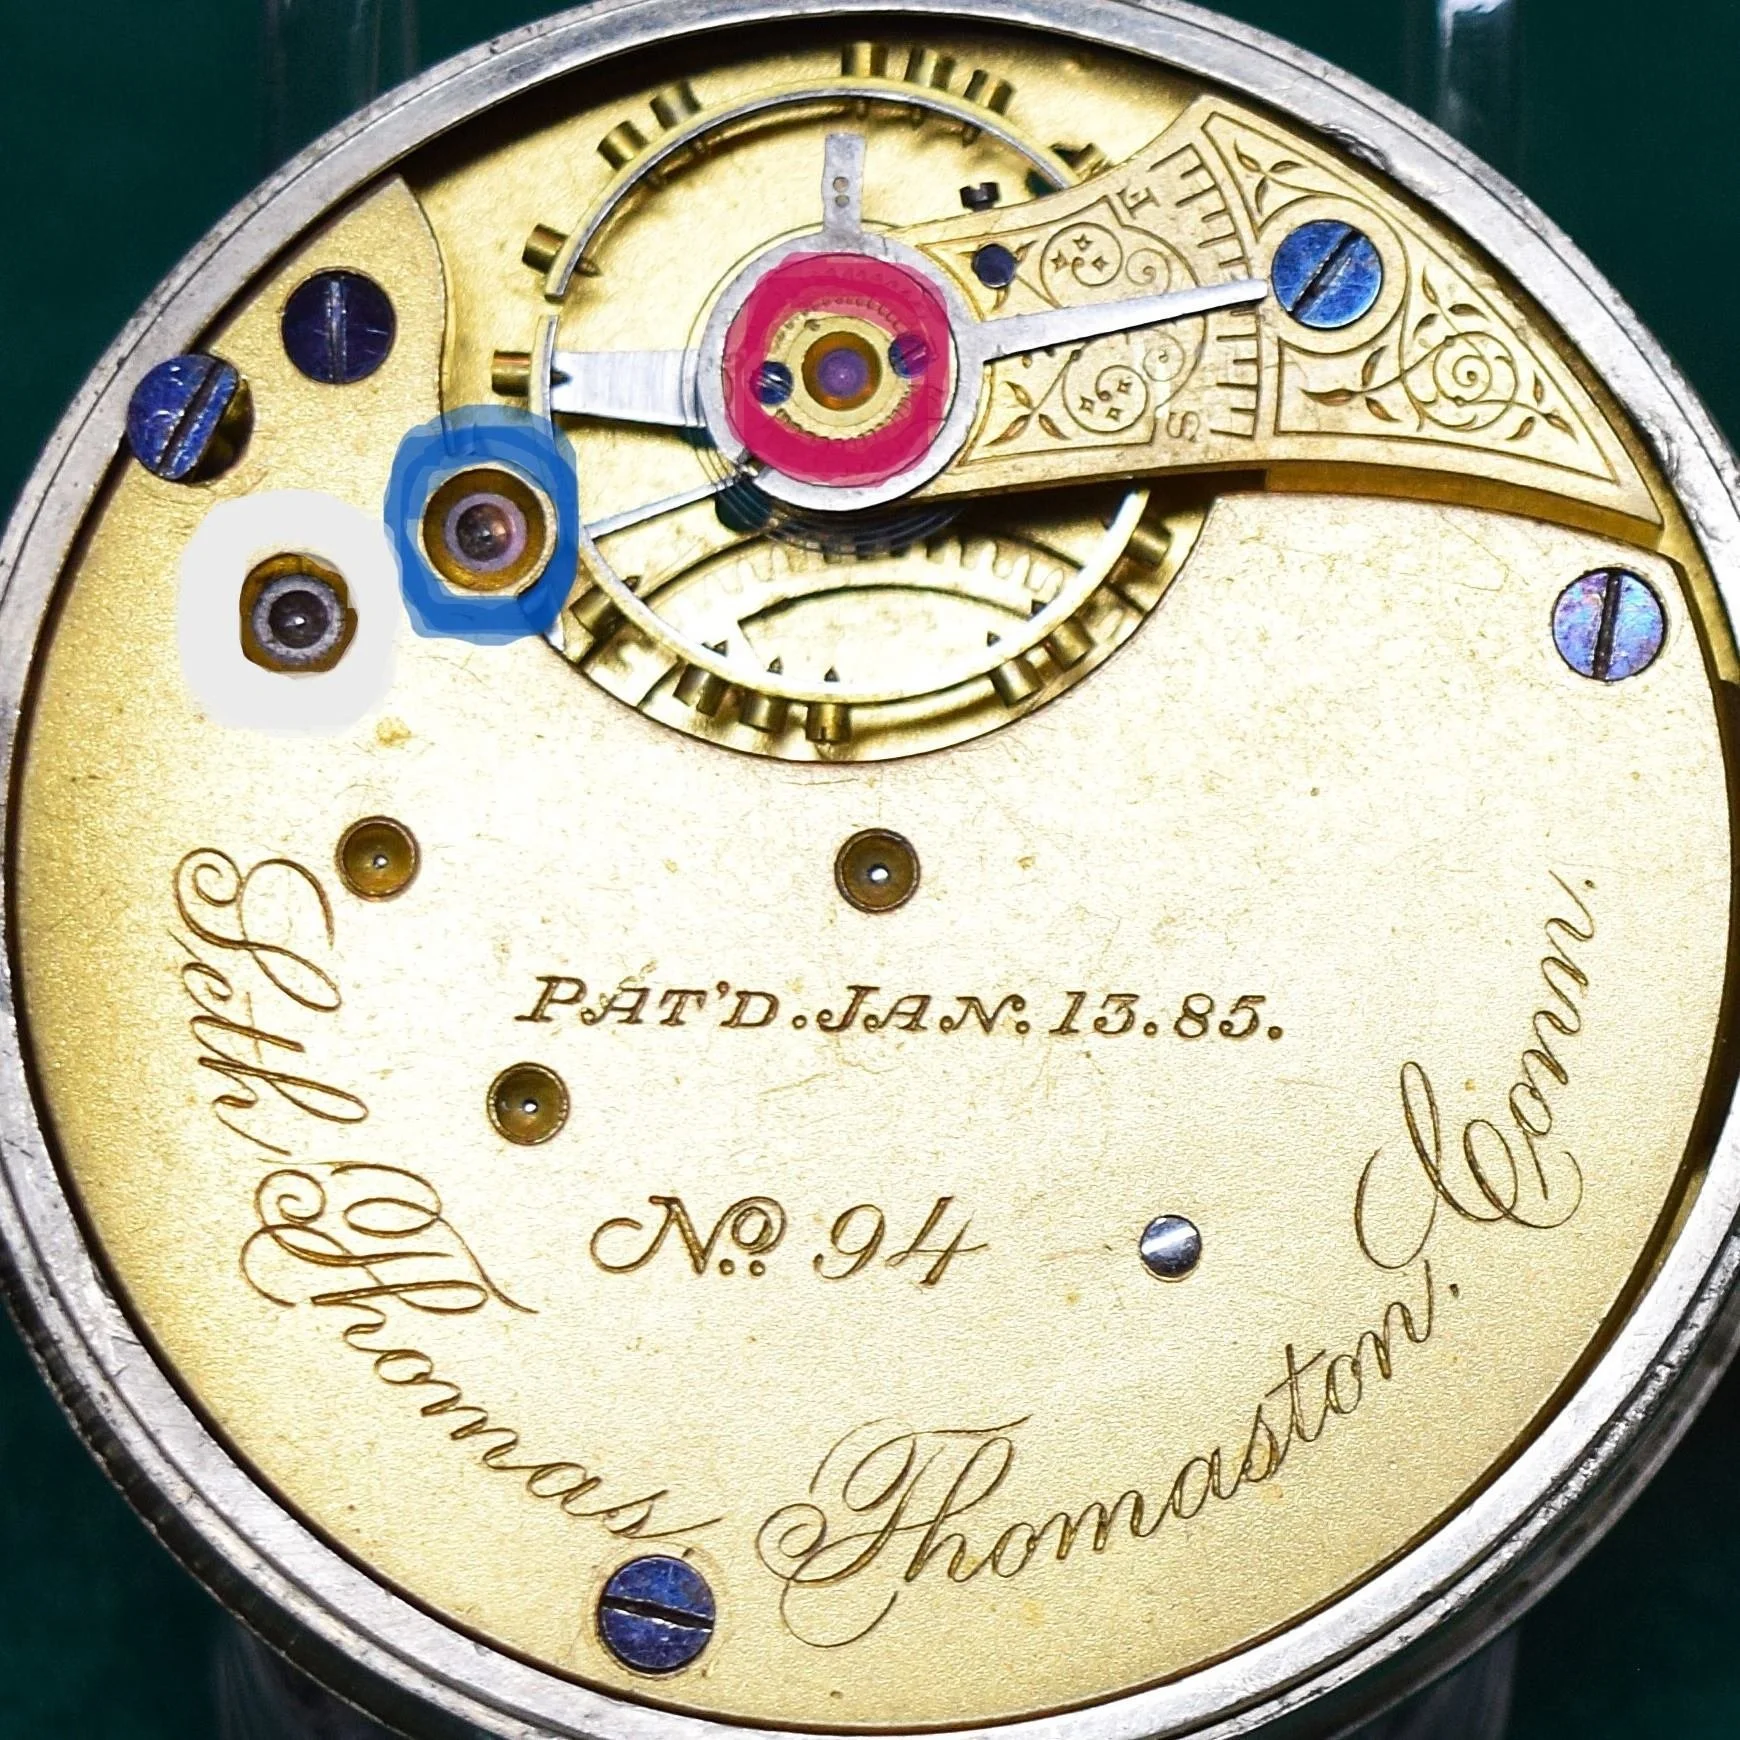
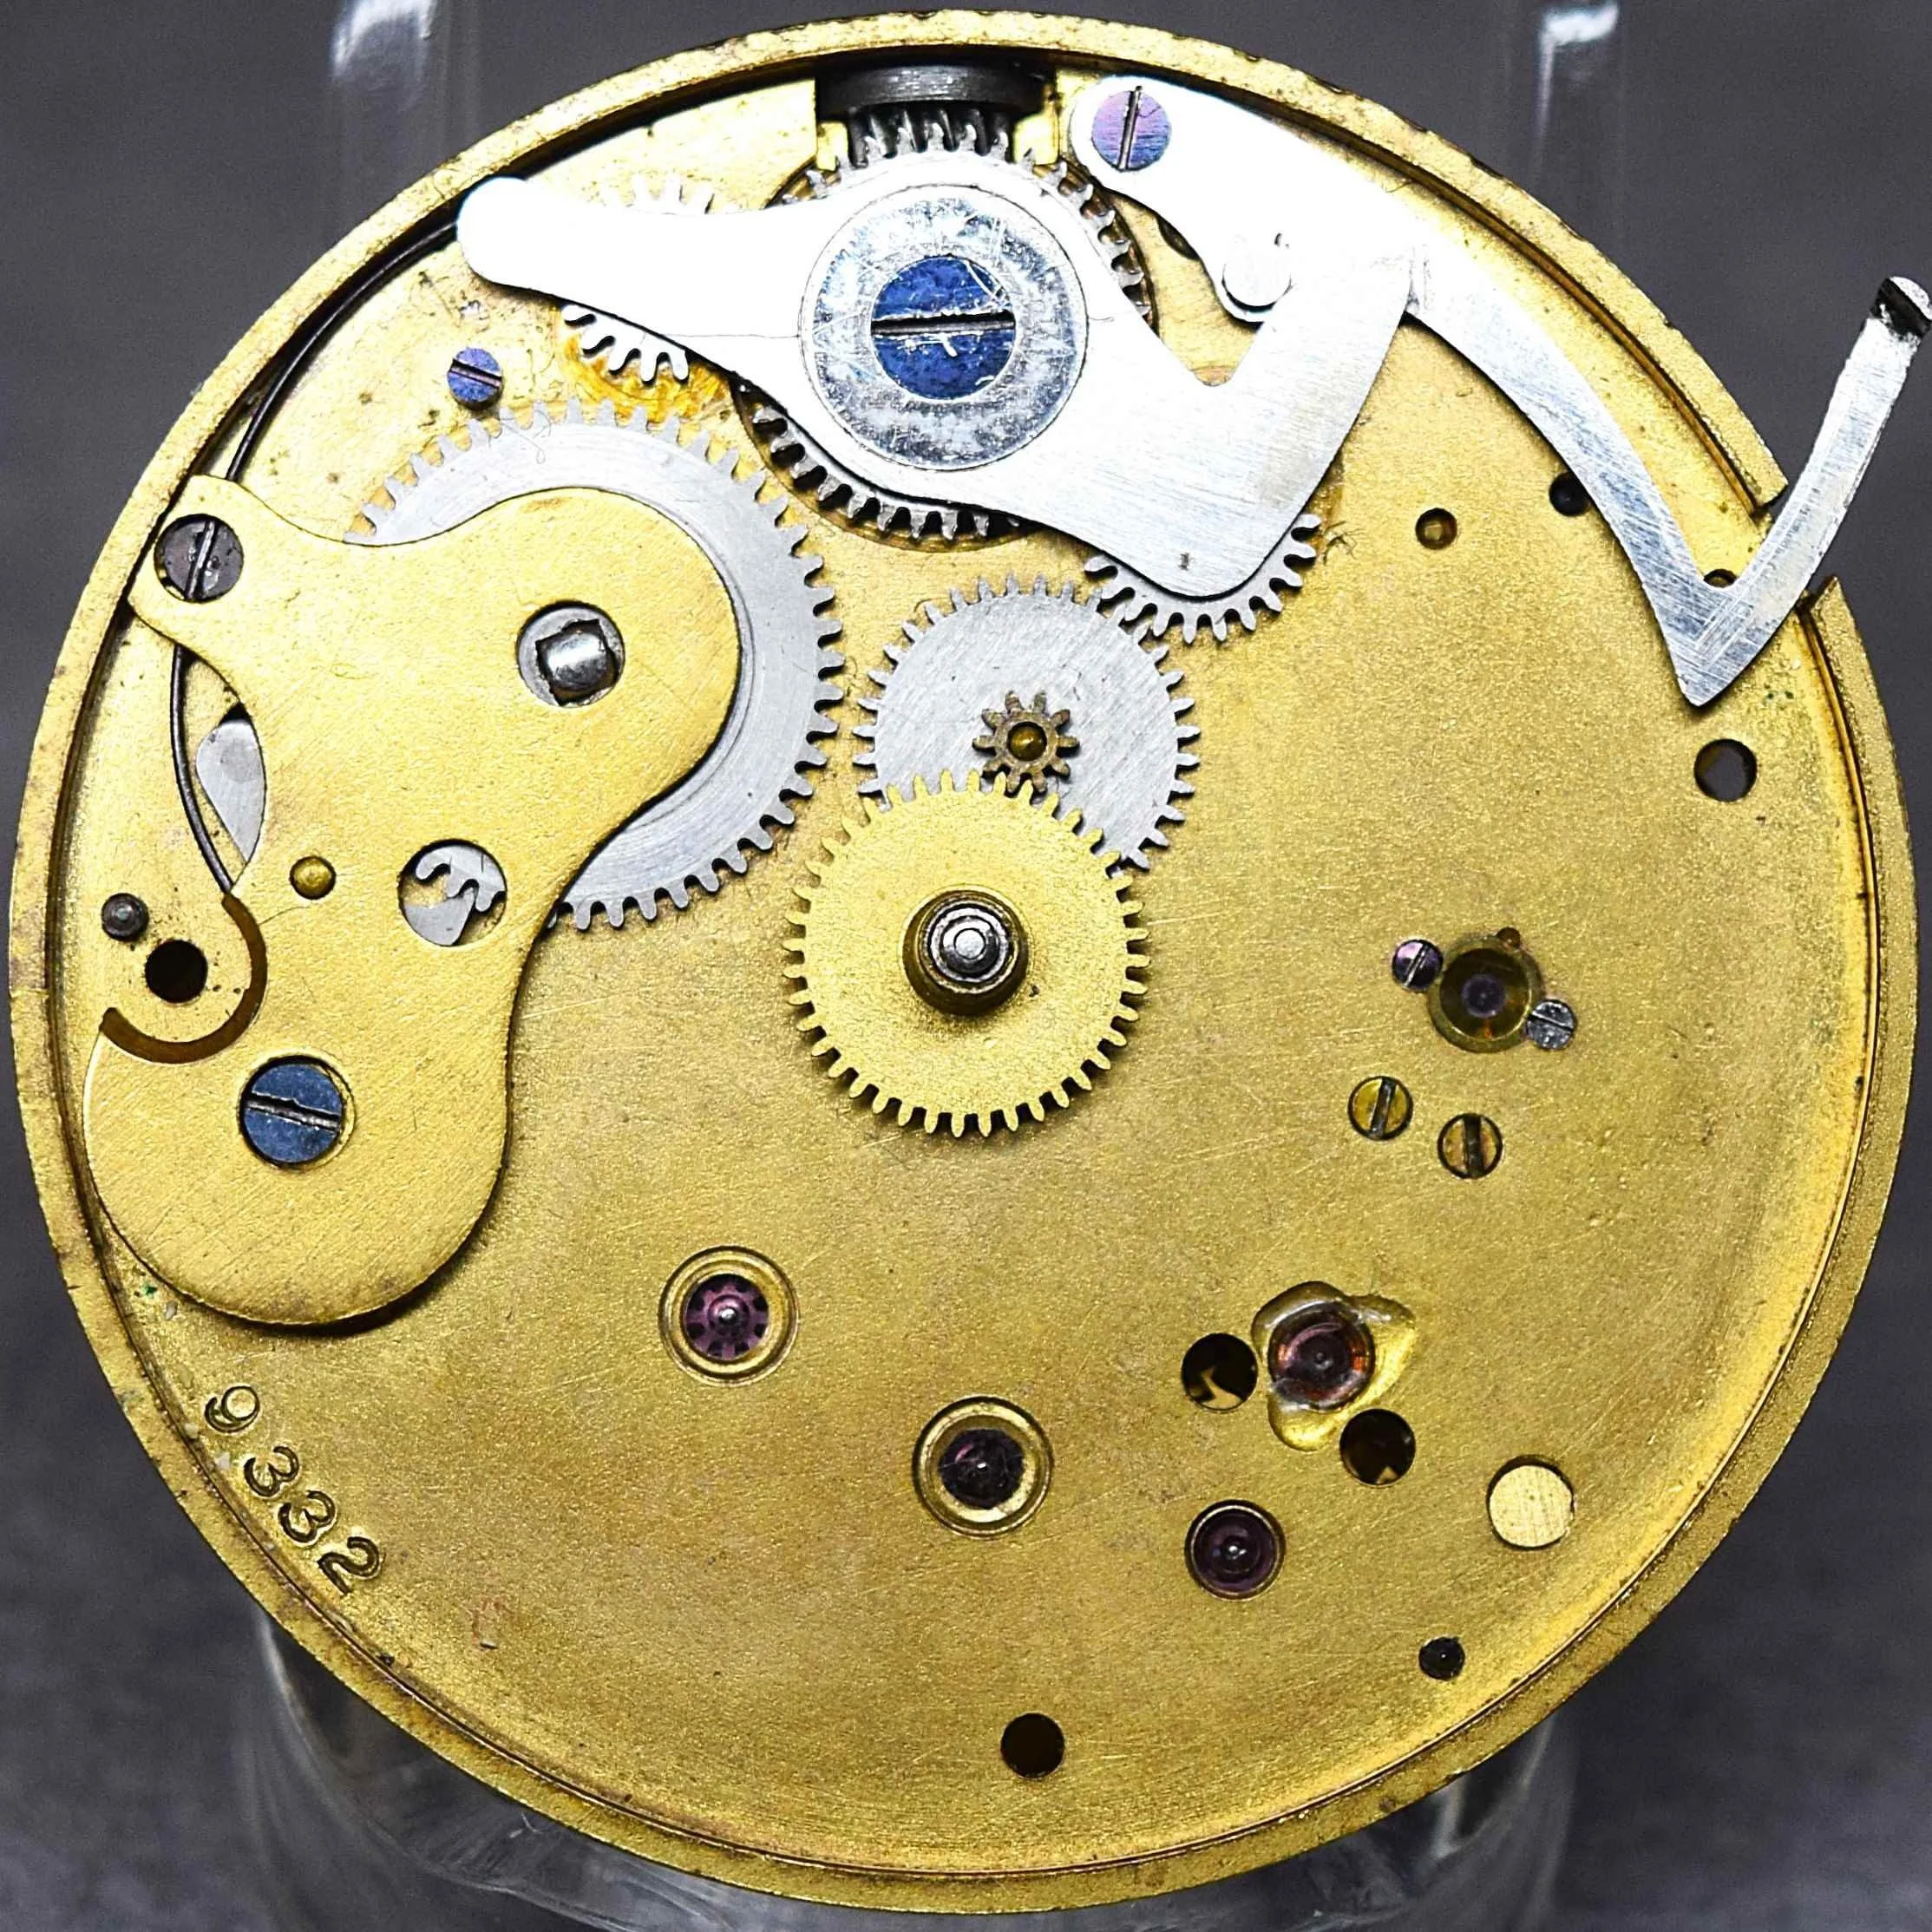
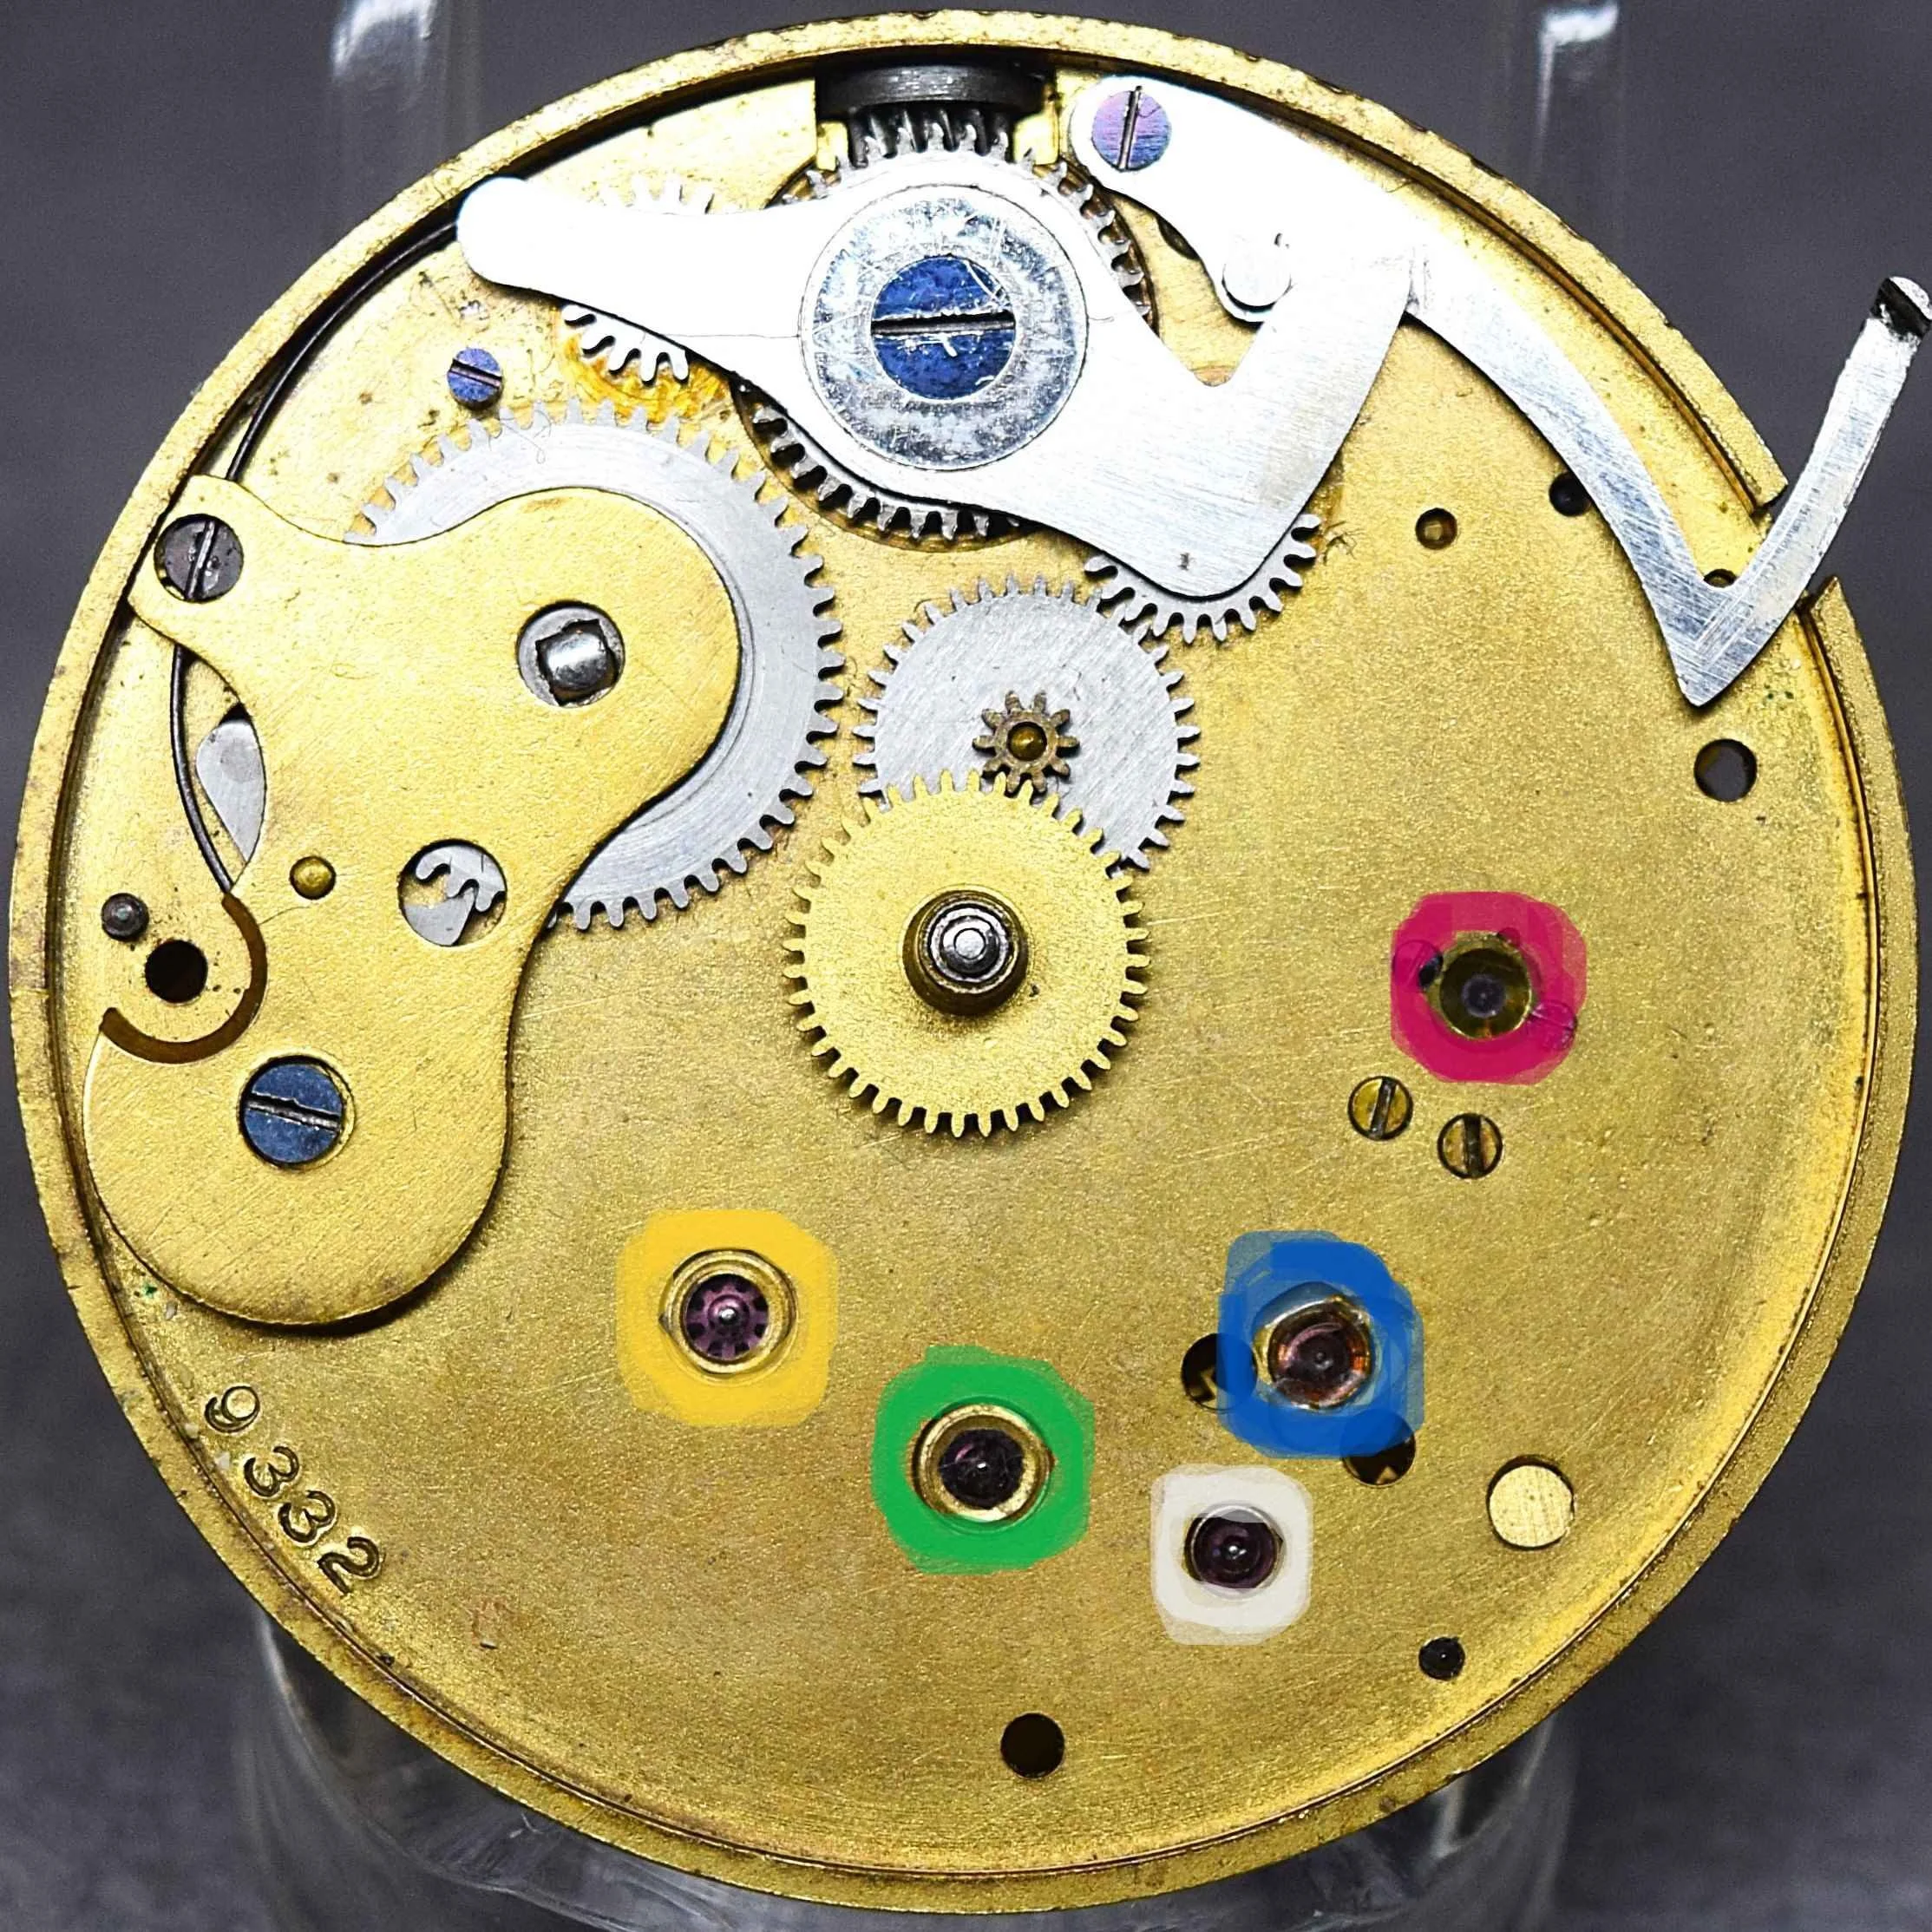
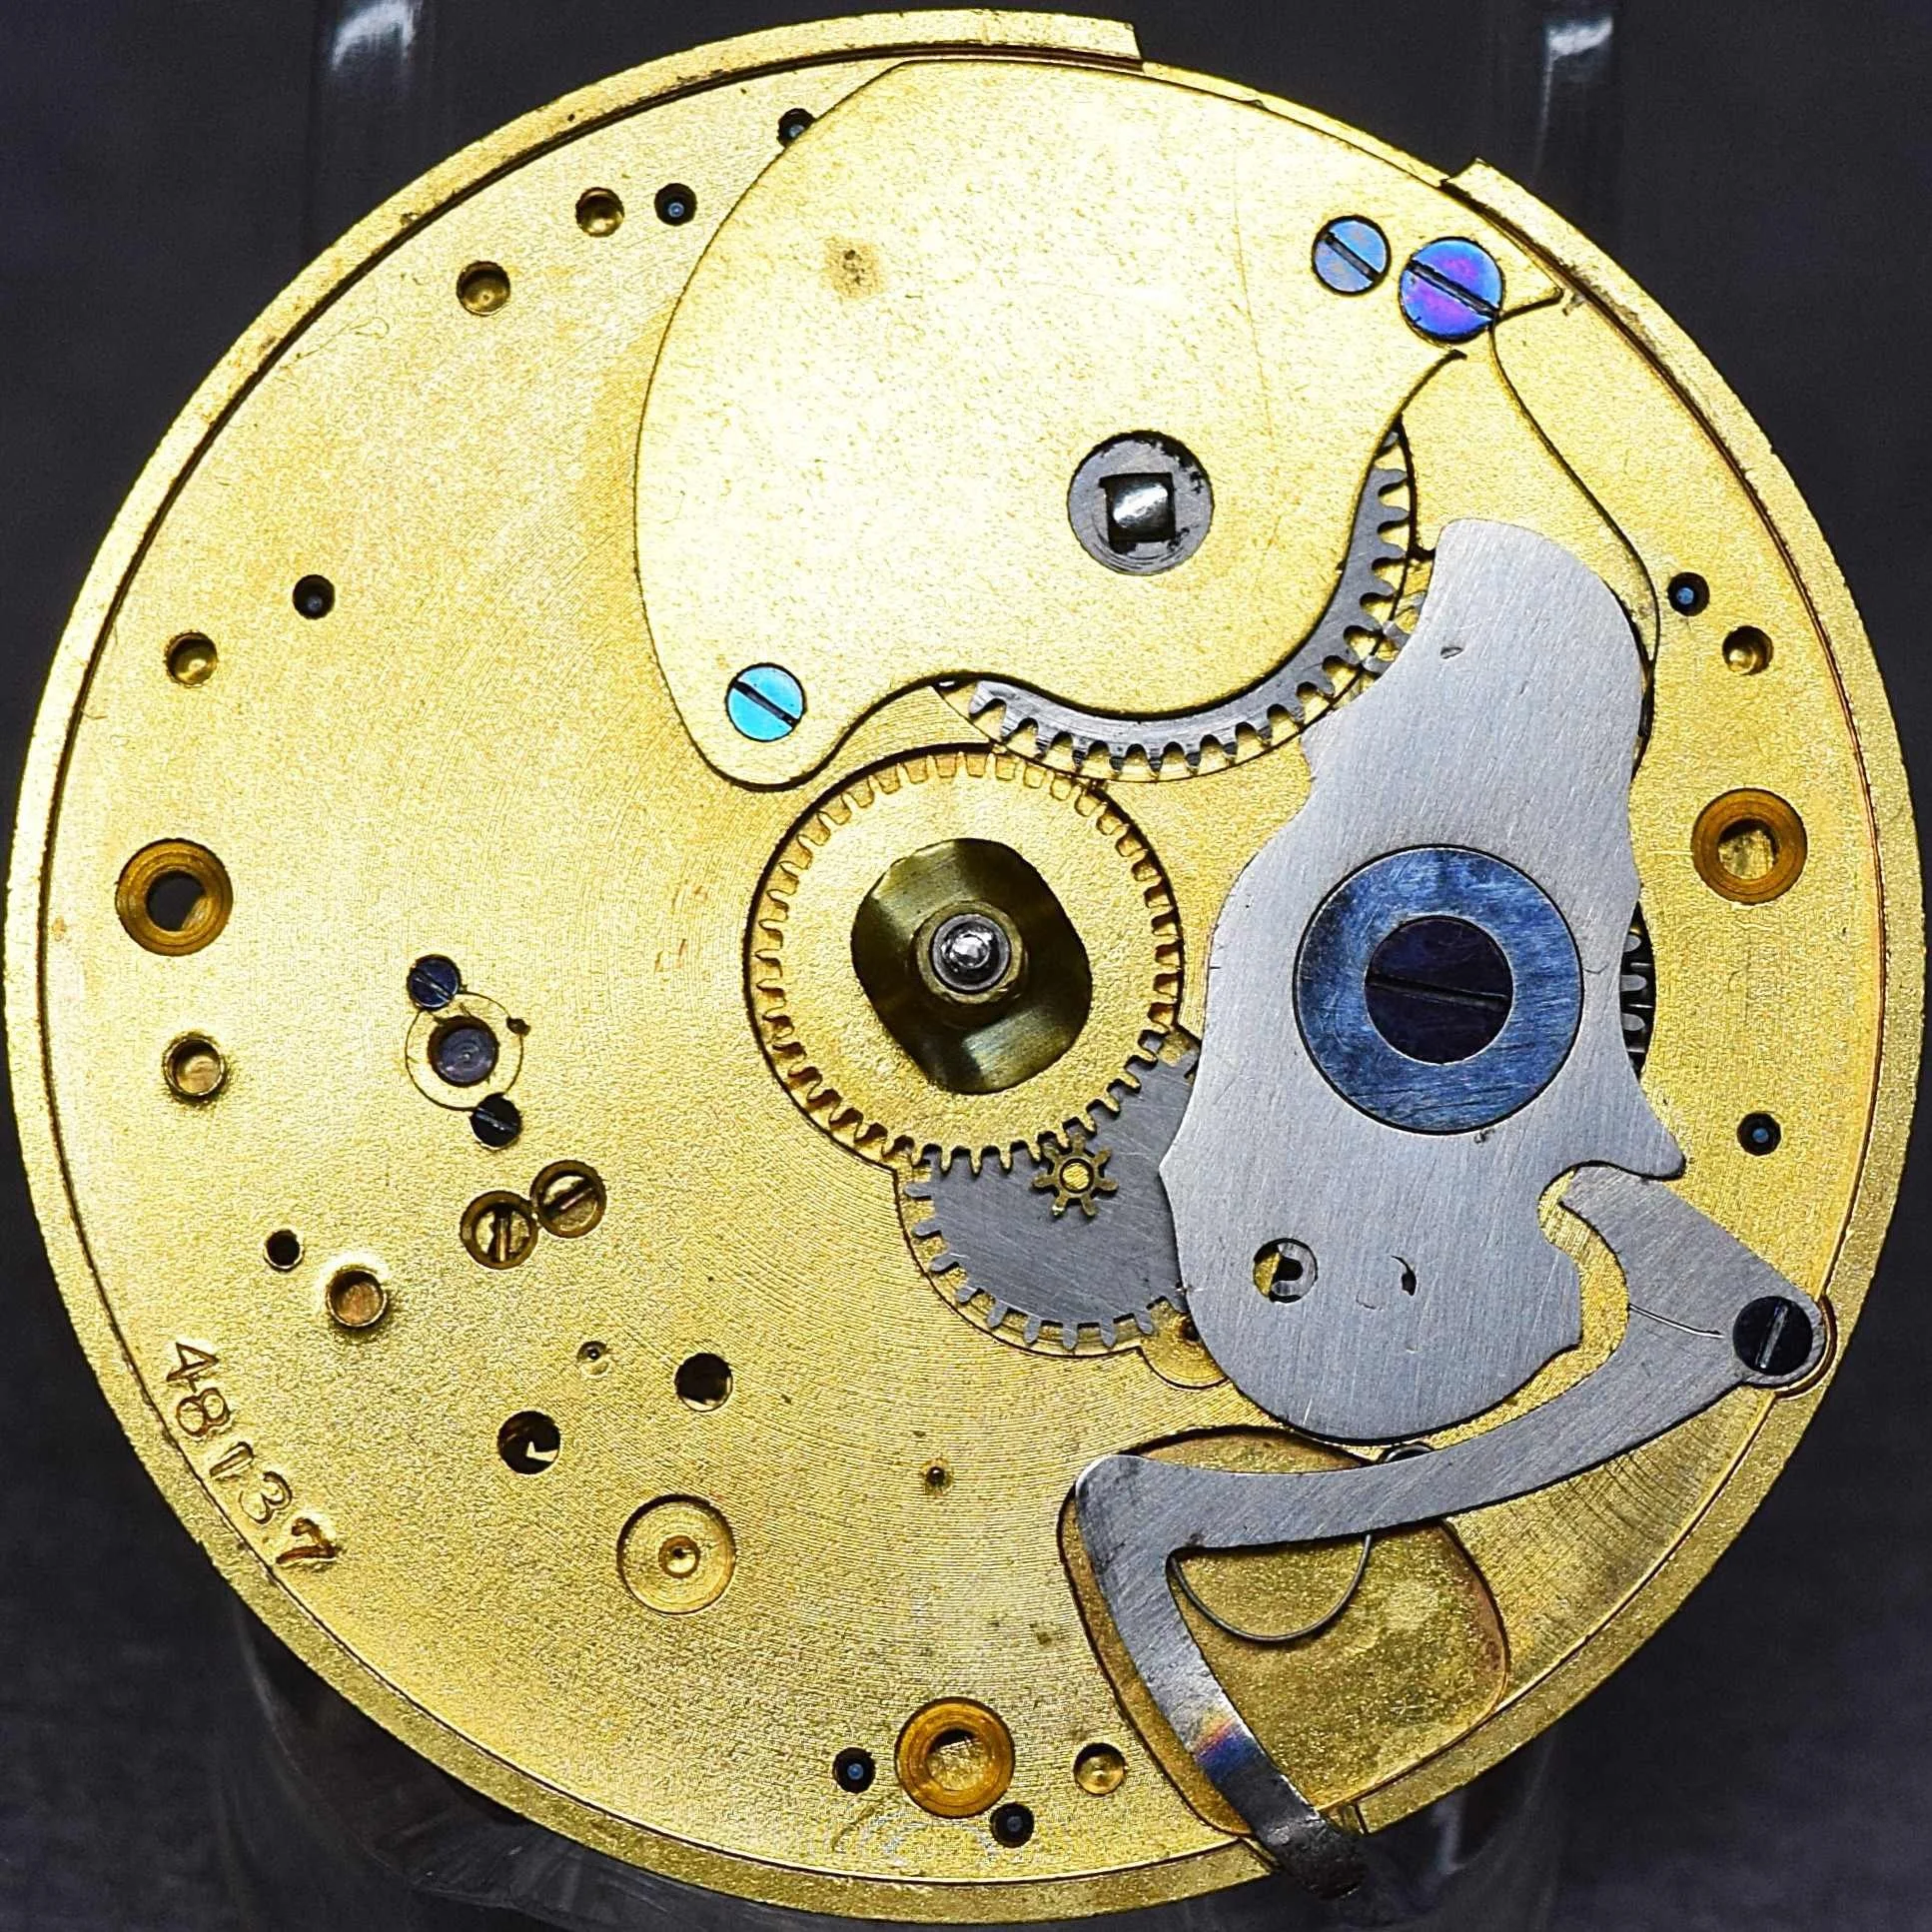
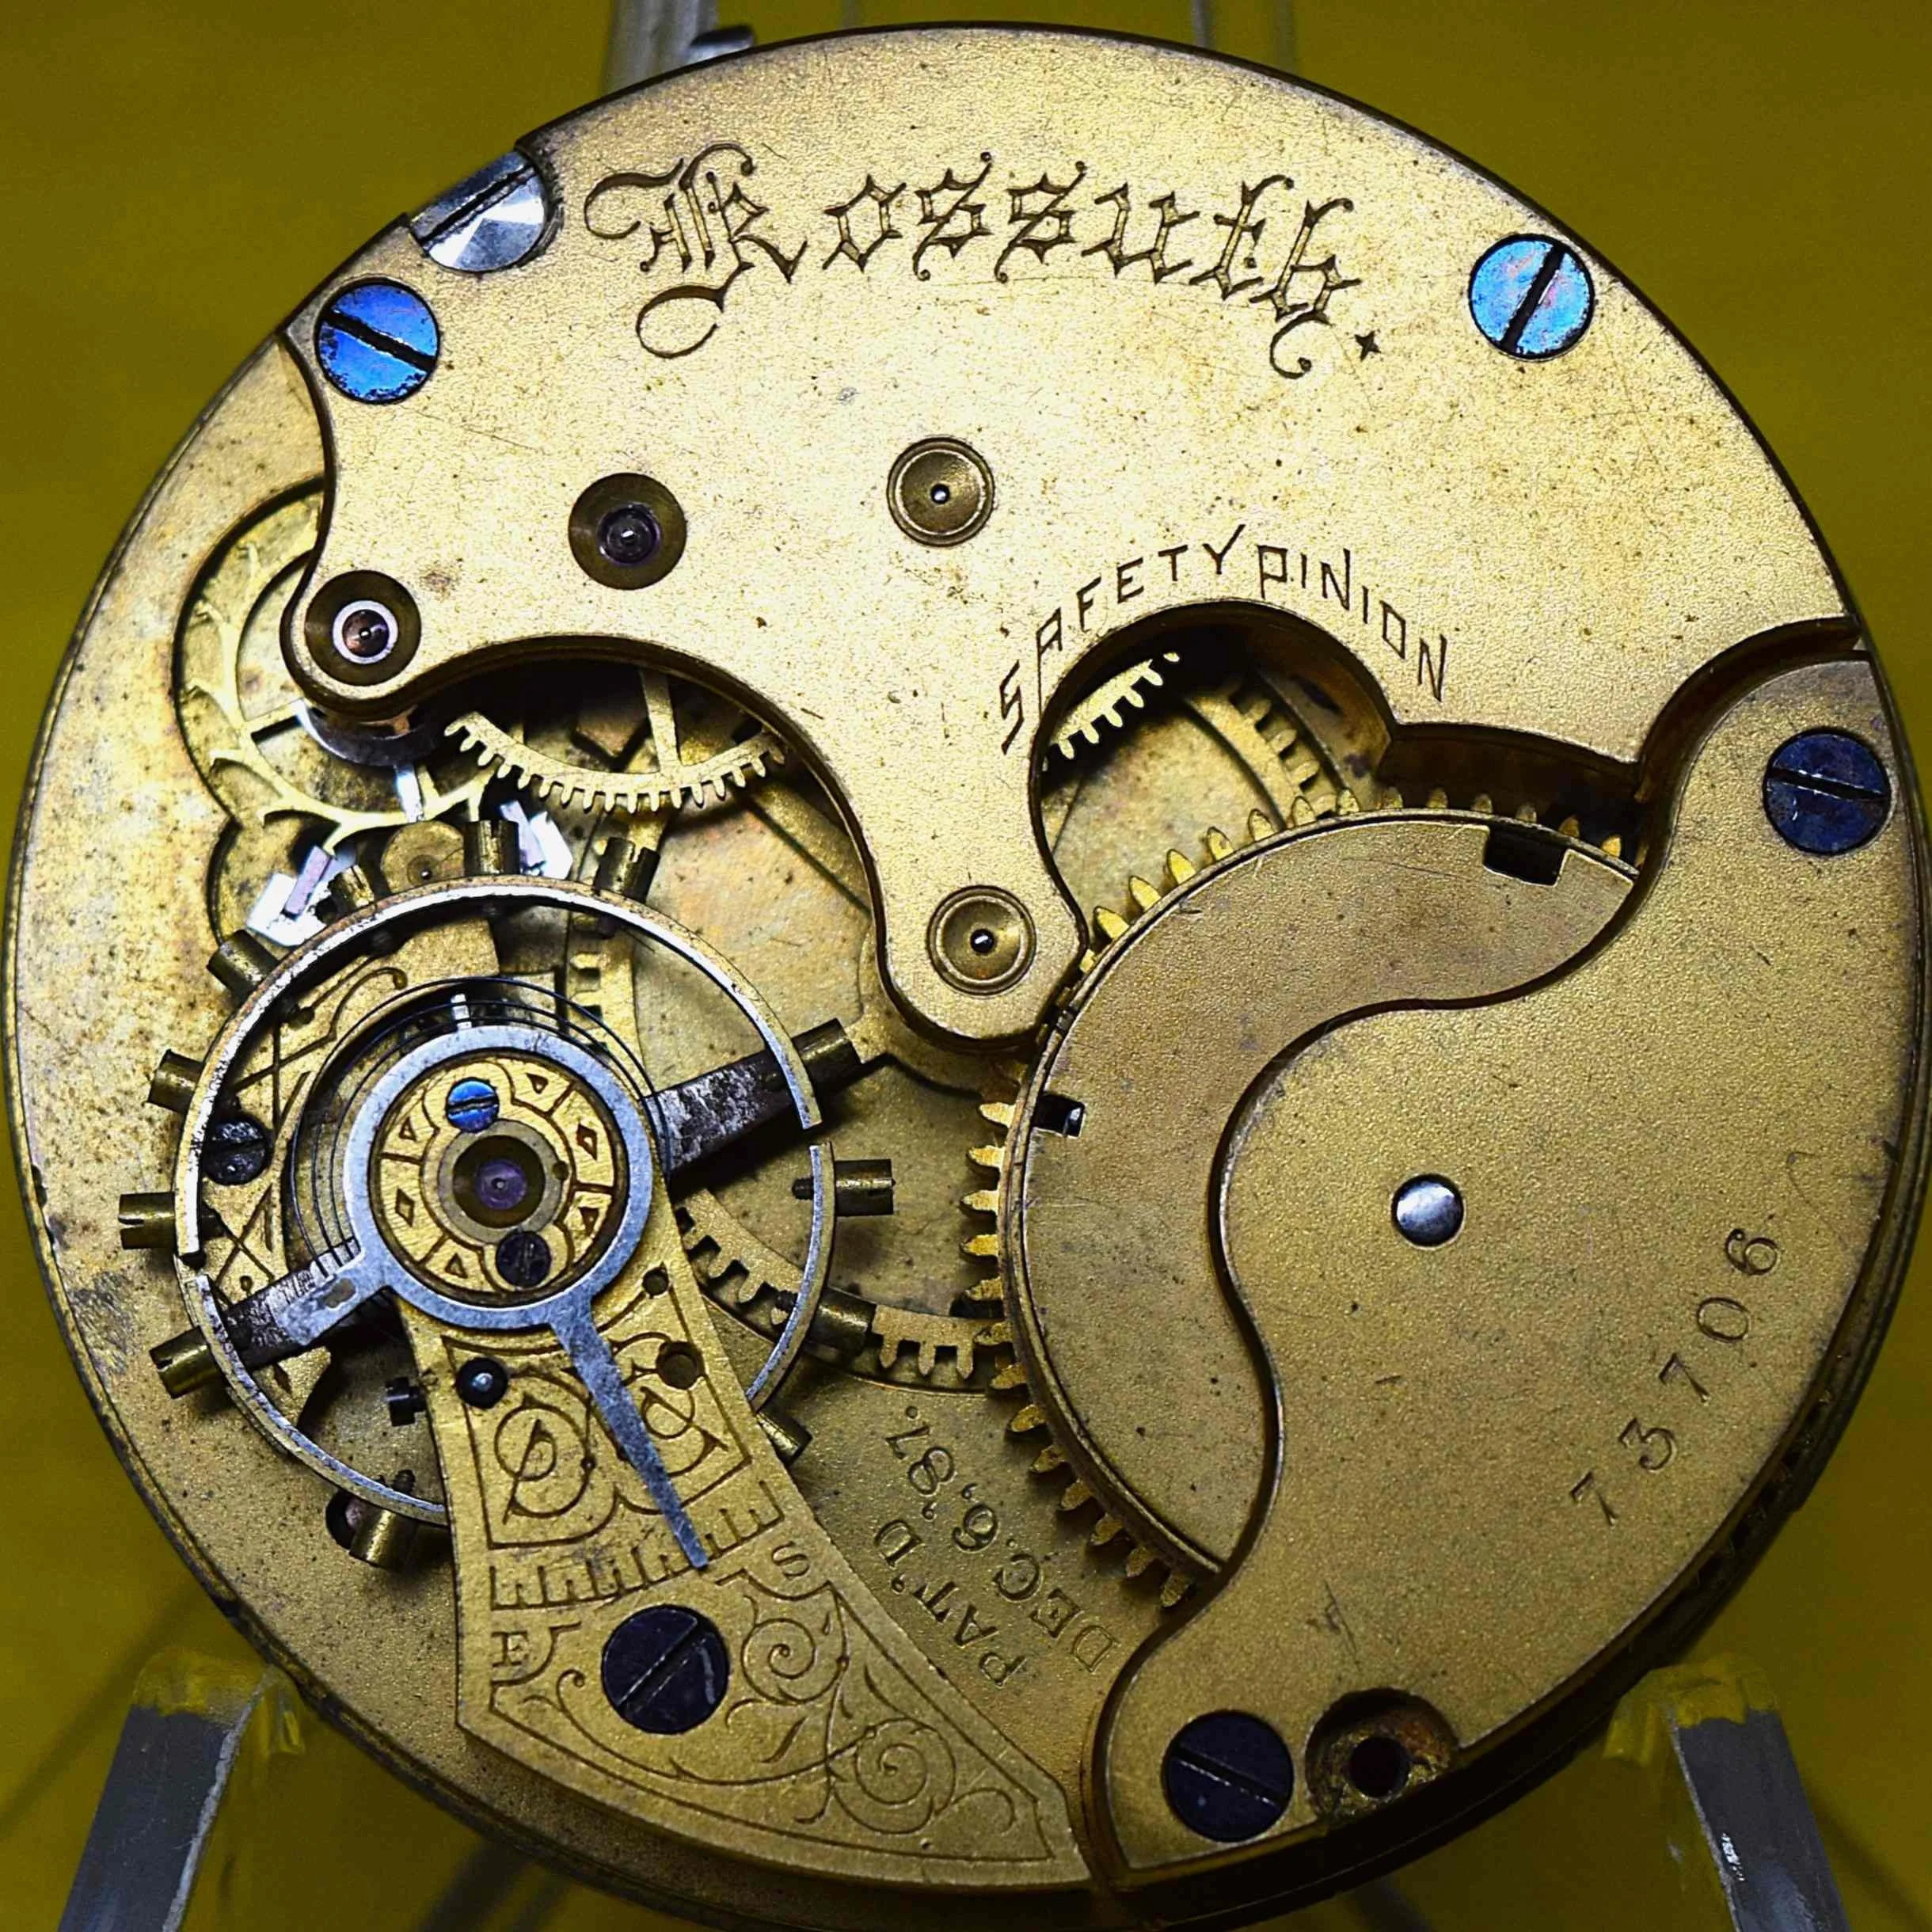
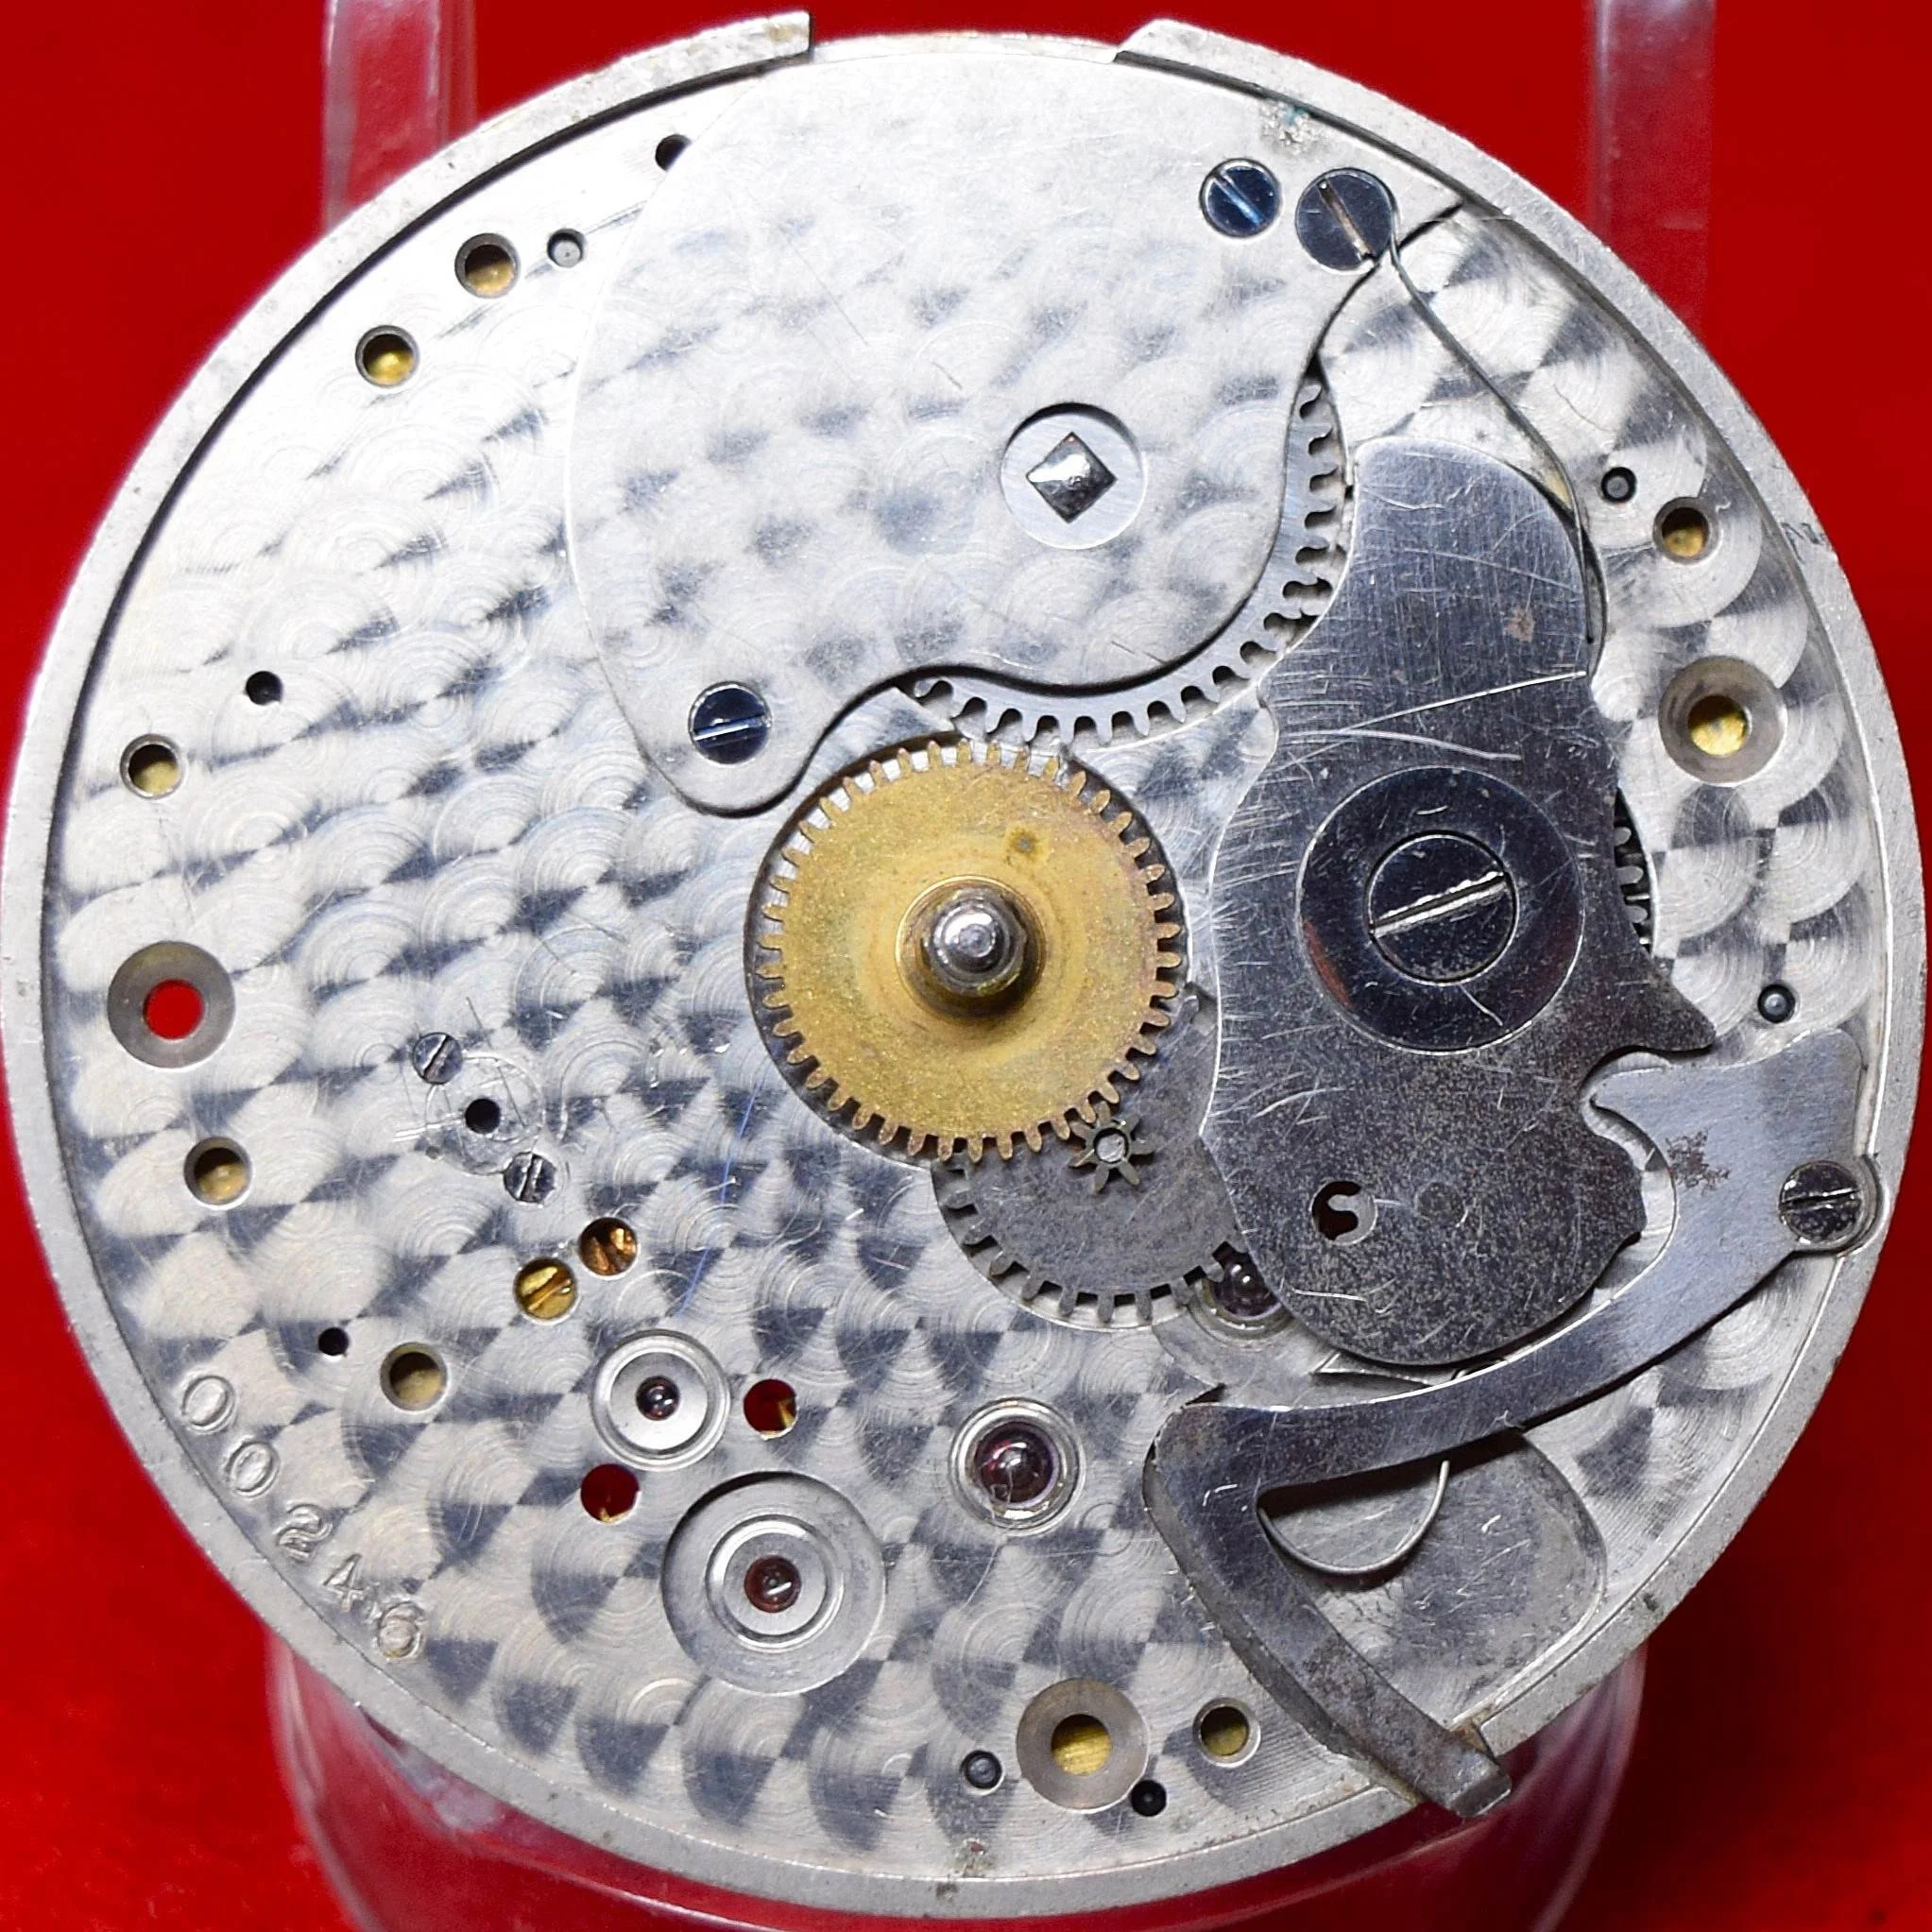
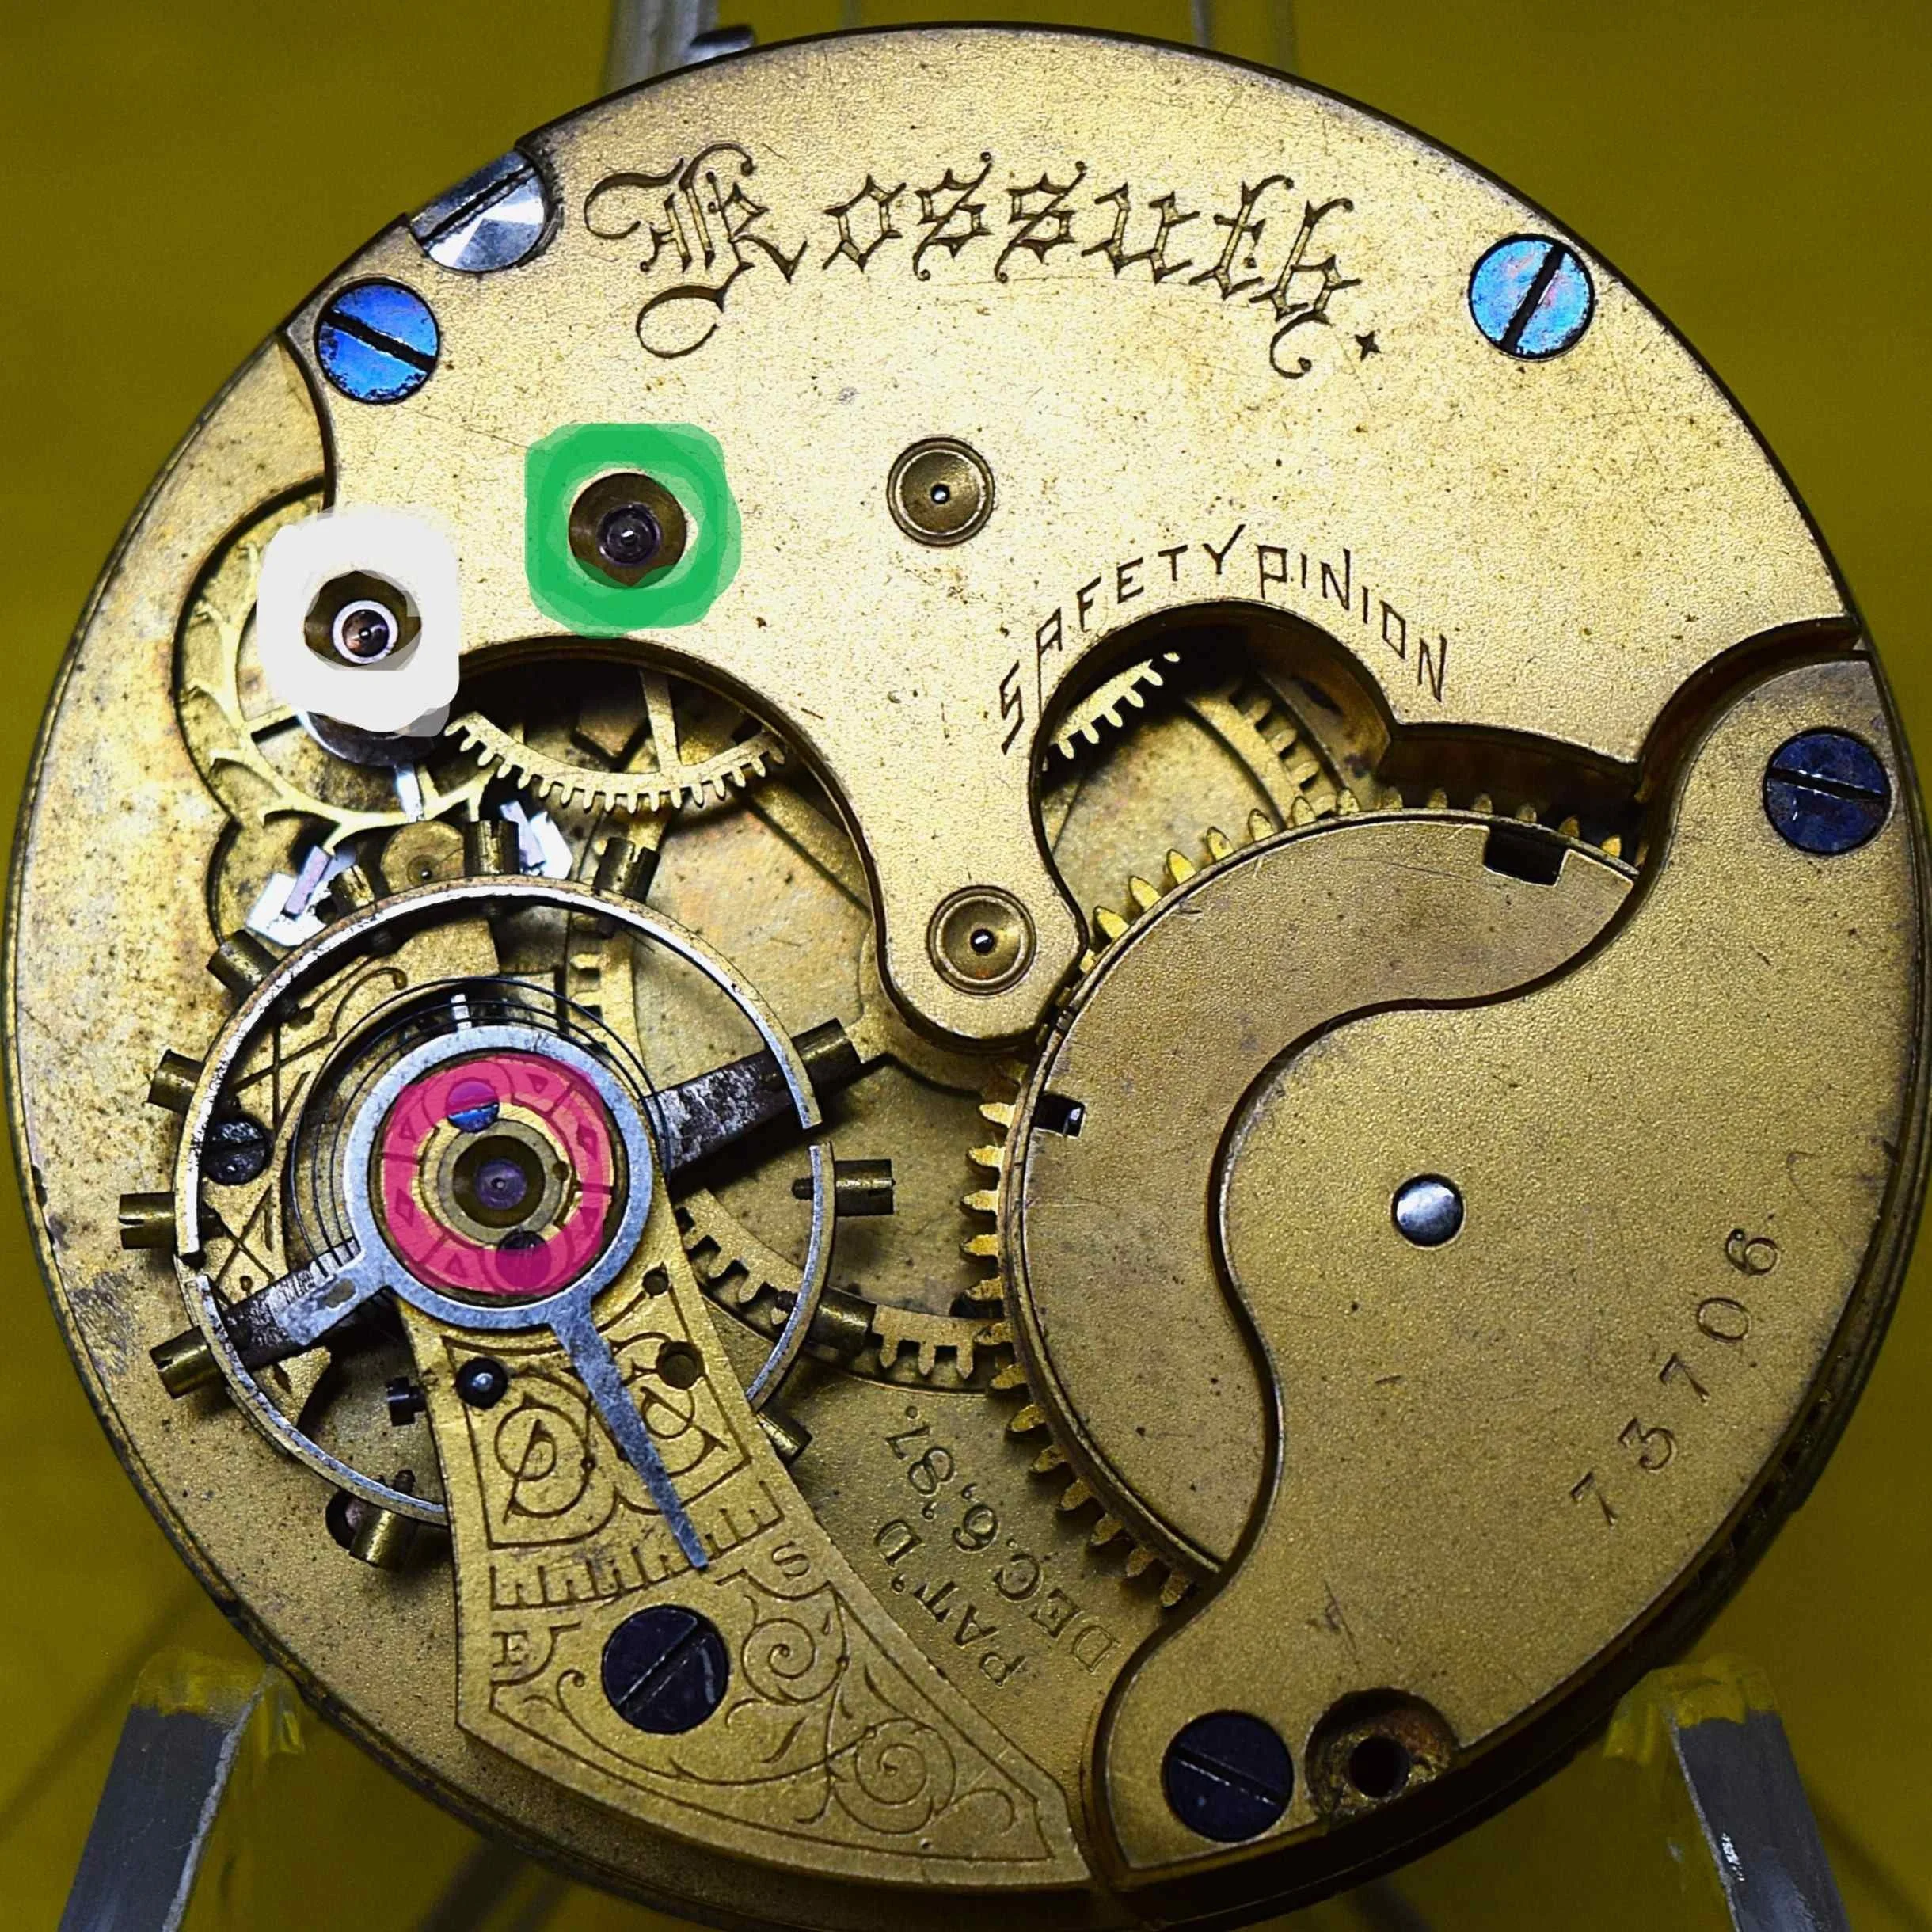
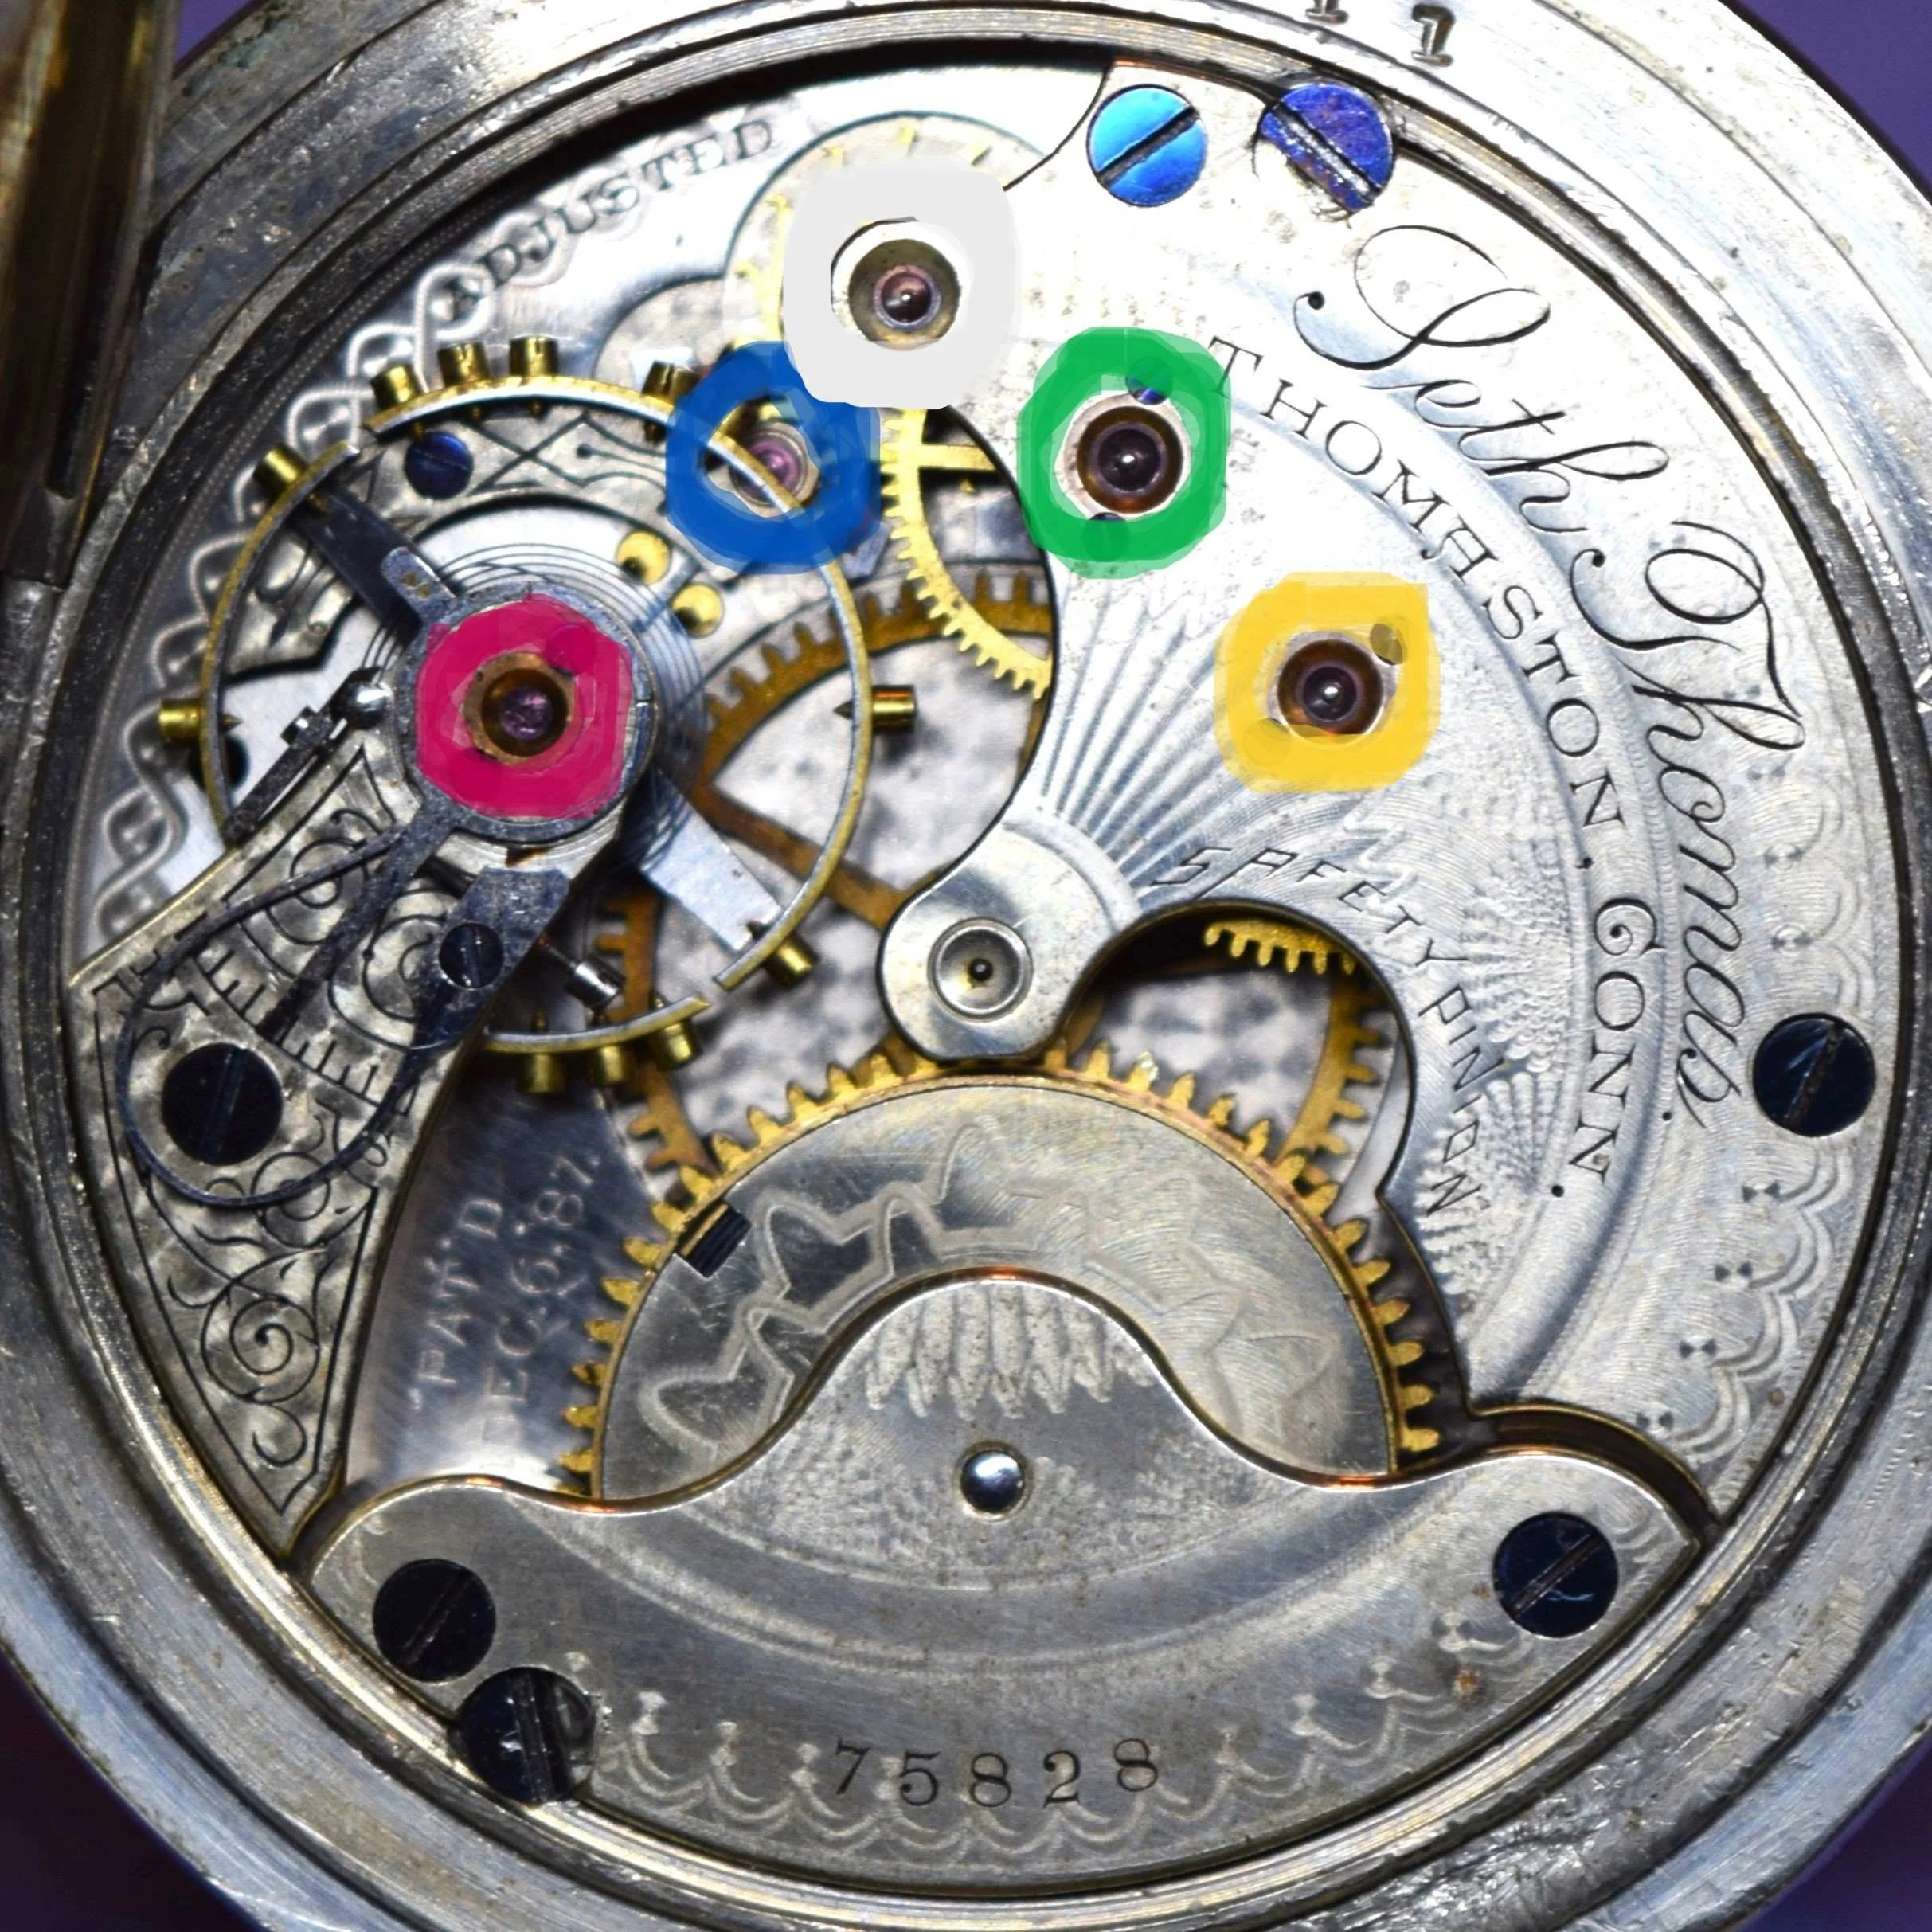
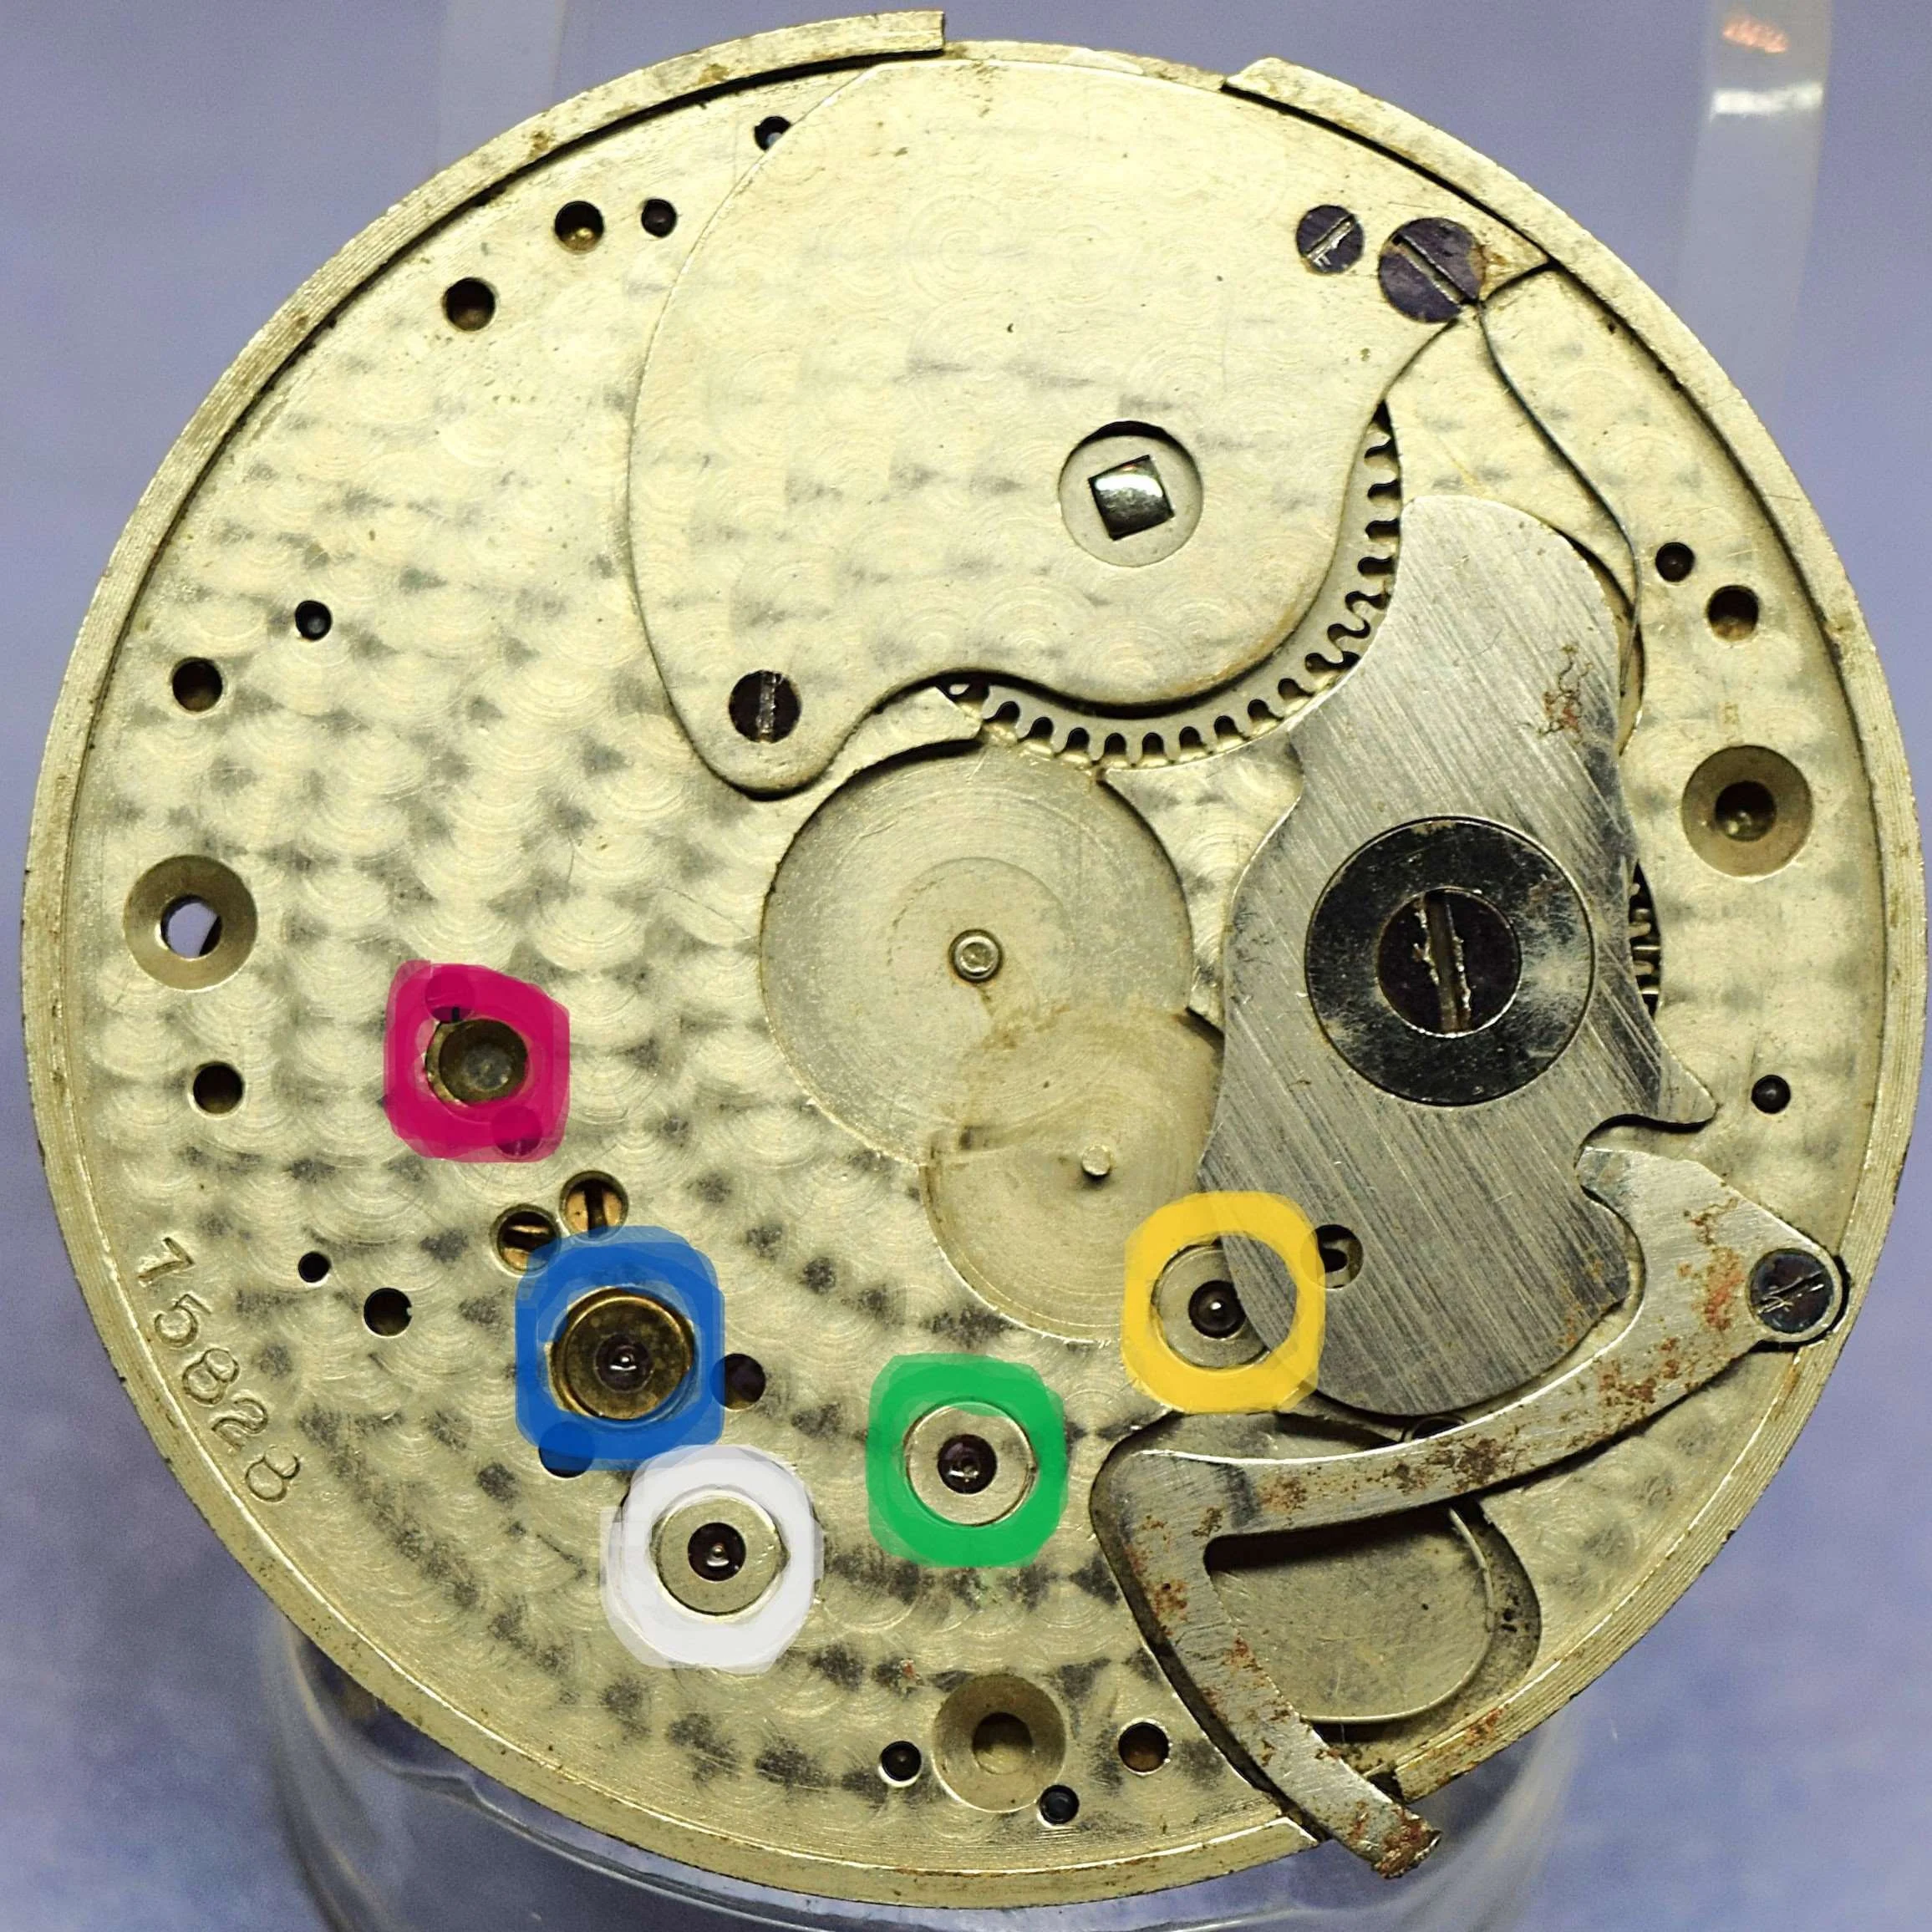
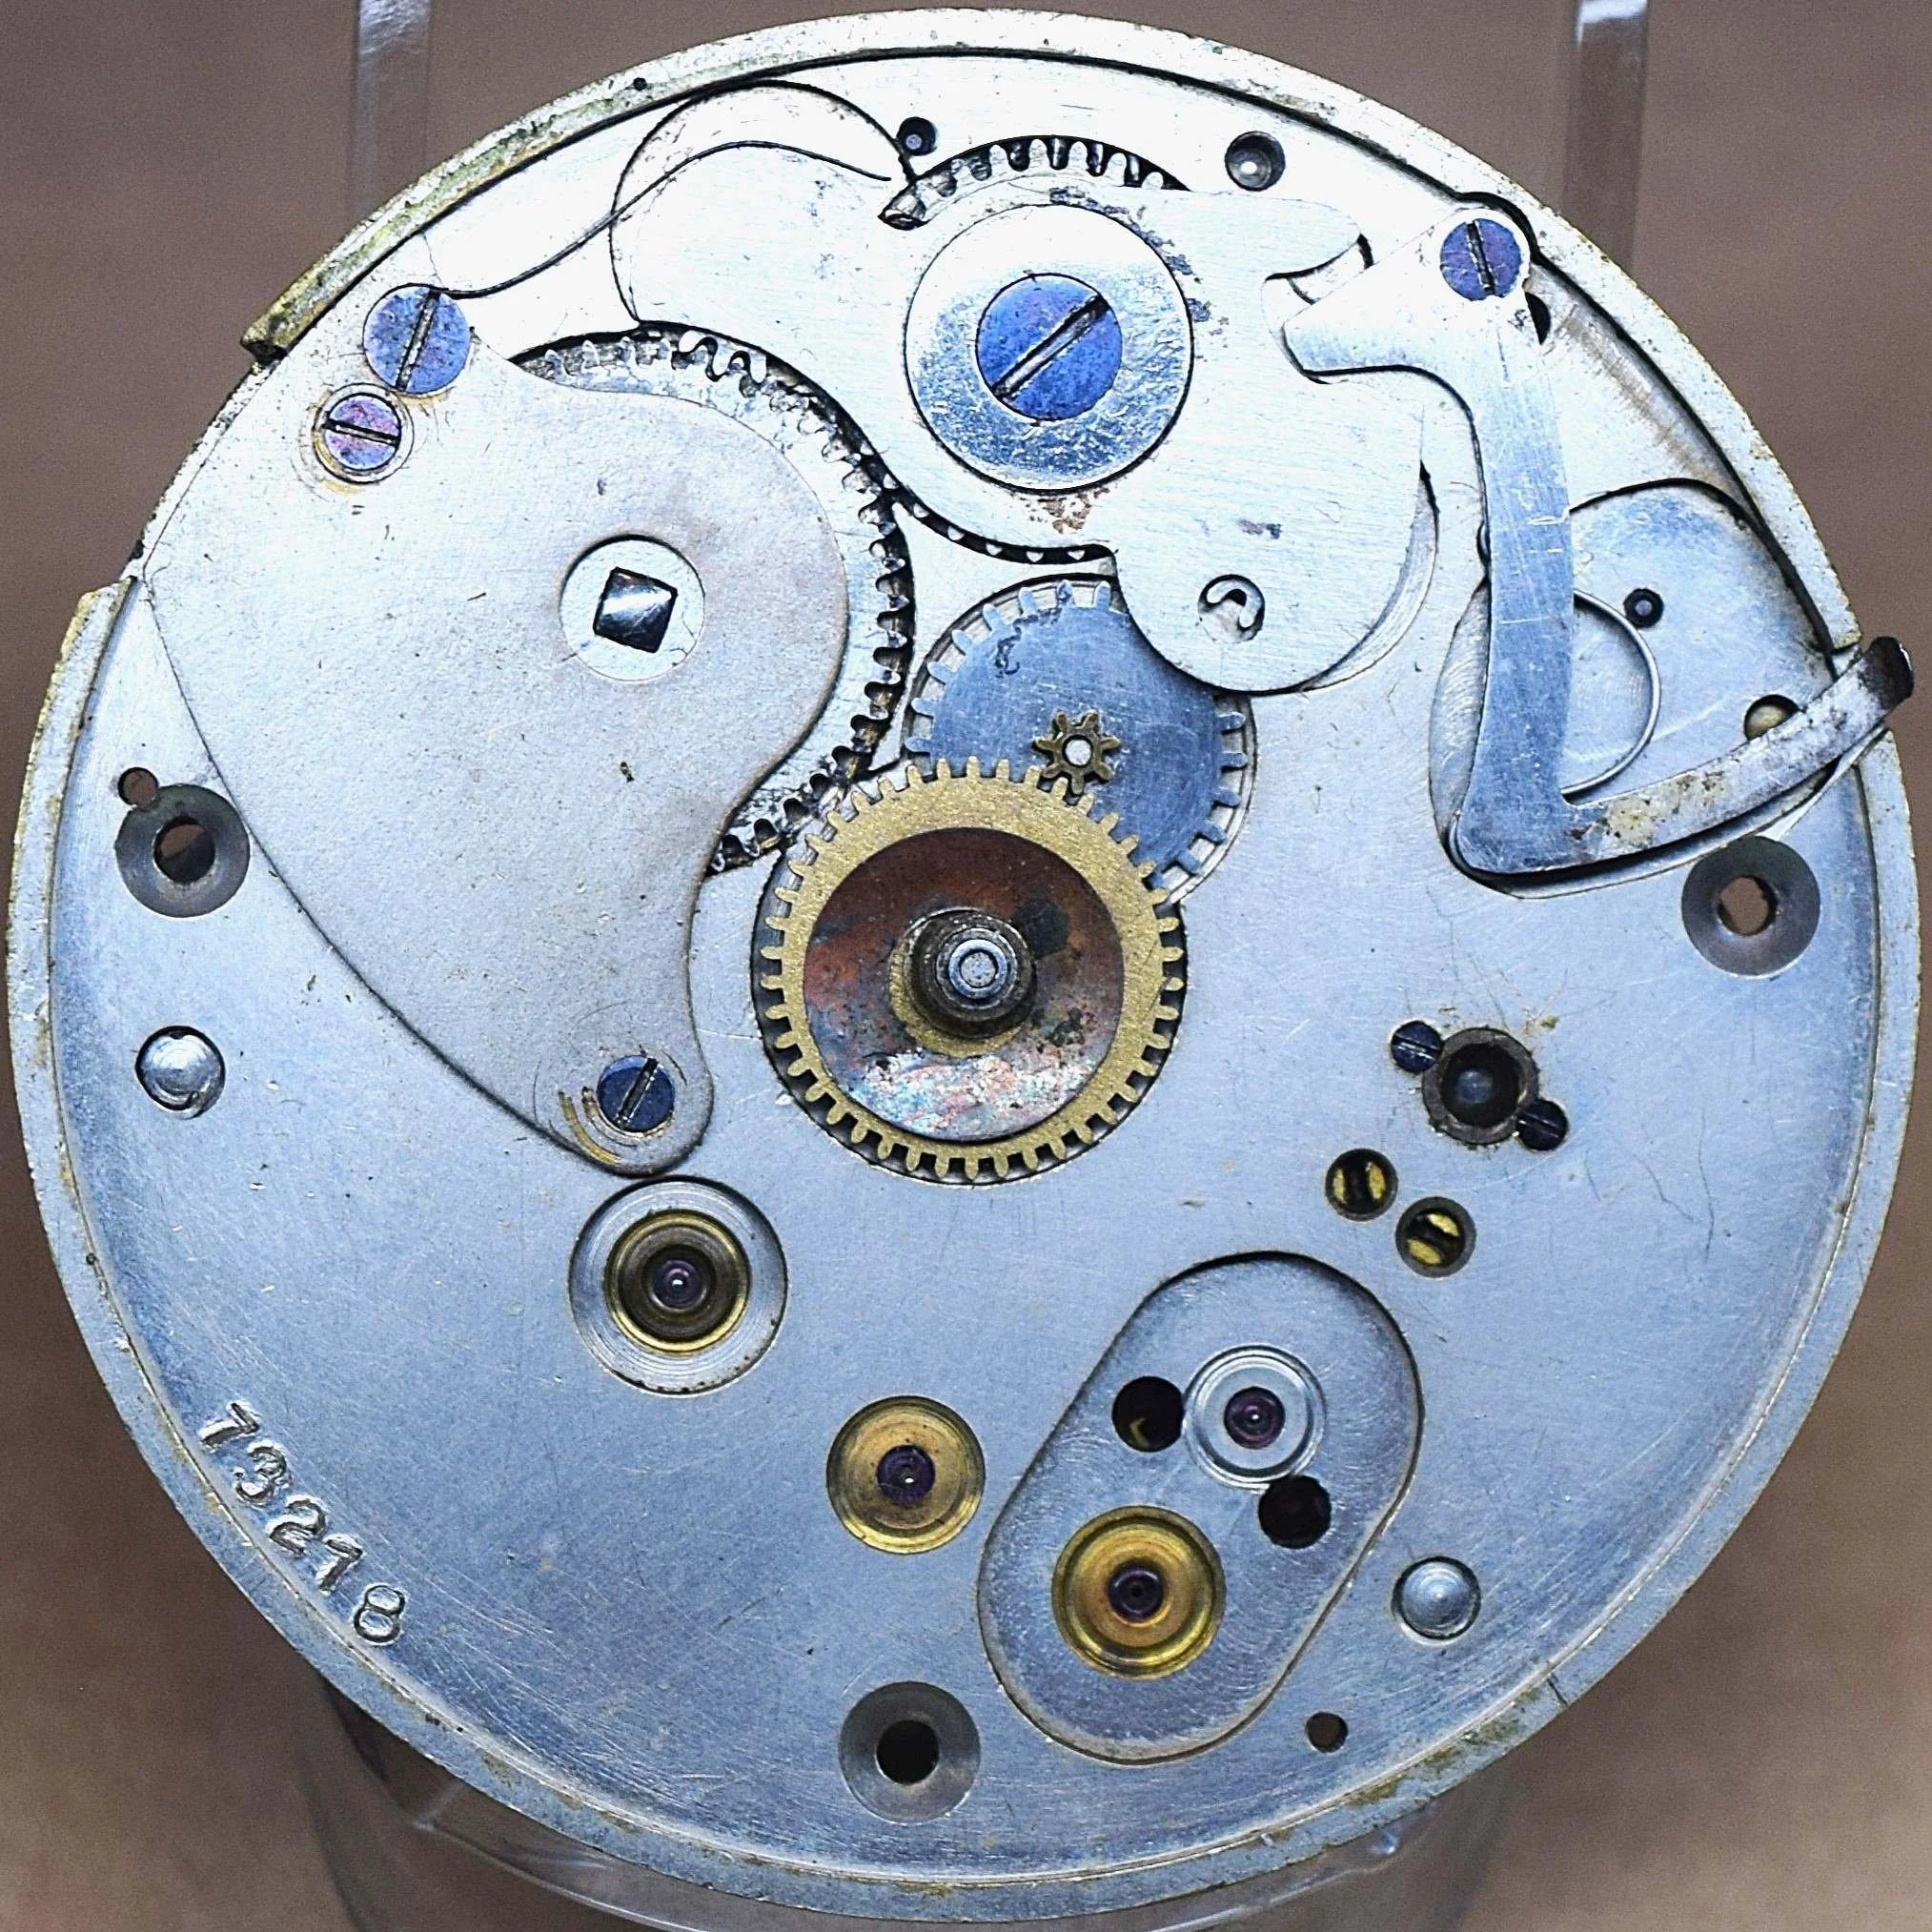
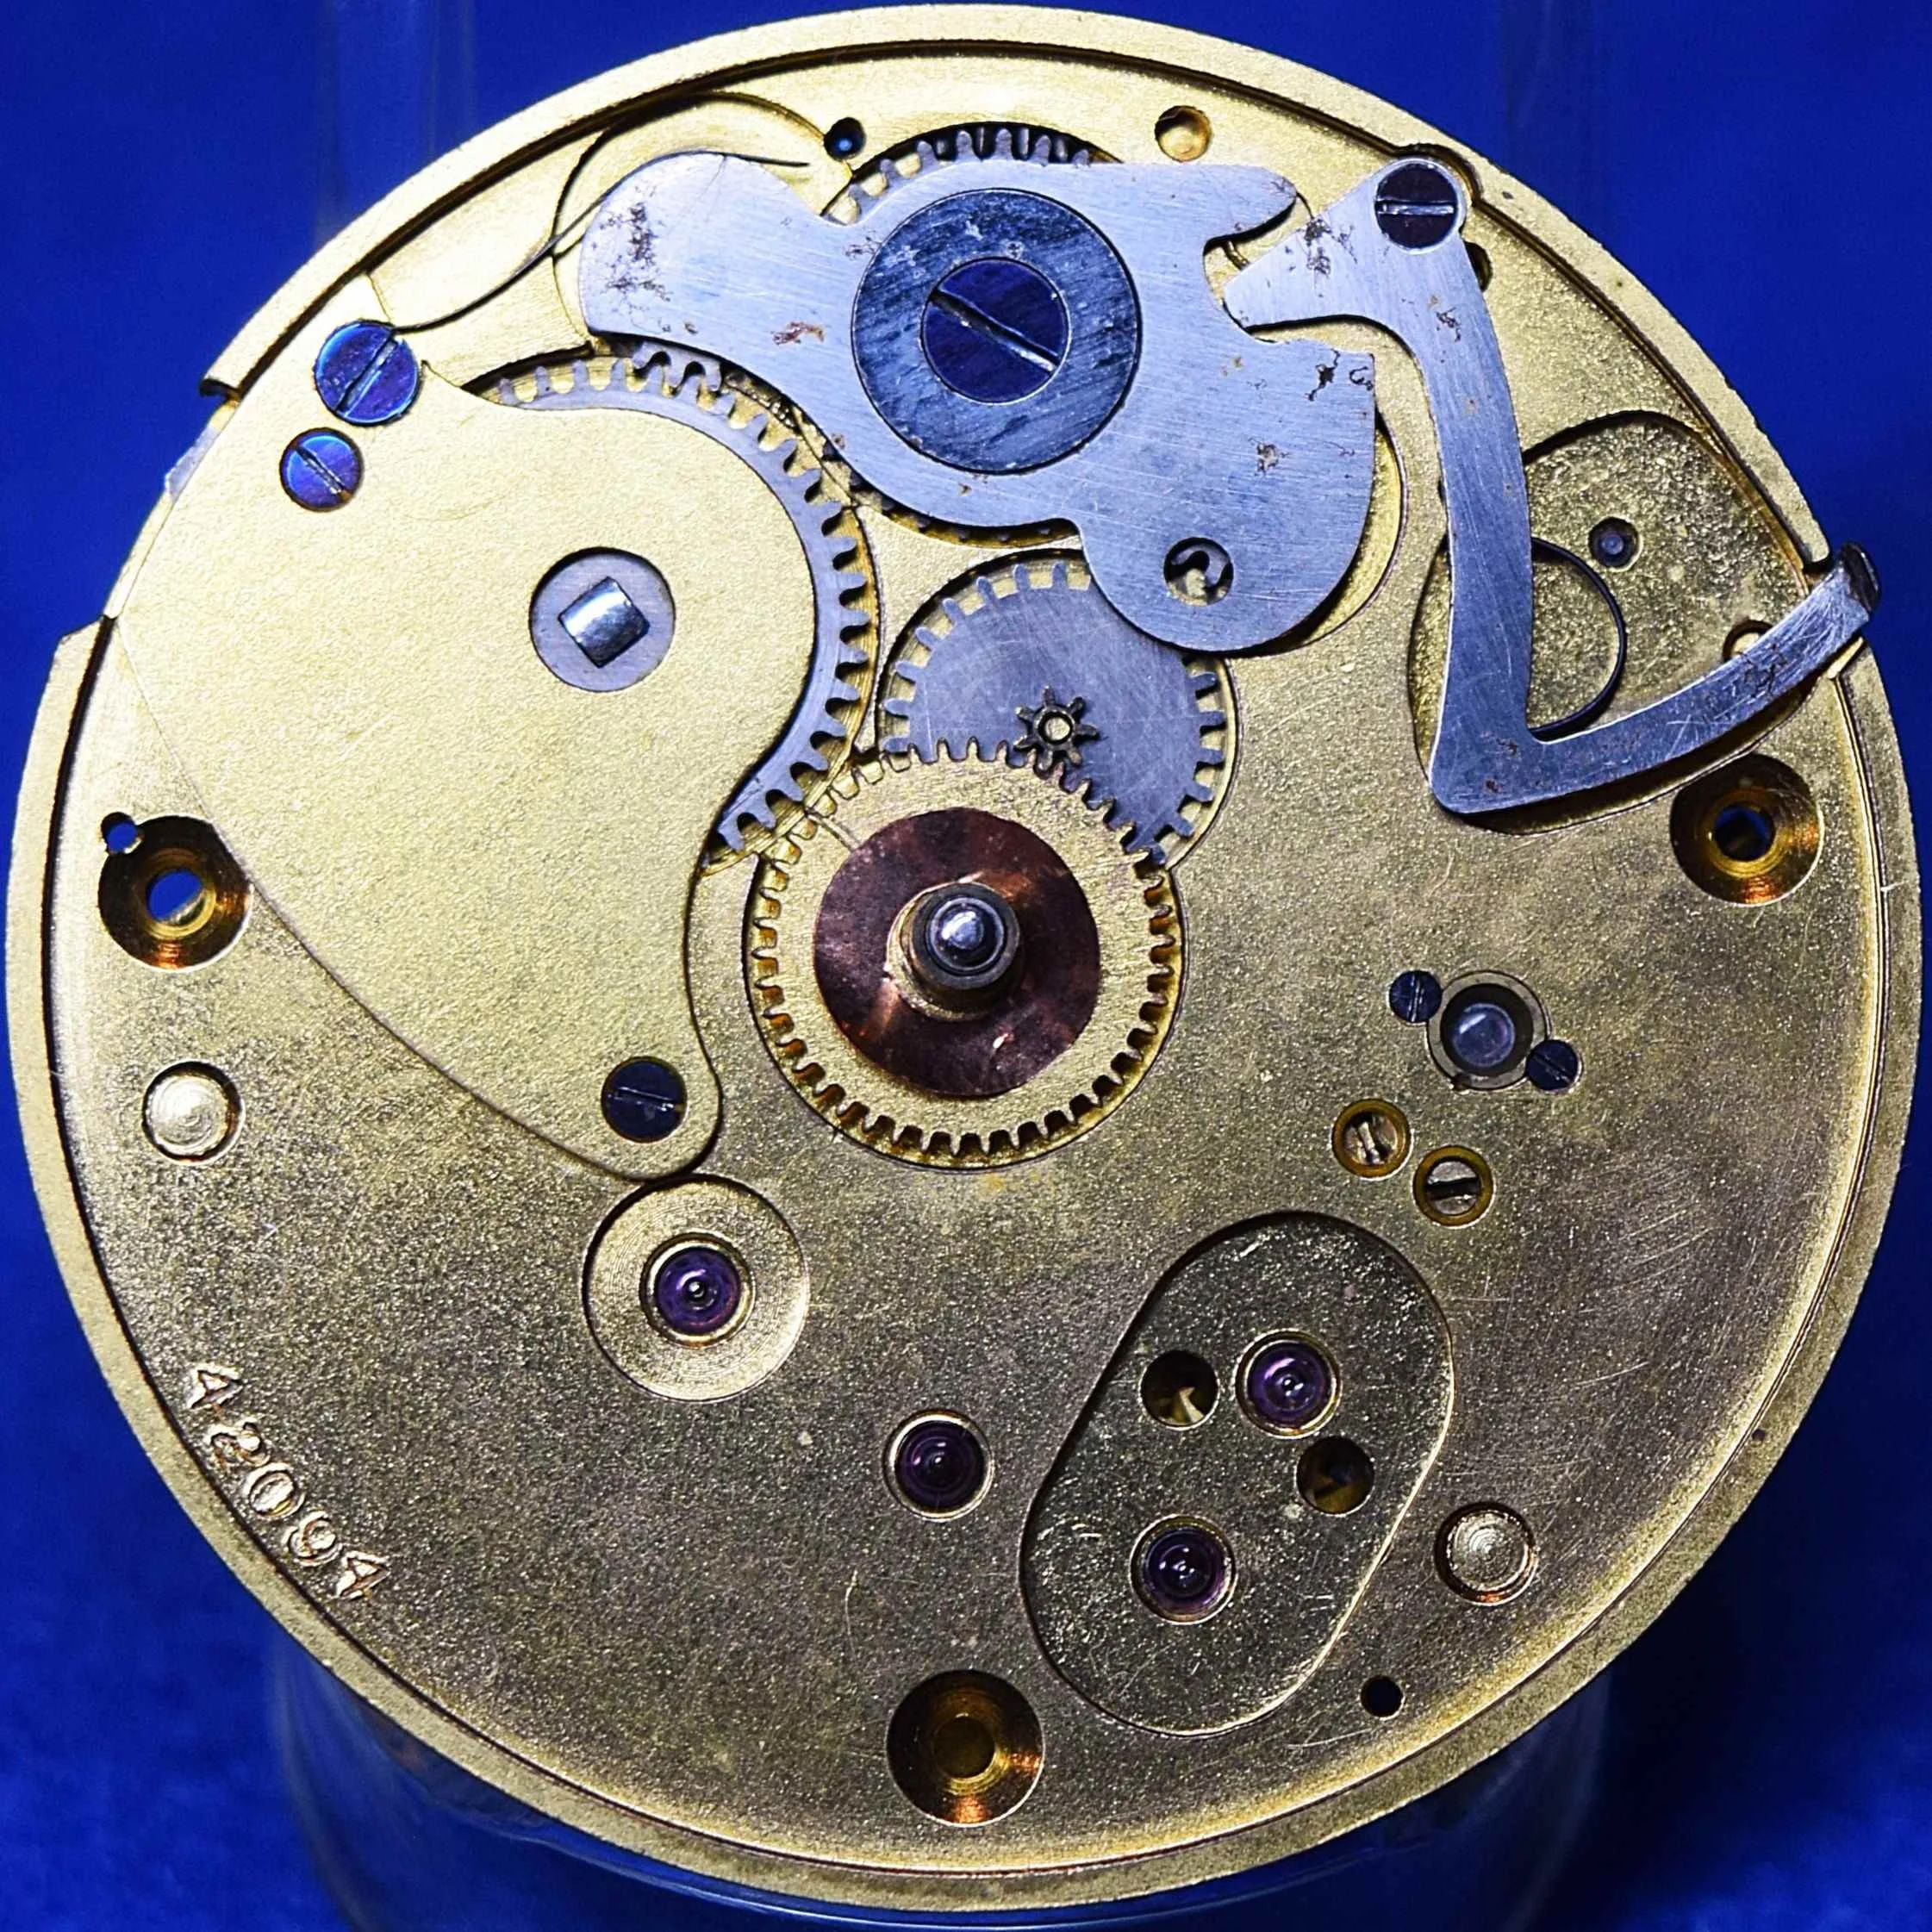
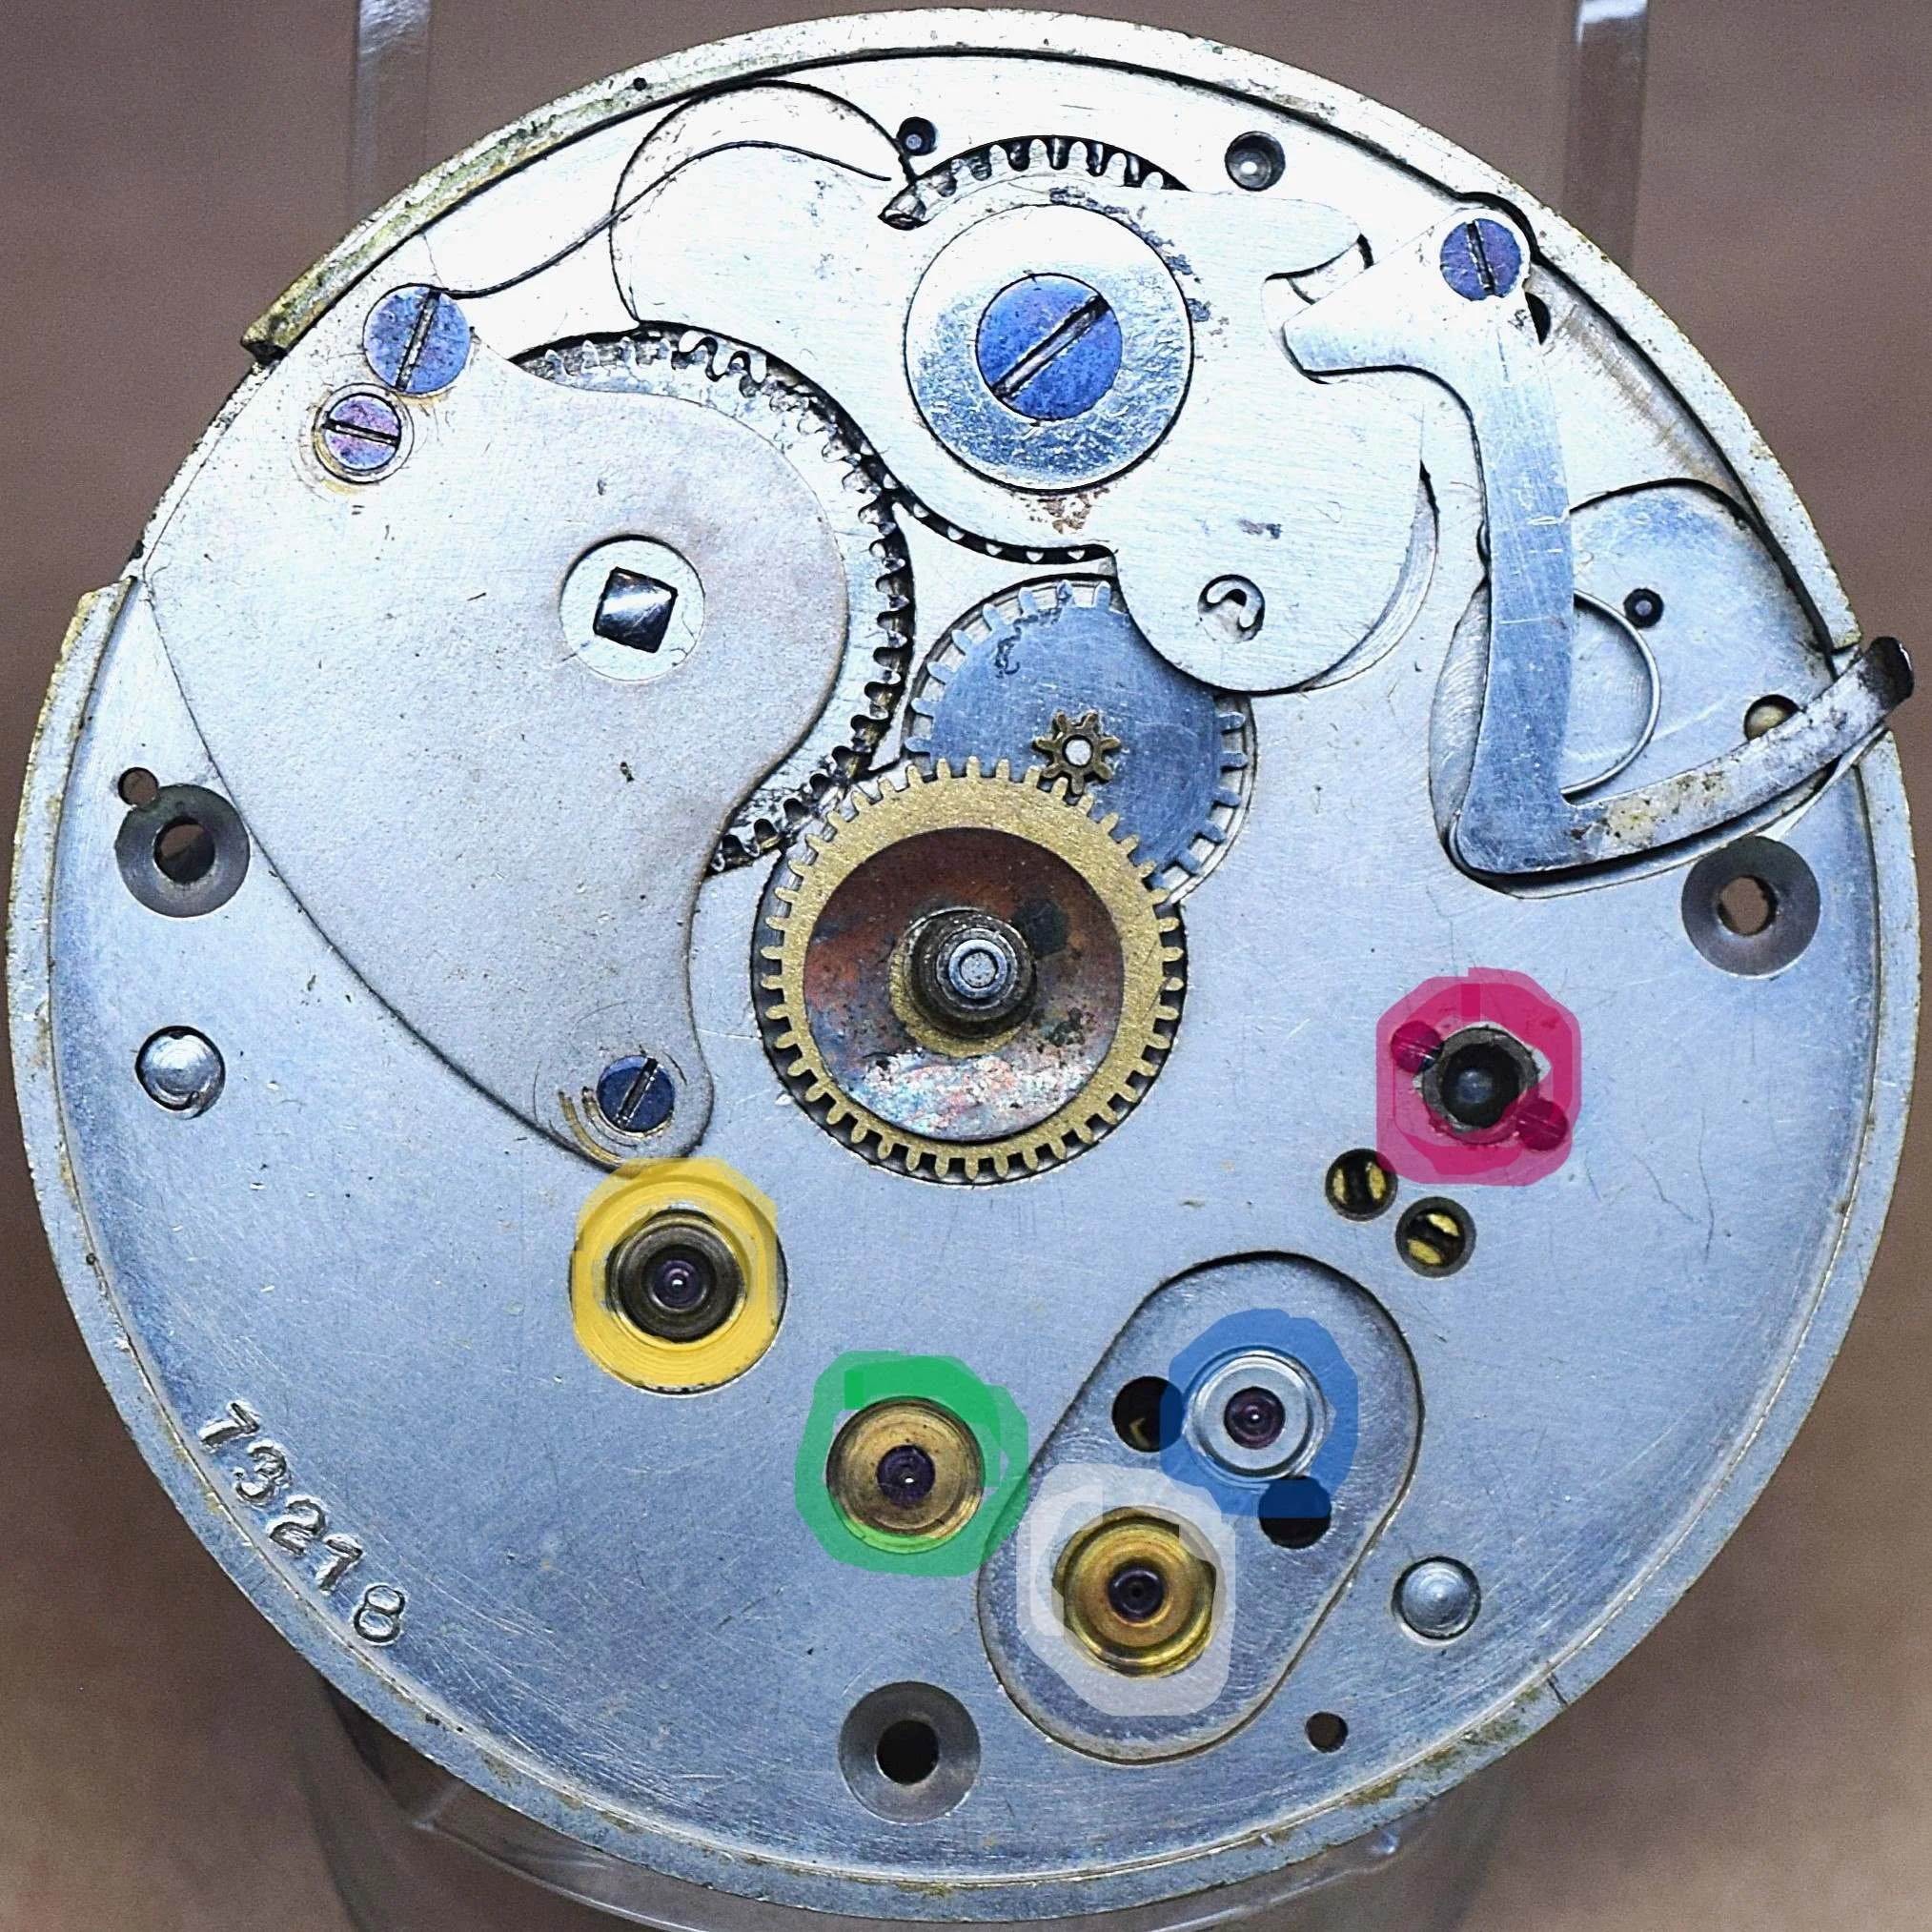
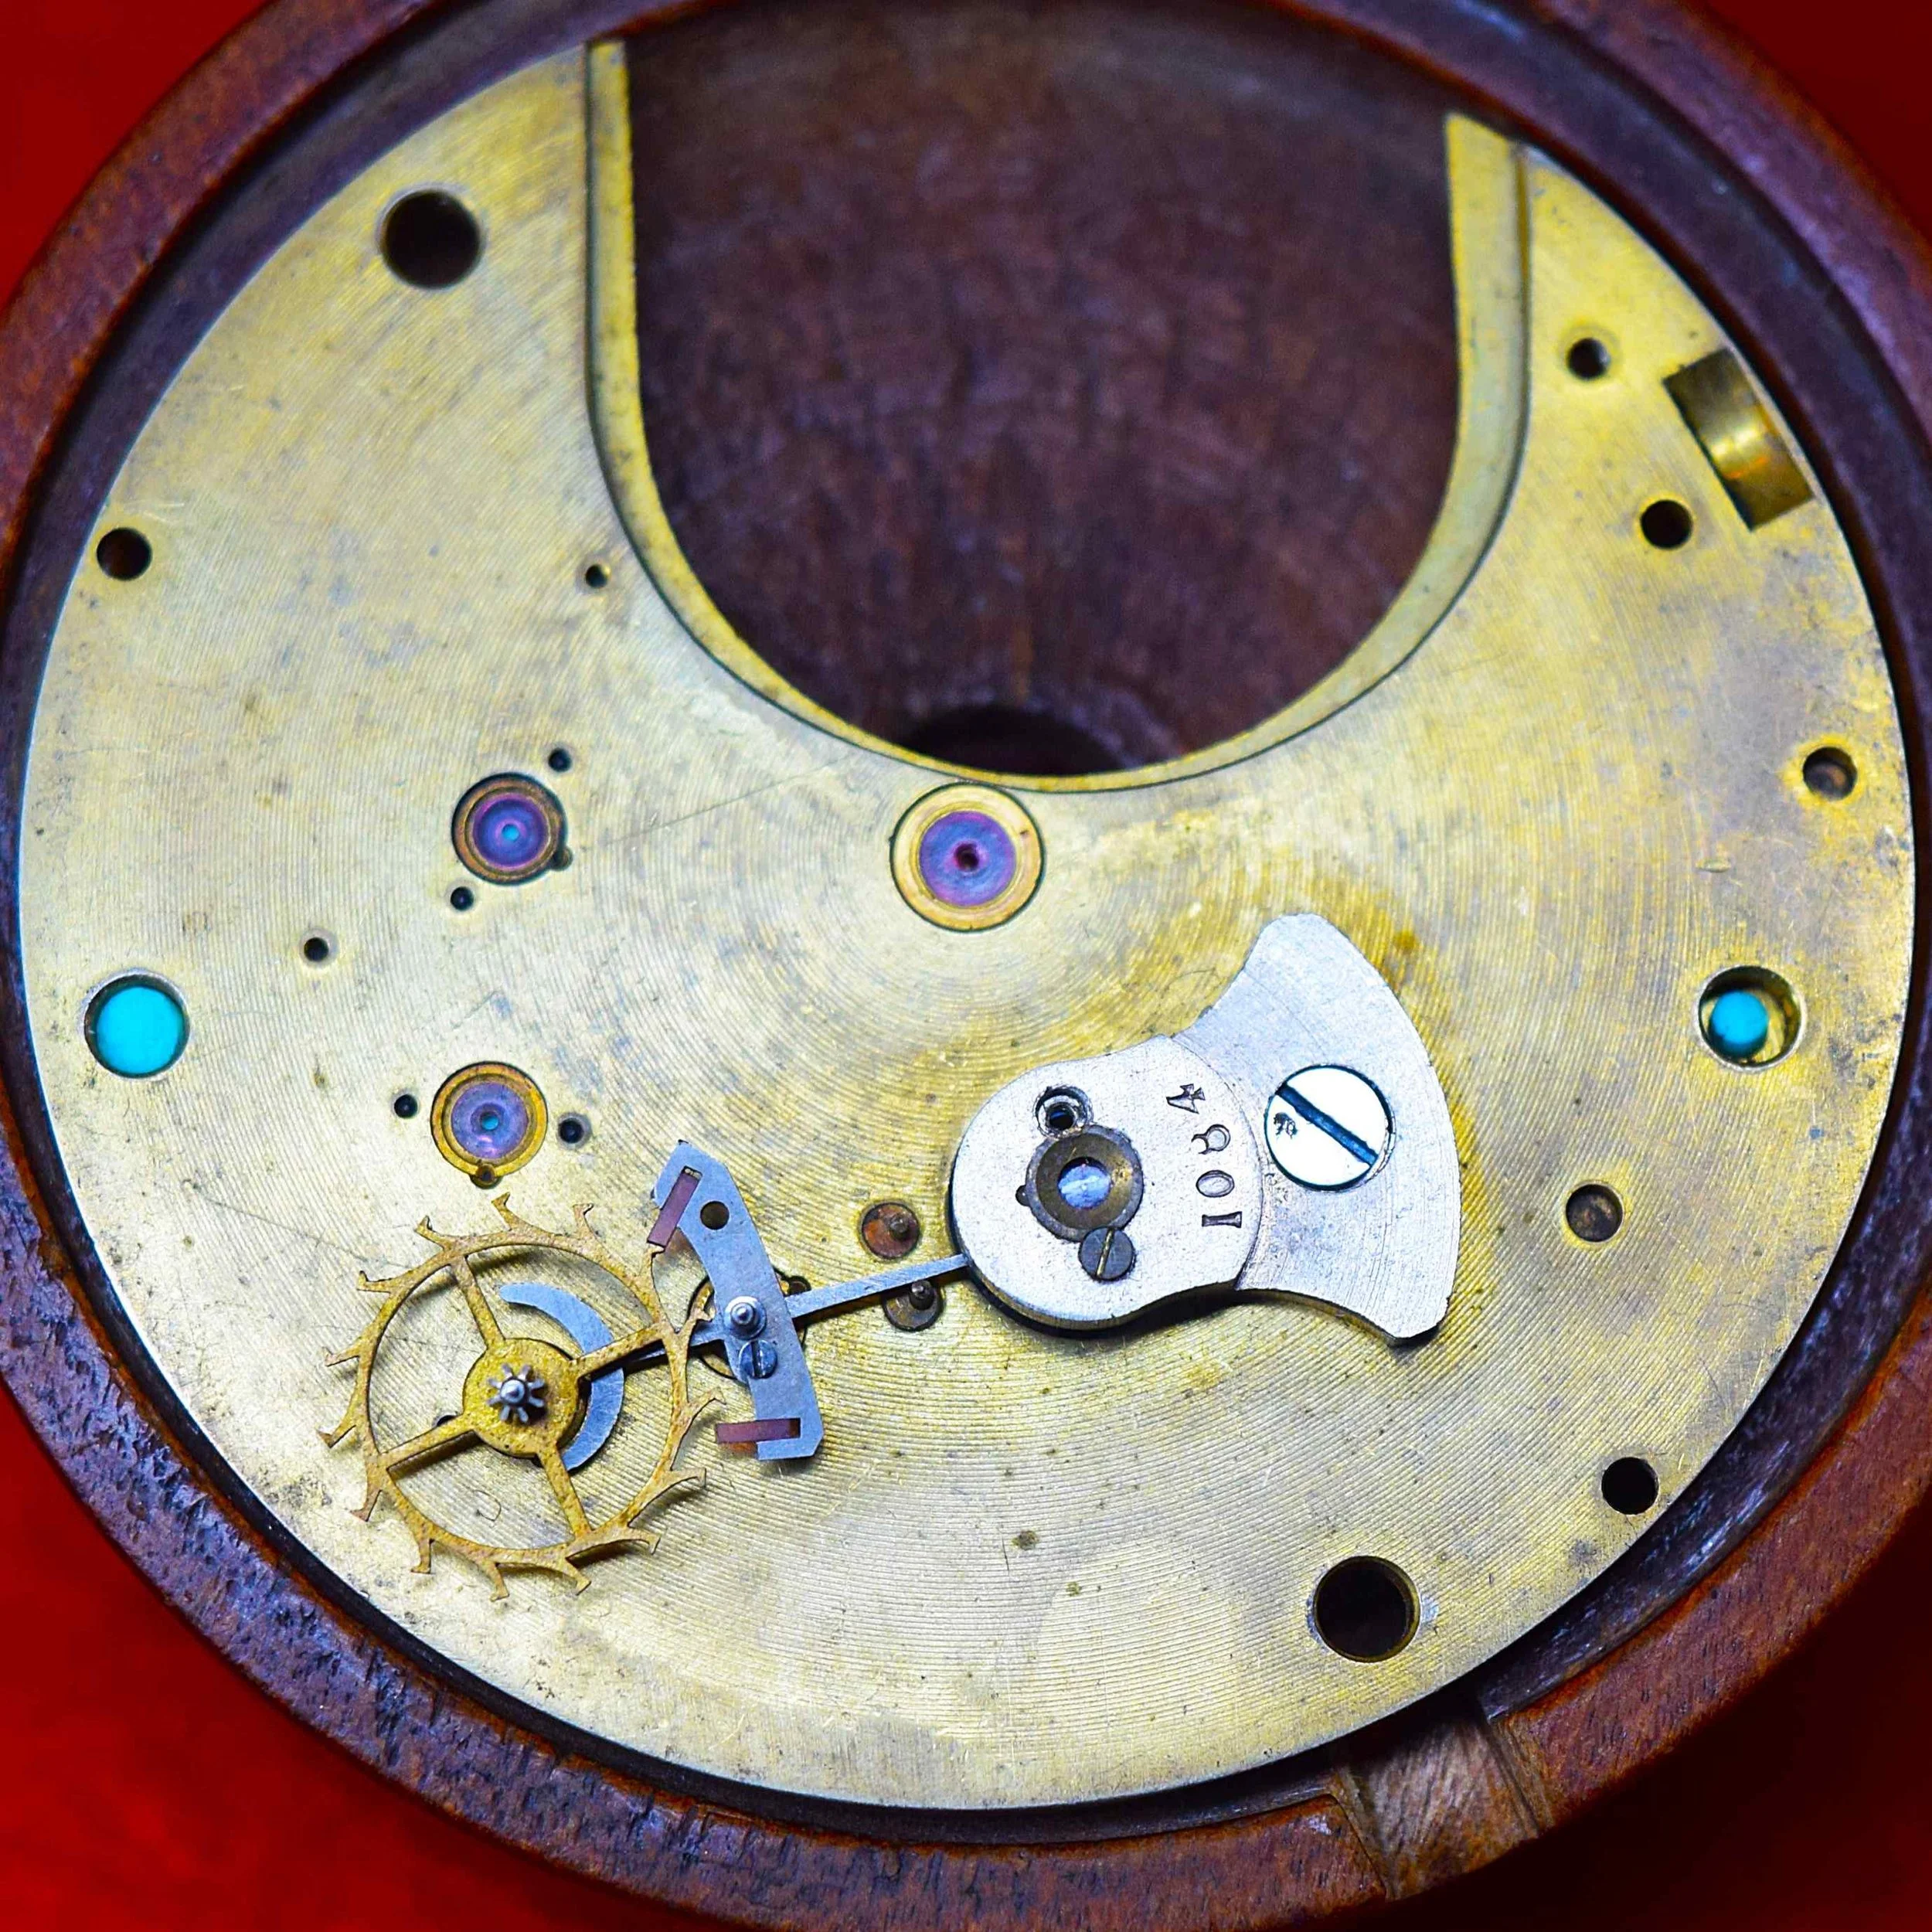
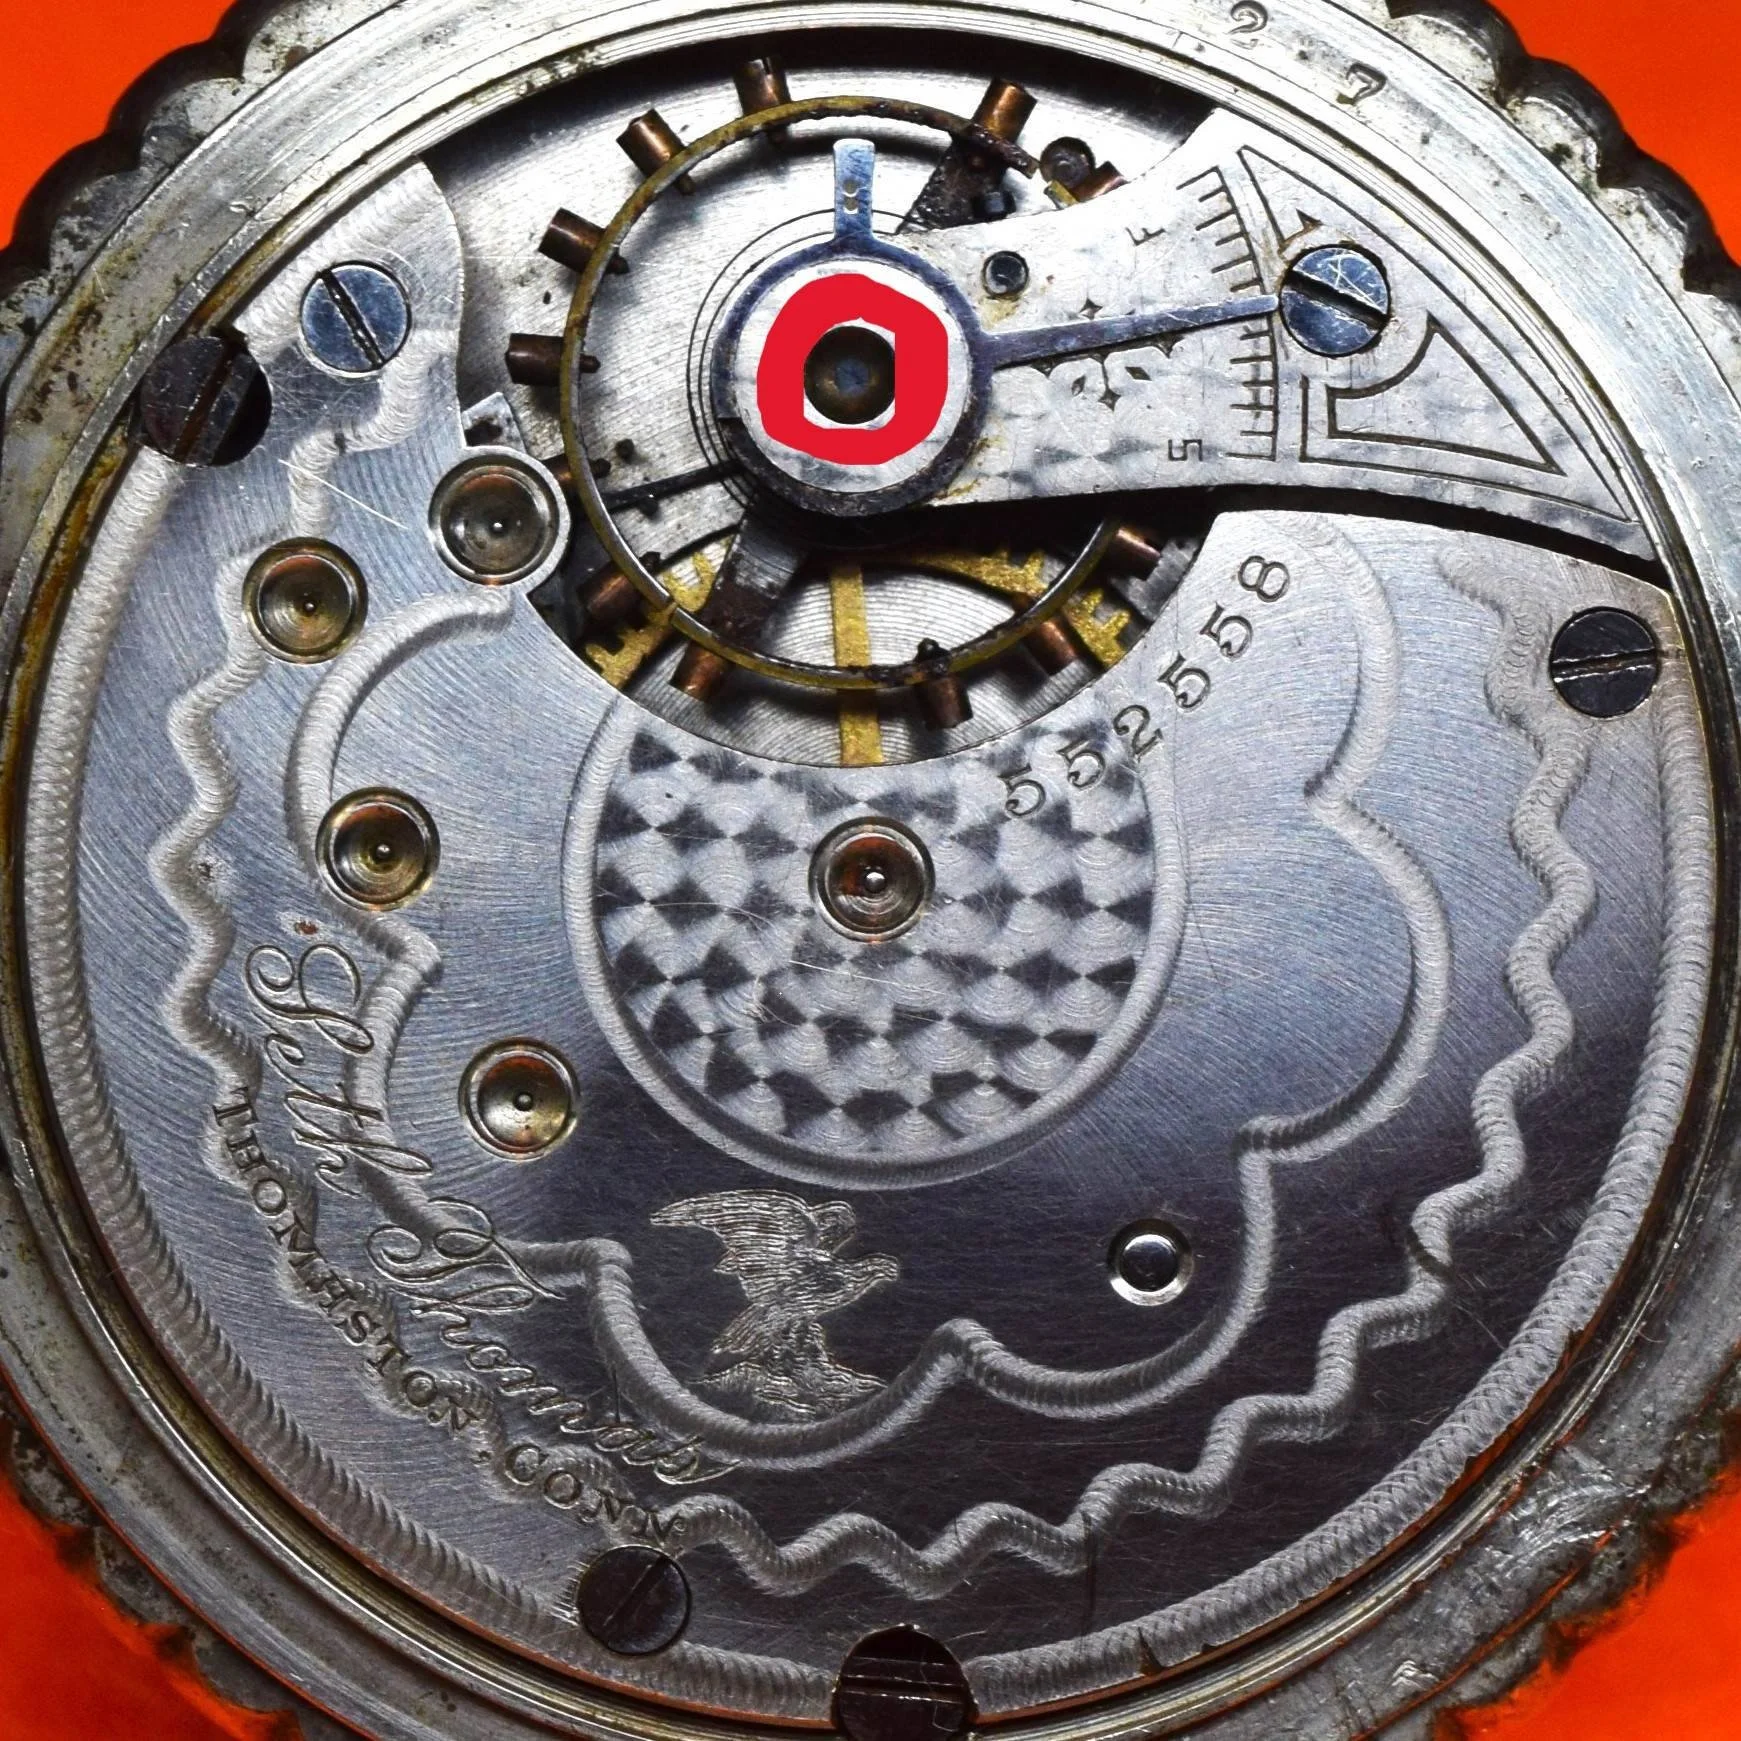
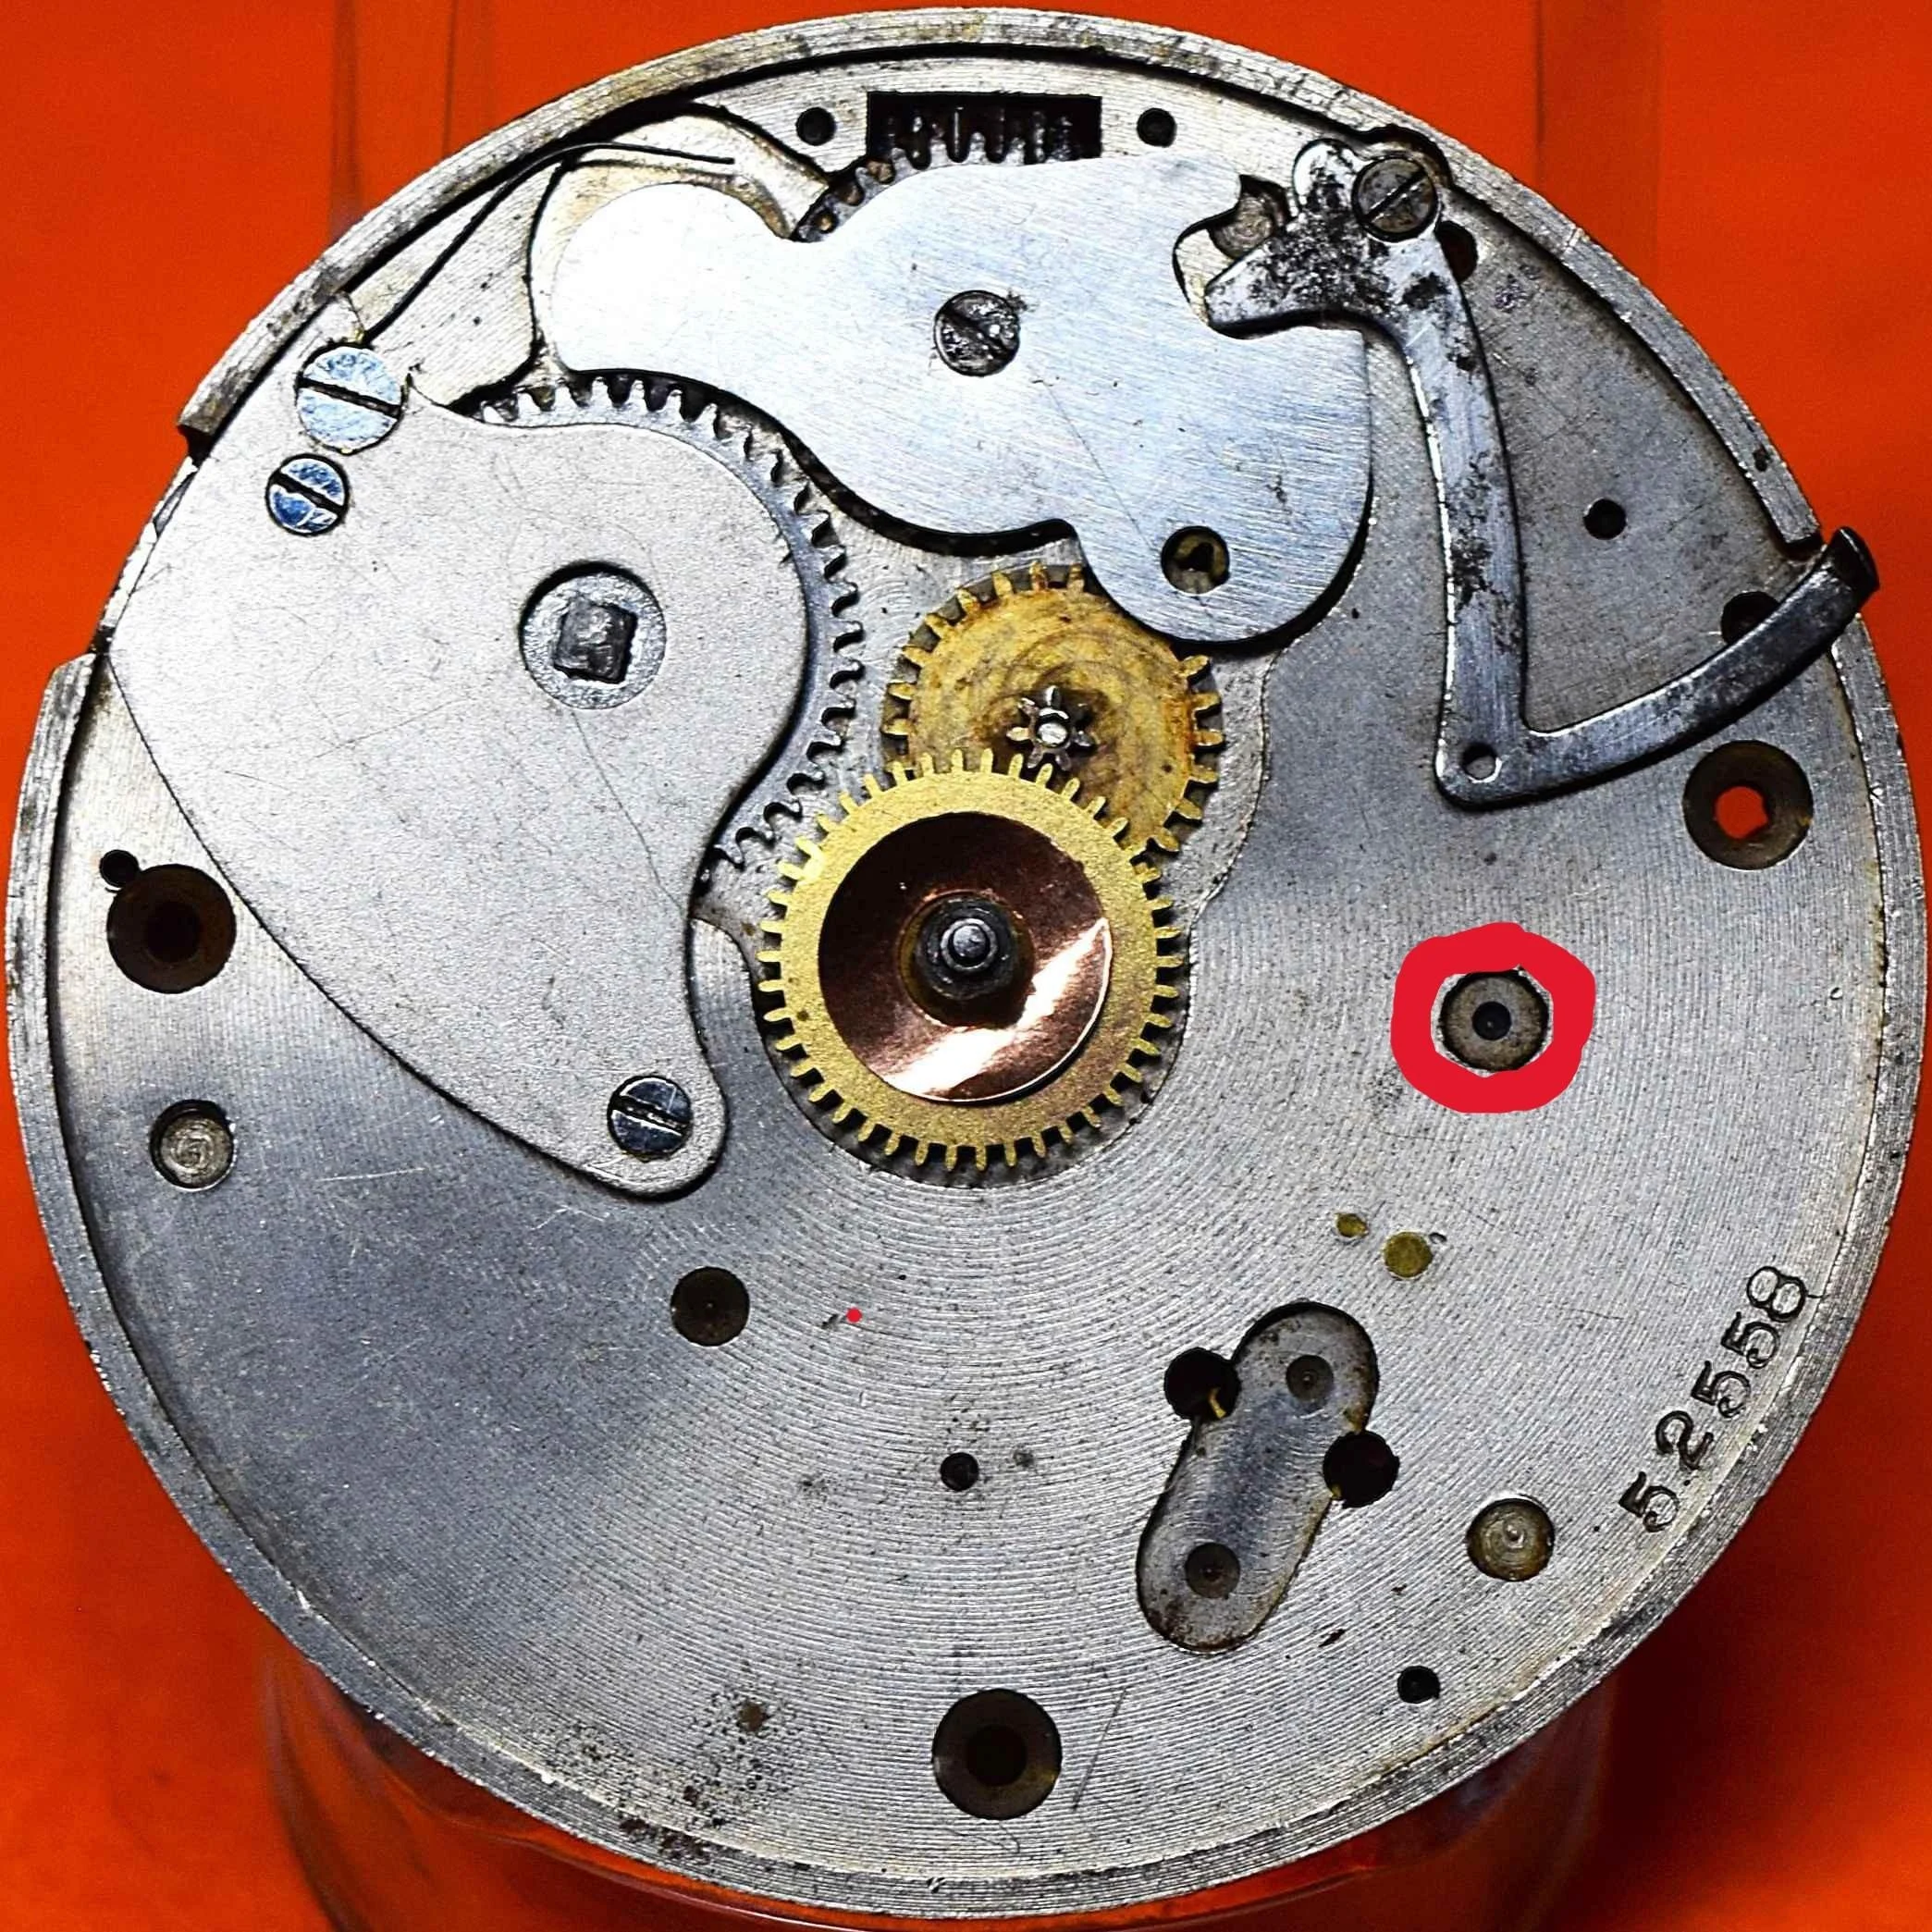
The two images below show the 11-jewel movement with its eight visible jewels highlighted.
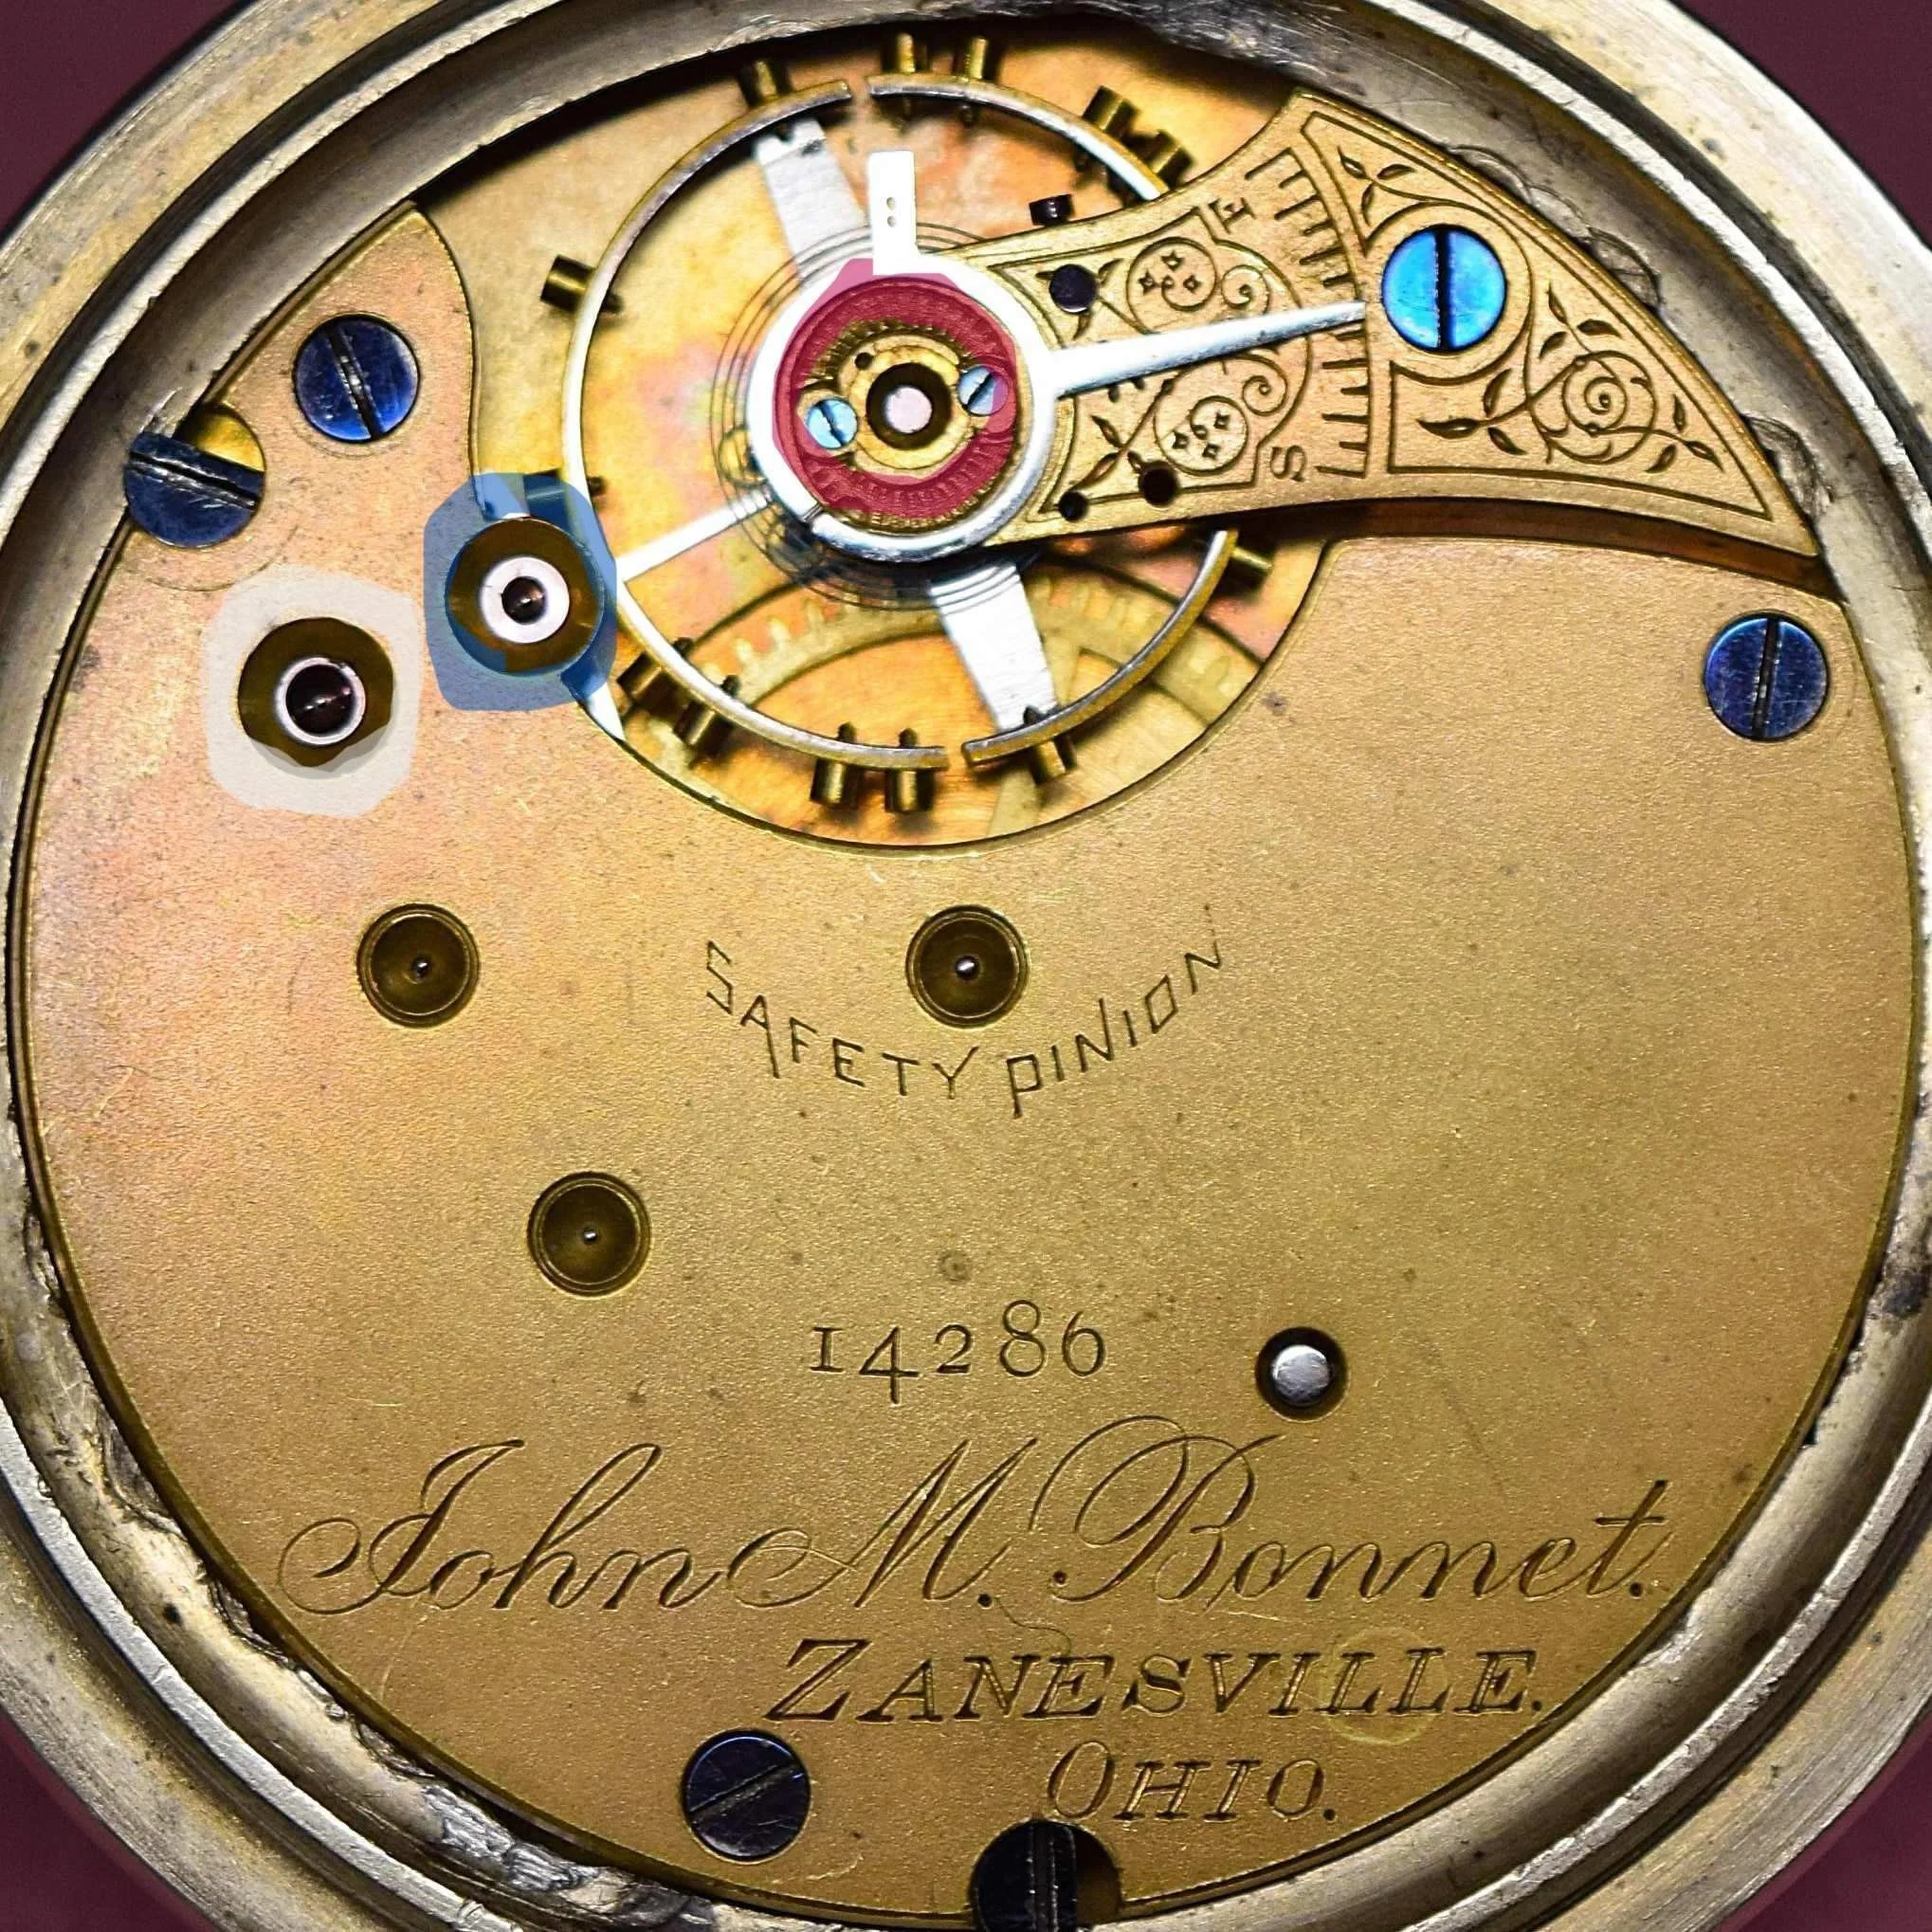
The image on the left, the Top Plate, shows the balance staff’s top cap stone/jewel, which is protecting the balance staff’s top jewel (hole jewel) directly beneath it highlighted in red.
It shows the top pallet jewel (hole jewel) highlighted in blue. The jewel reduces friction in the movement of the pallet fork that occurs with metal pivot passing through a metal bearing.
The image also shows the top escape wheel jewel (hole jewel) highlighted in white.

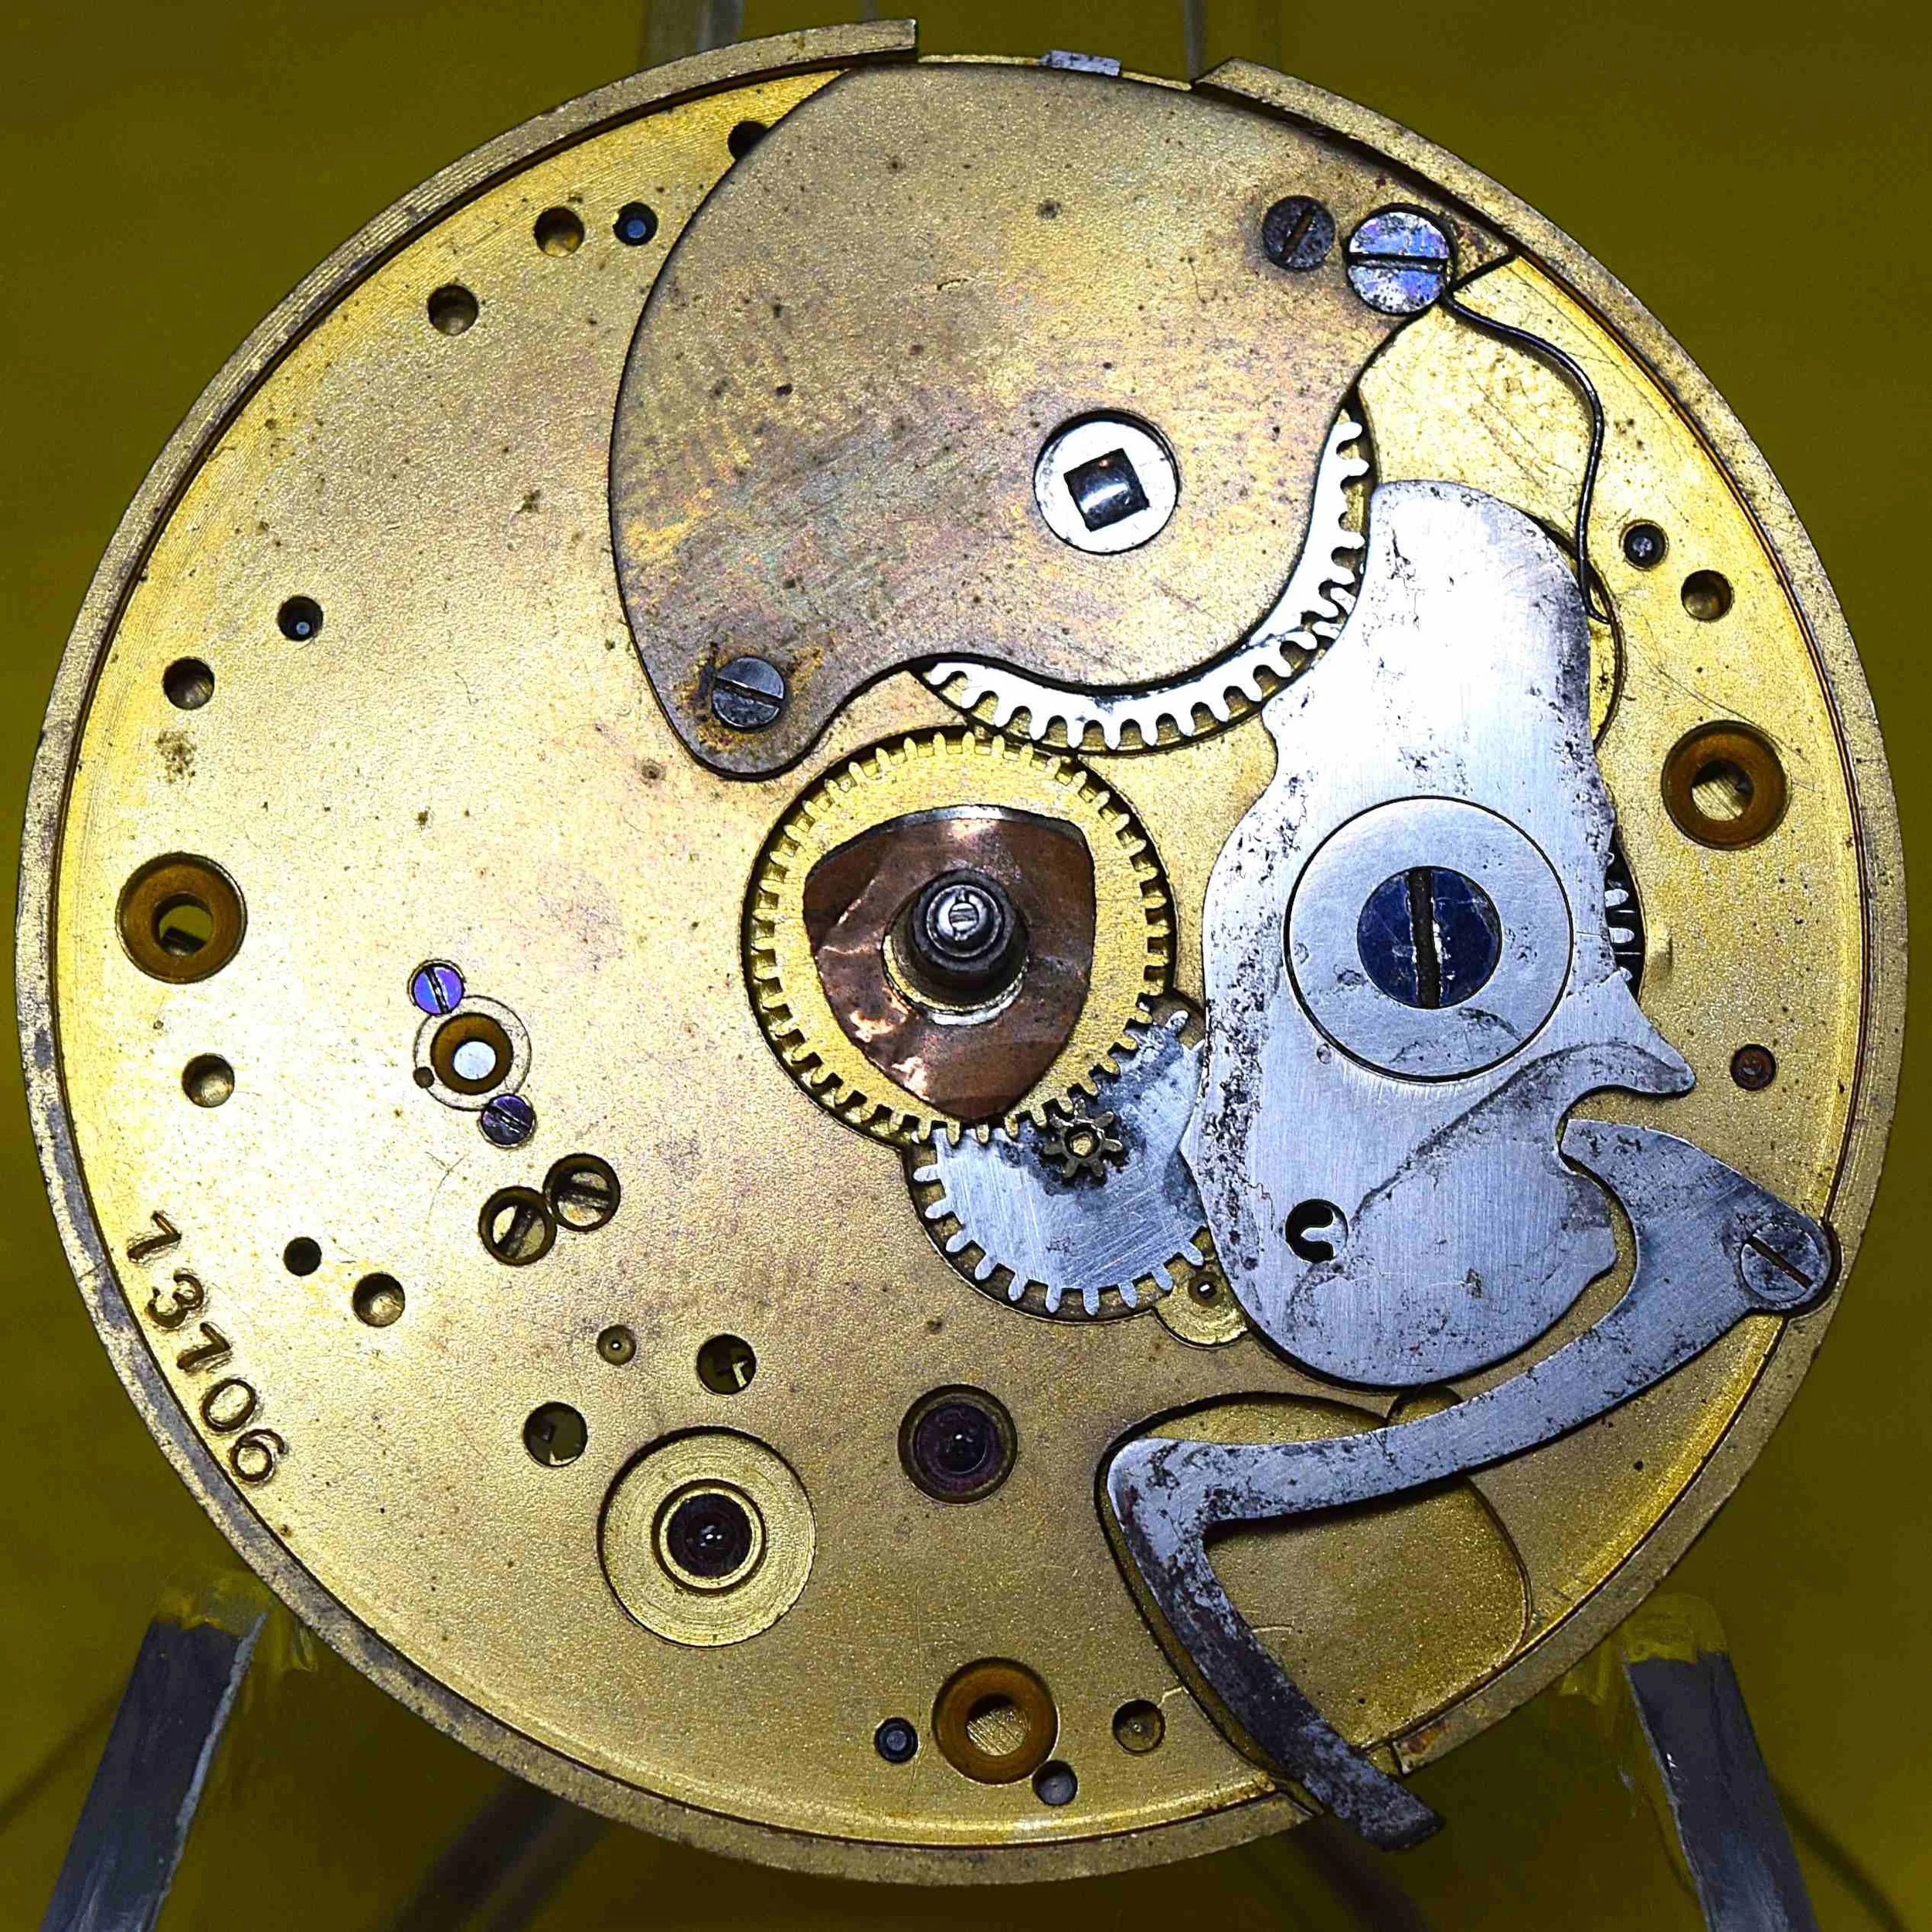
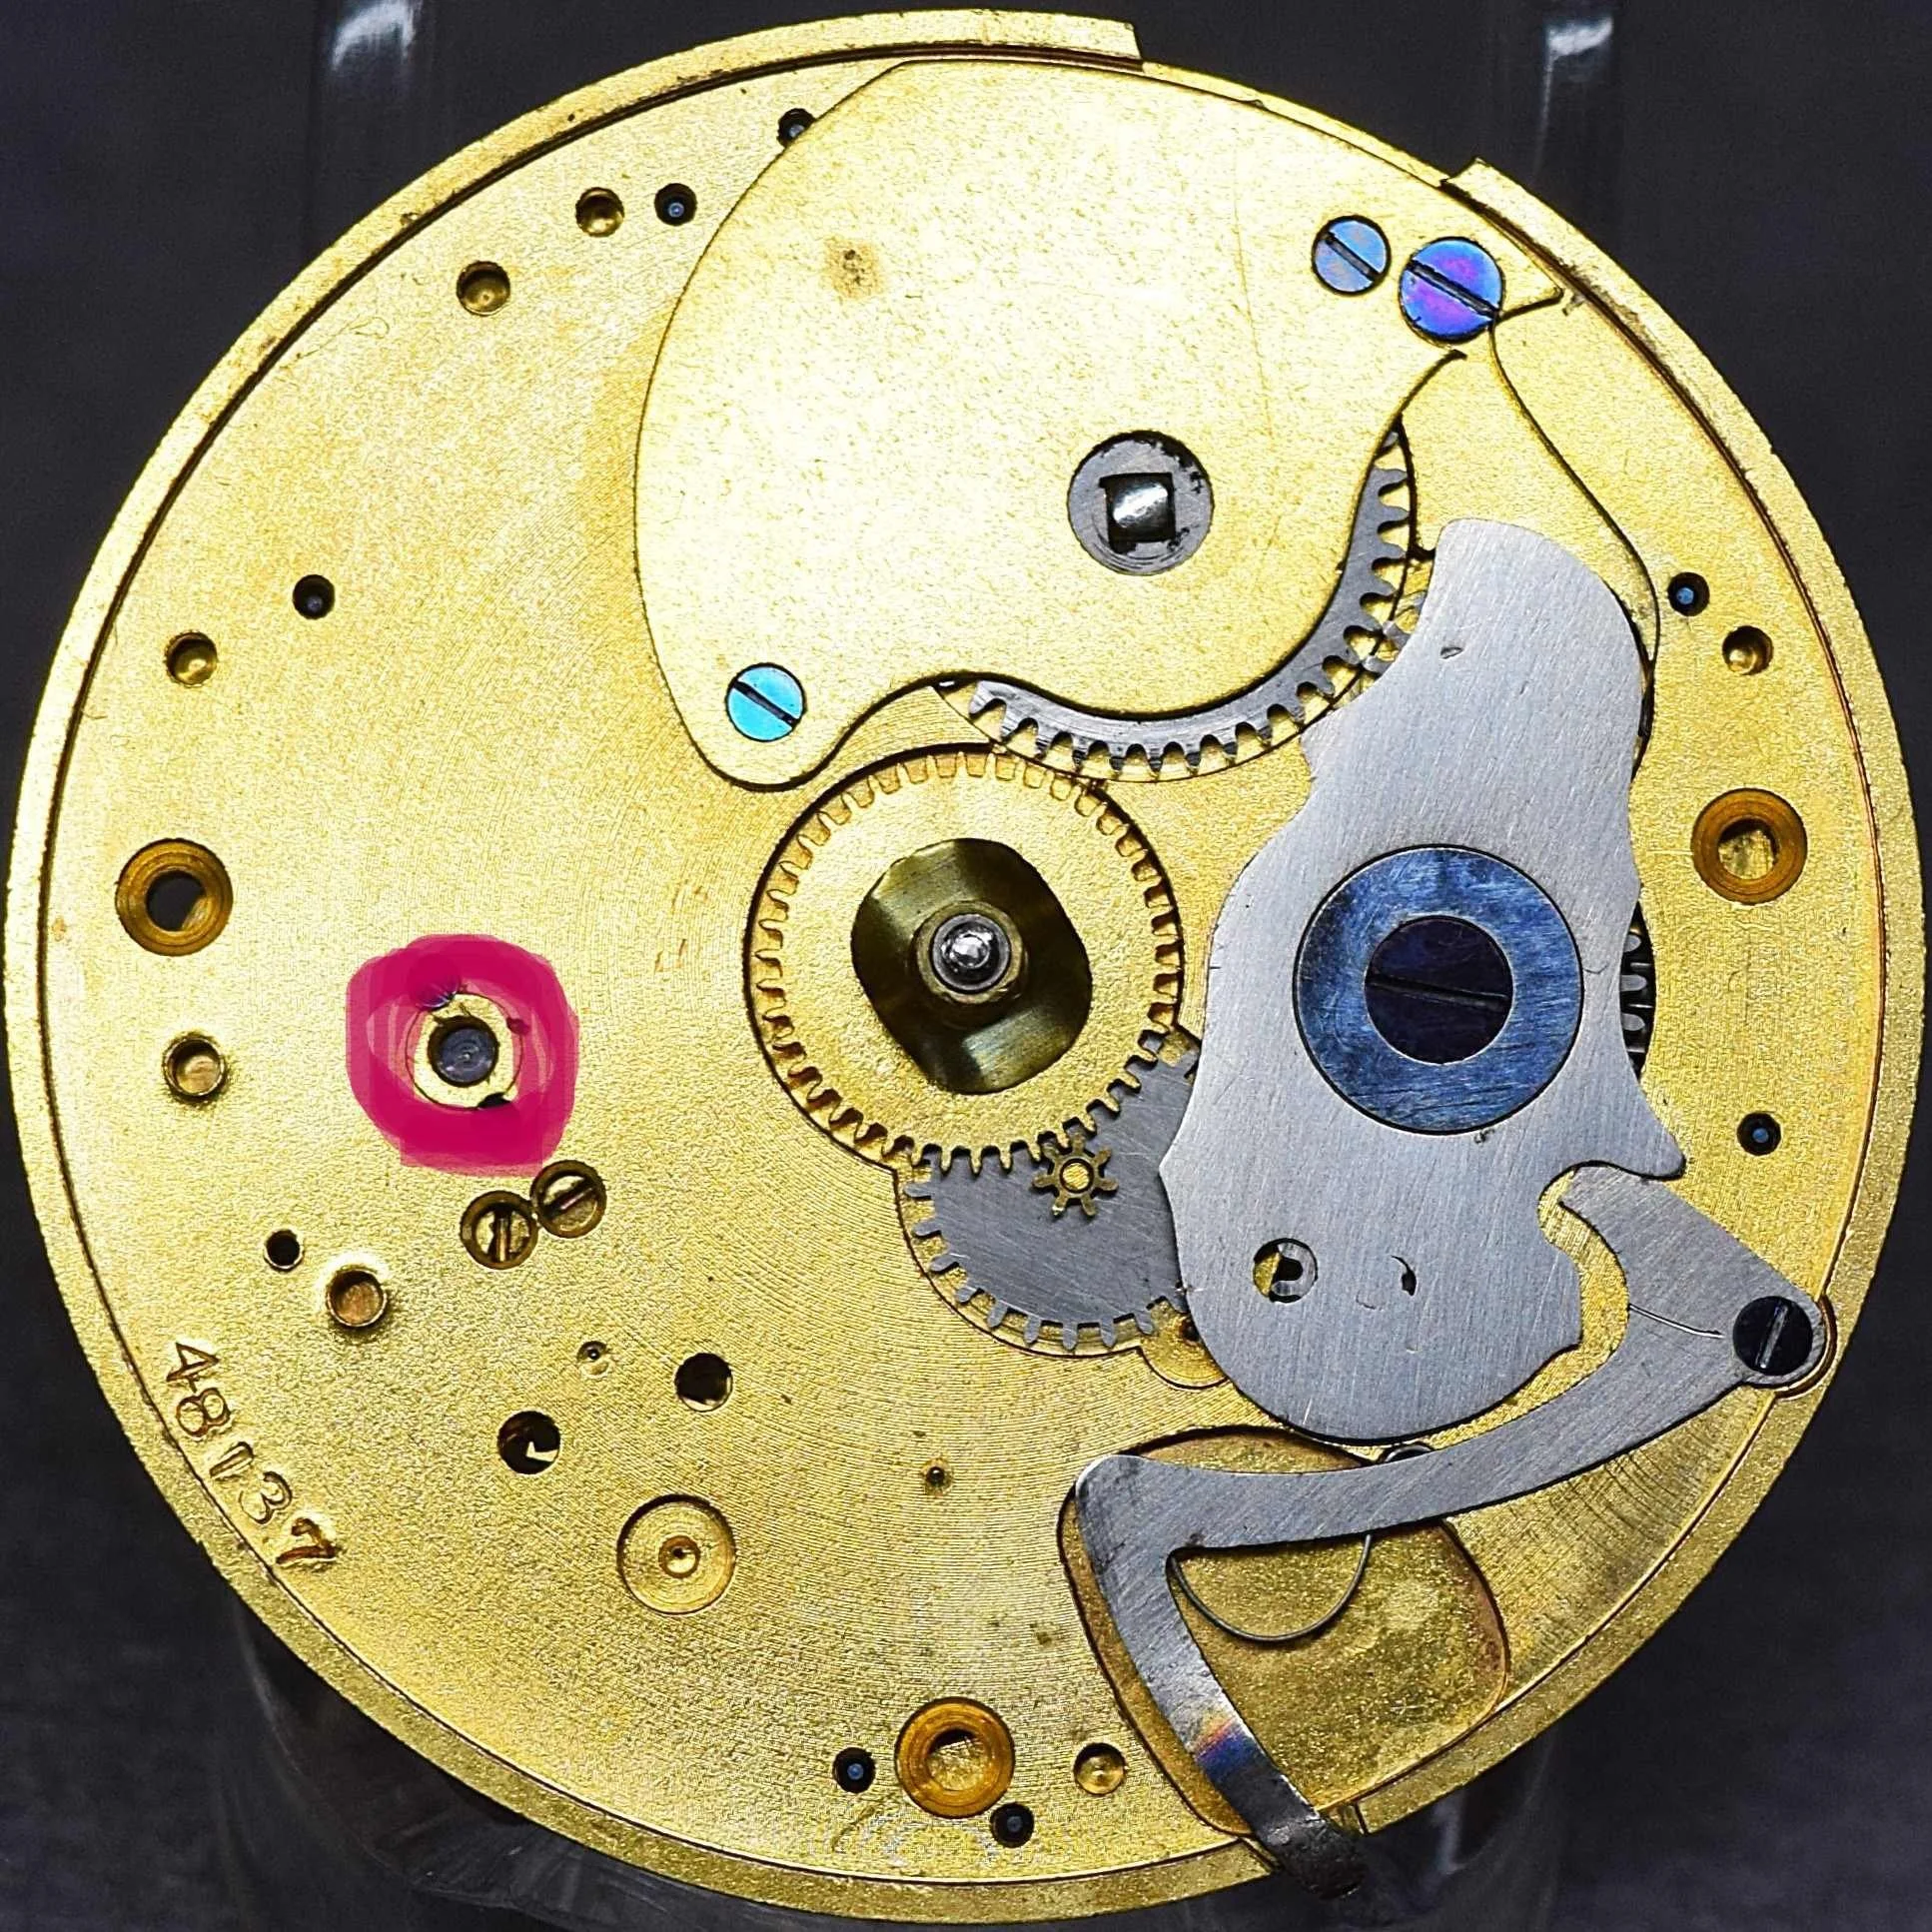
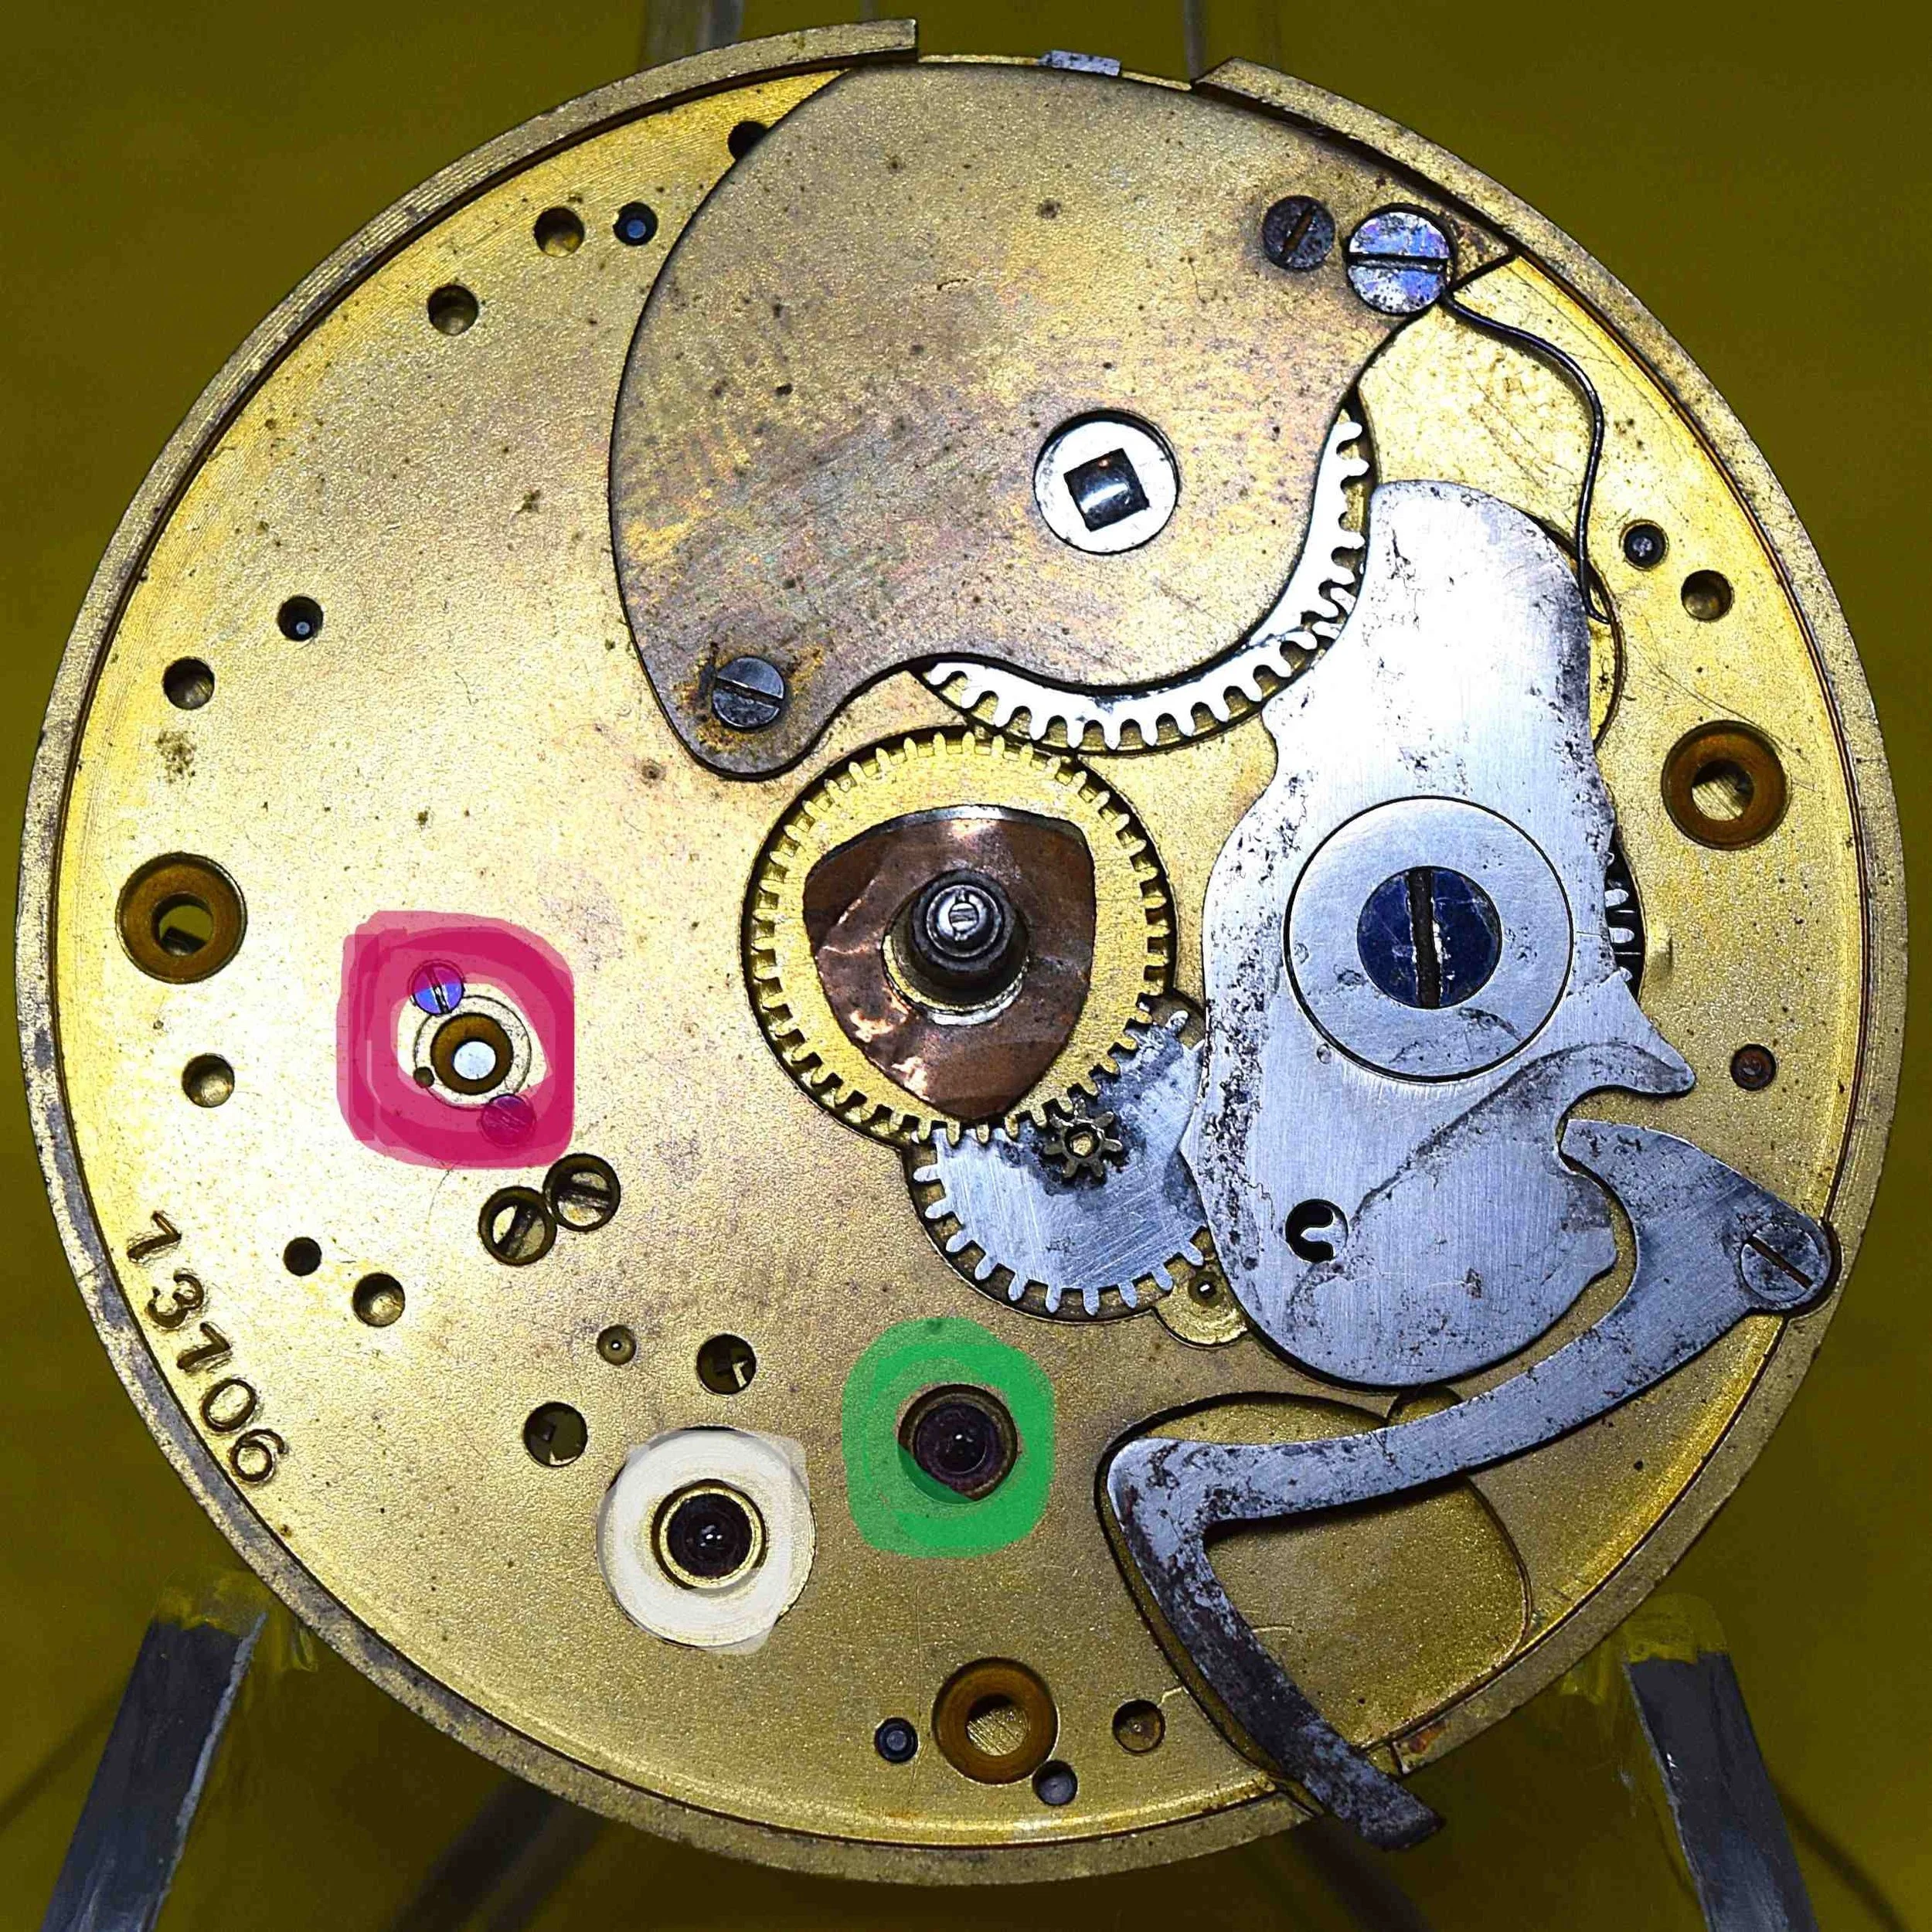
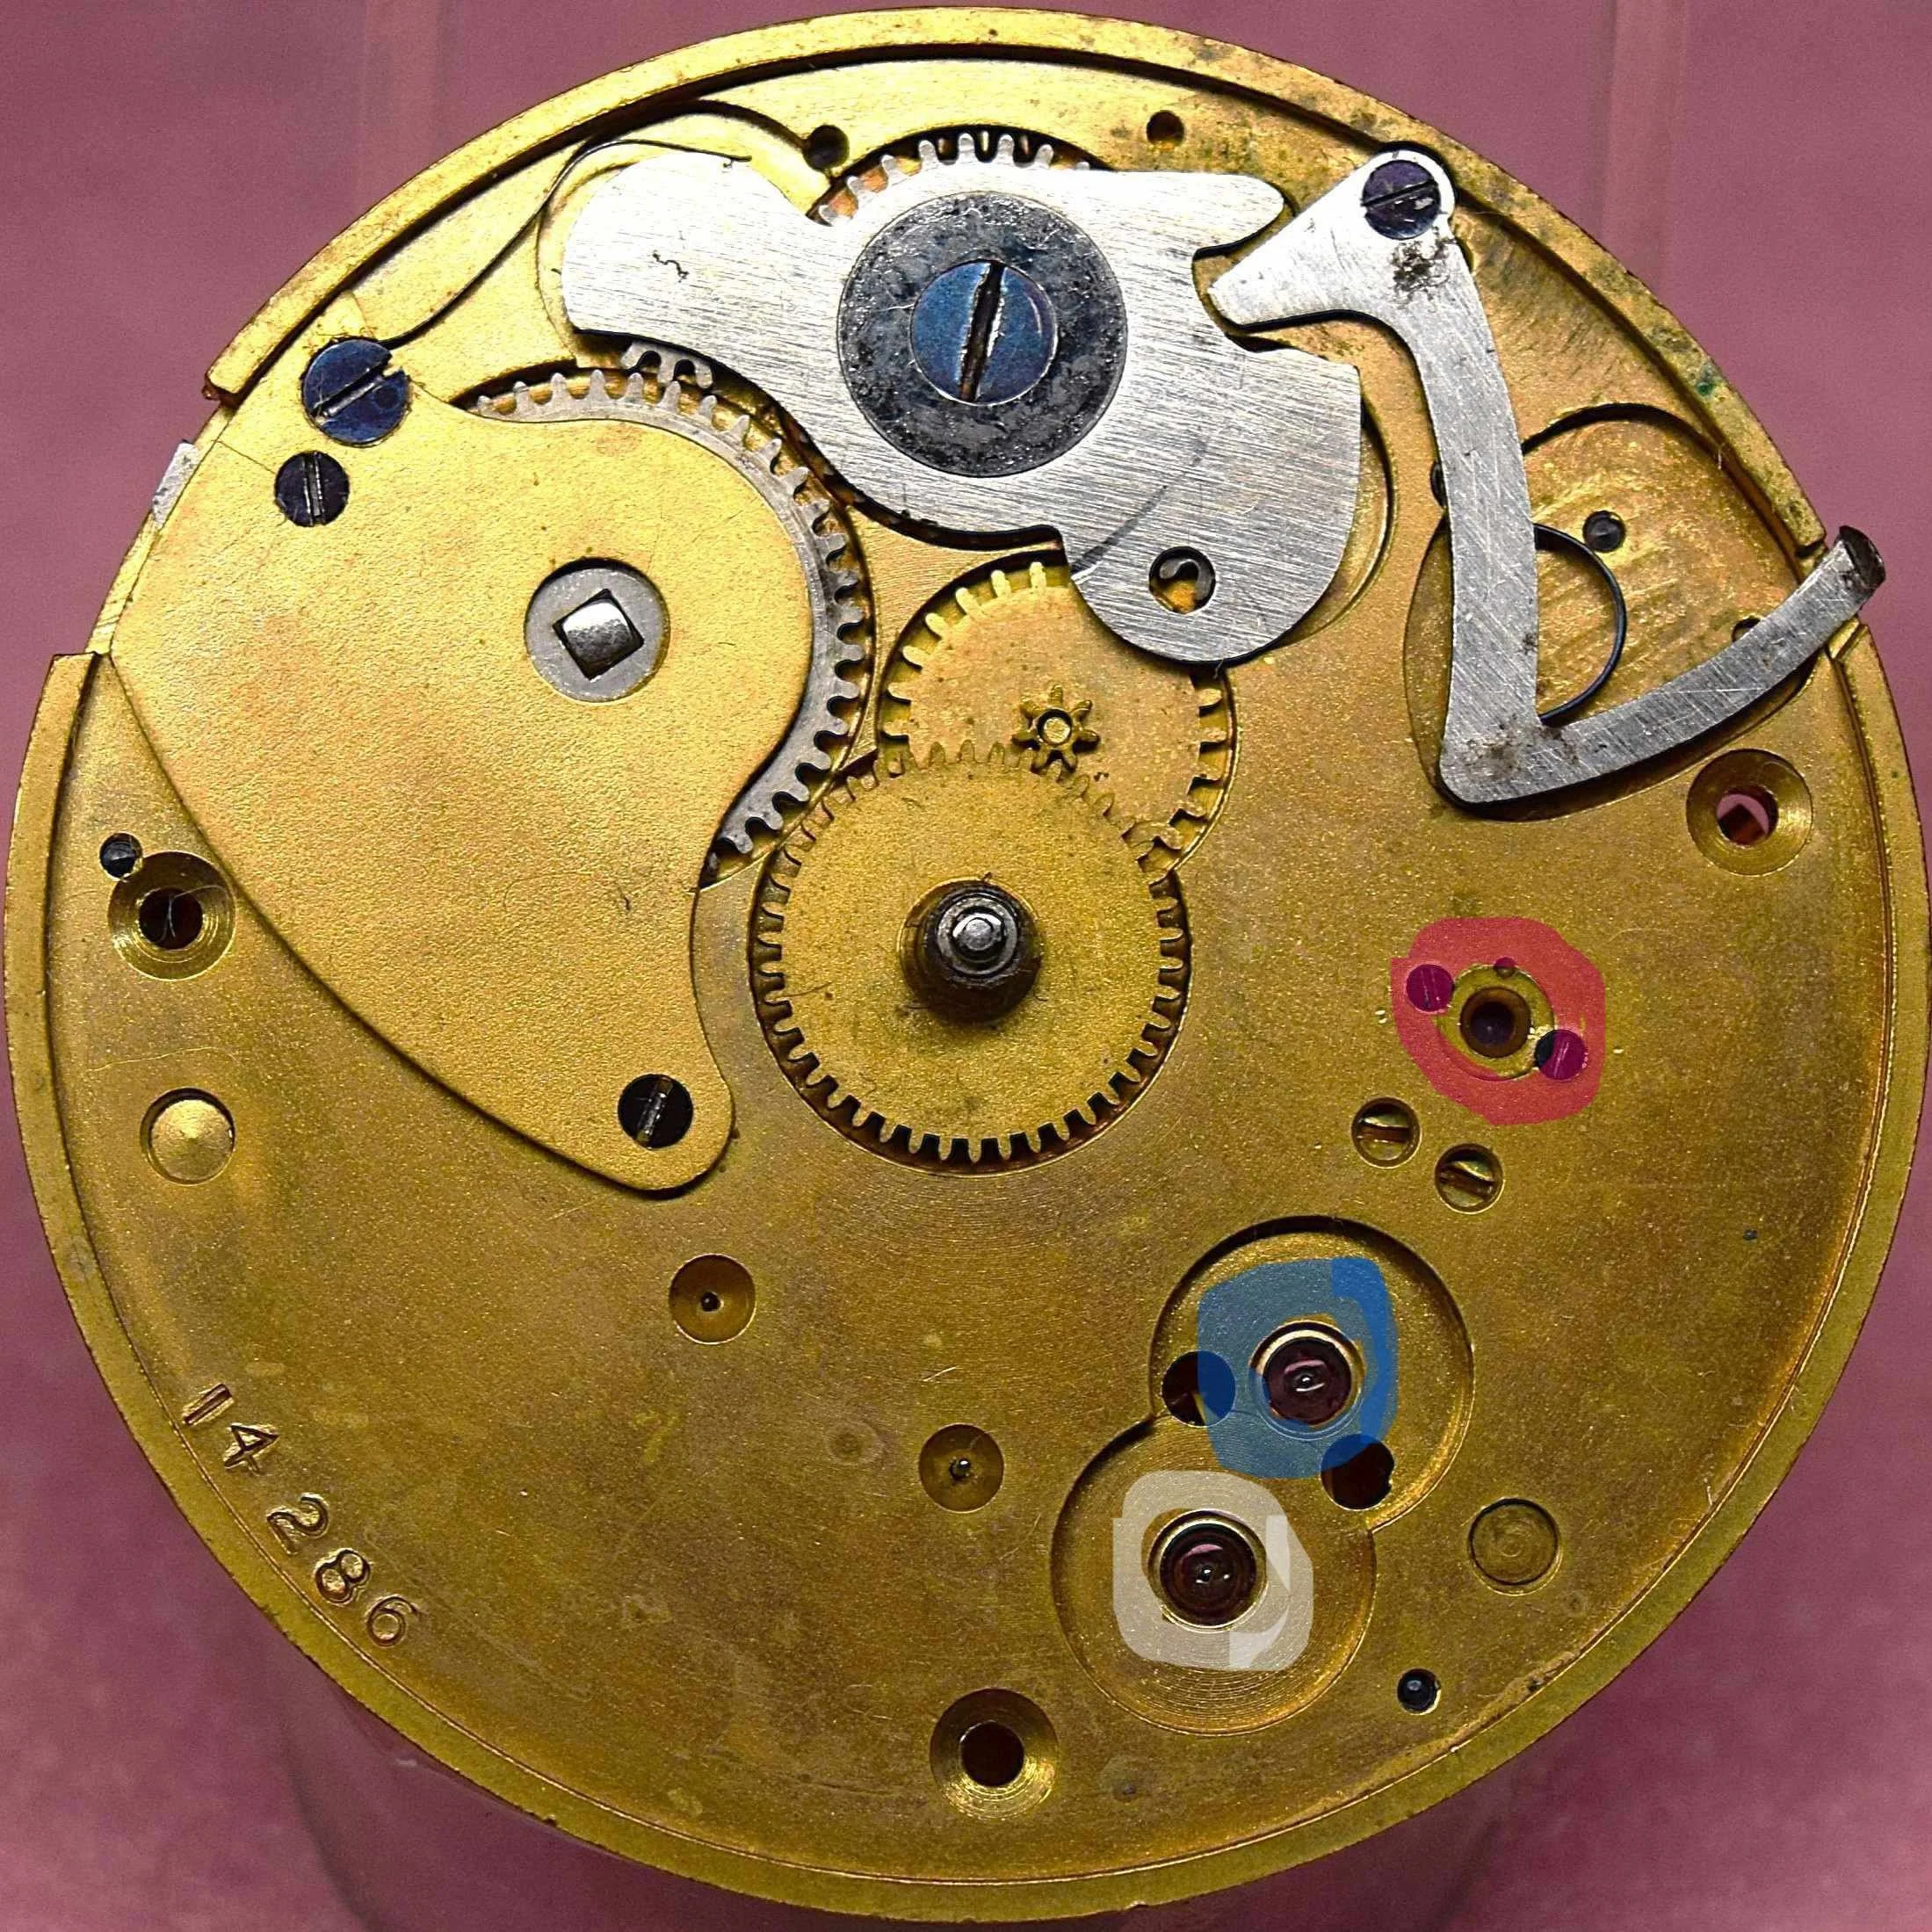
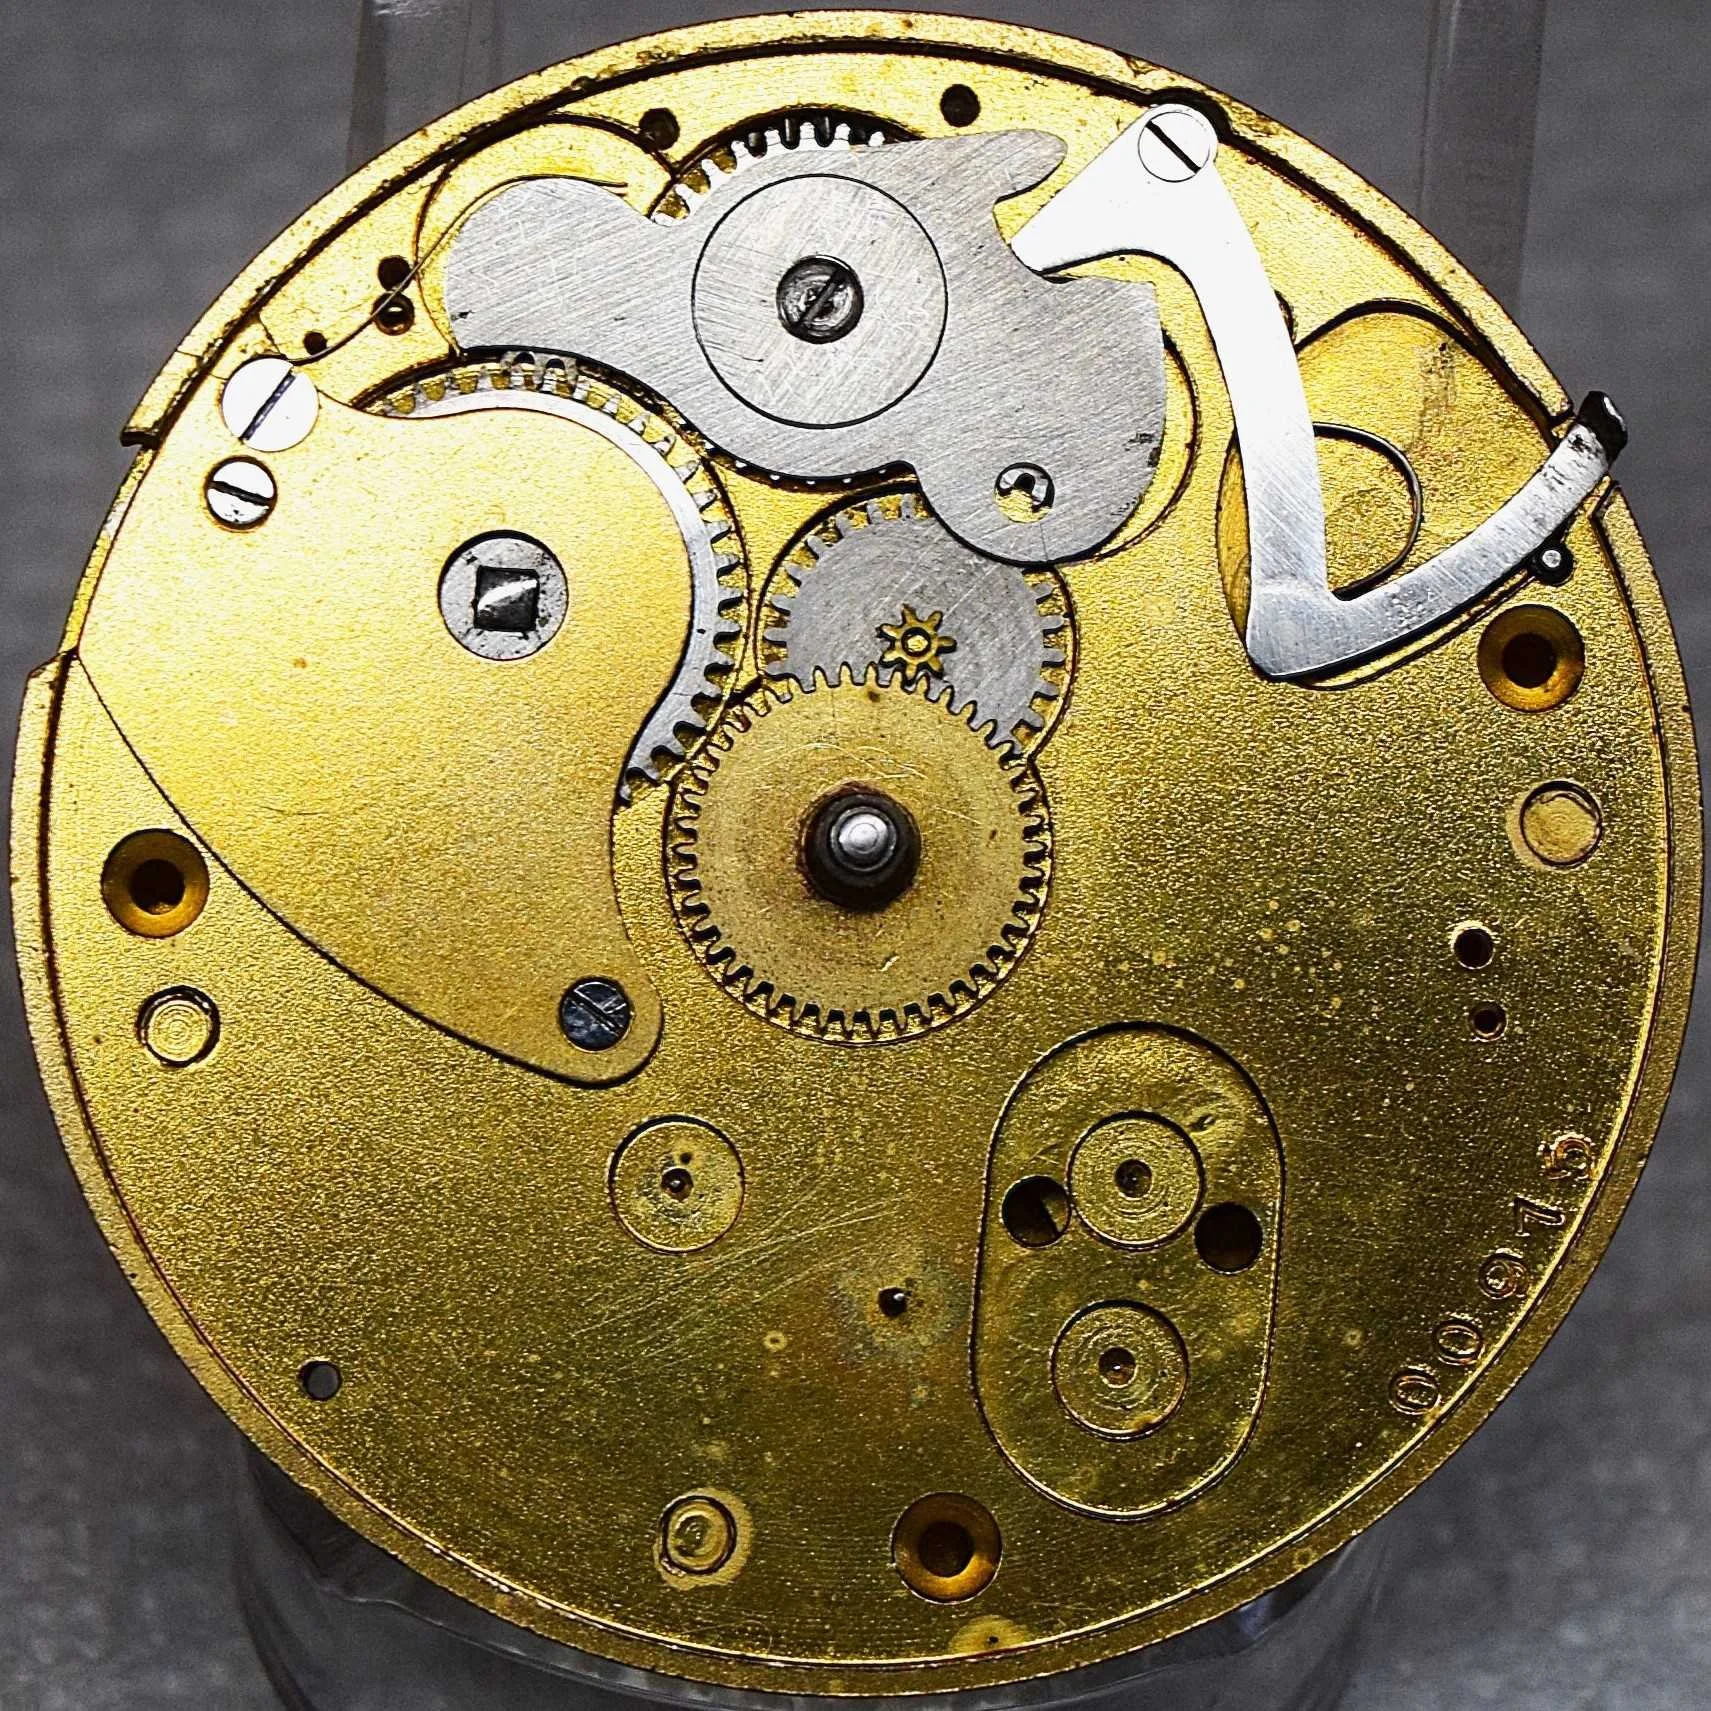
The image on the right, the Pillar Plate, shows the balance staff’s bottom cap stone/jewel, which is protecting the balance staff’s bottom jewel (hole jewel) directly beneath it highlighted in red.
It shows the bottom pallet jewel (hole jewel) highlighted in blue. This reduces friction in the movement of the pallet fork.
The image also shows the bottom escape wheel jewel (hole jewel) highlighted in white.
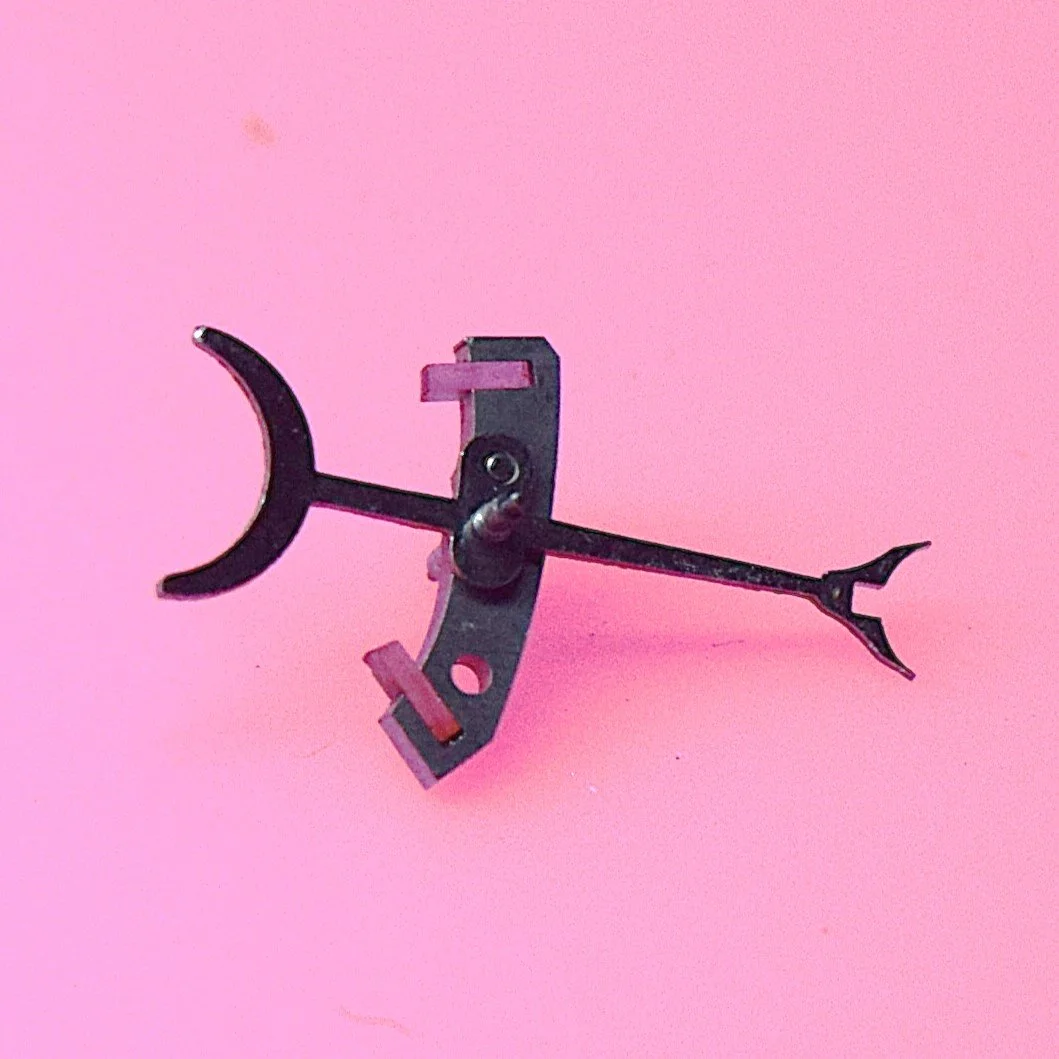
There are three more jewels that are hidden between the plates:
The two pallet jewels are on the wide end of the pallet fork that make contact with the escape wheel. As the escape wheel turns due to the release of power from the main spring it makes contact with the two pallet jewels in such a way that it causes the pallet fork to swing from side to side. This also moves the narrow end of the pallet fork from side to side making intermittent contact with the impulse jewel, pushing it from side to side.
The impulse jewel rides beneath the roller table near the bottom of the balance staff. As the tip of the pallet fork moves the impulse jewel from side to side it turns the roller table, hairspring, and balance wheel back and forth providing resistance to the power being released from the mainspring. By regulating the strength of this resistance, we are able to regulate the rate at which the power can be released from the mainspring through the gear train, and ultimately the rate at which the hands of the watch move around the dial.
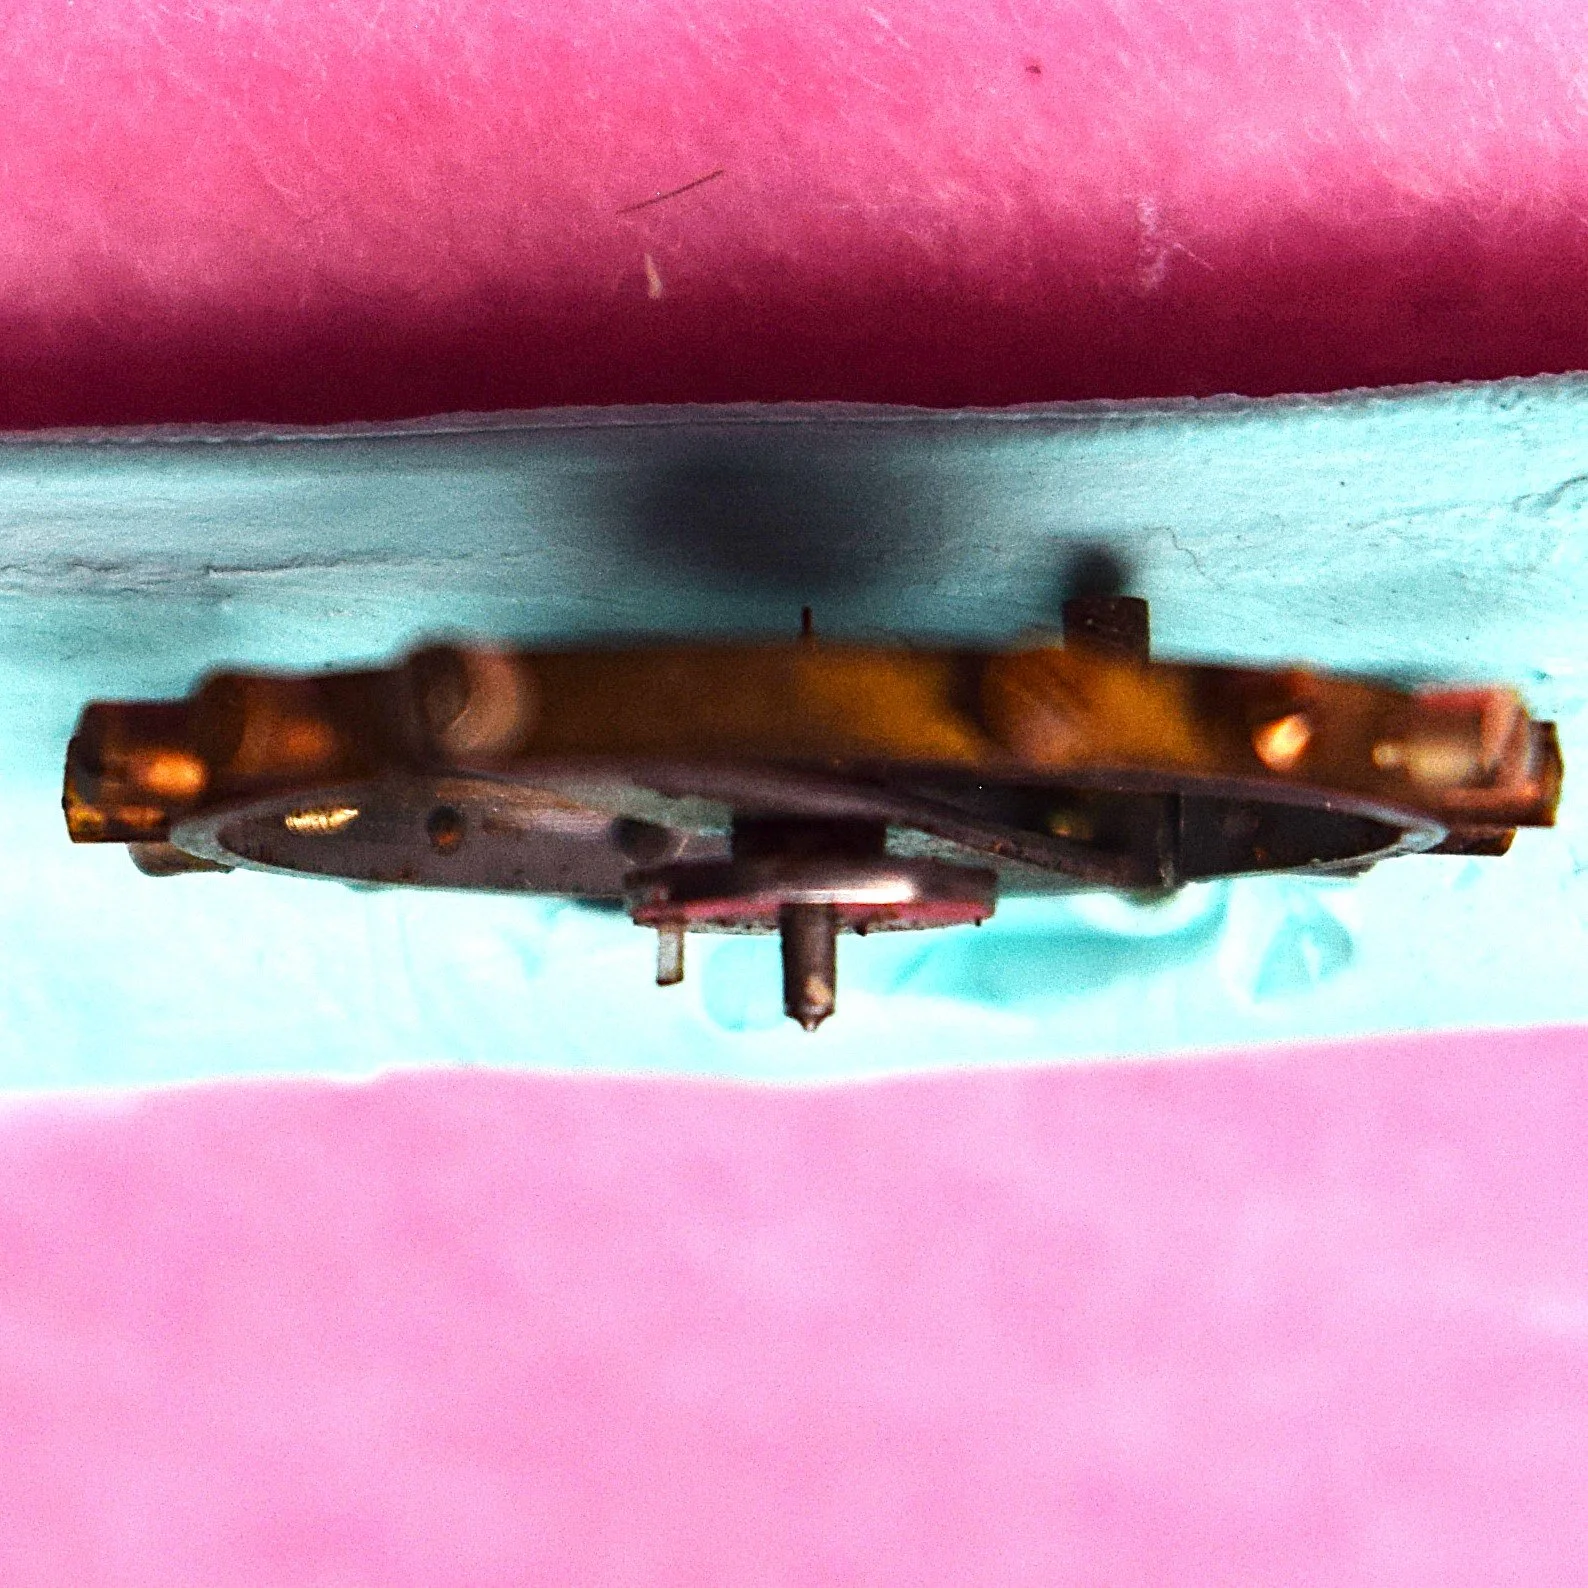
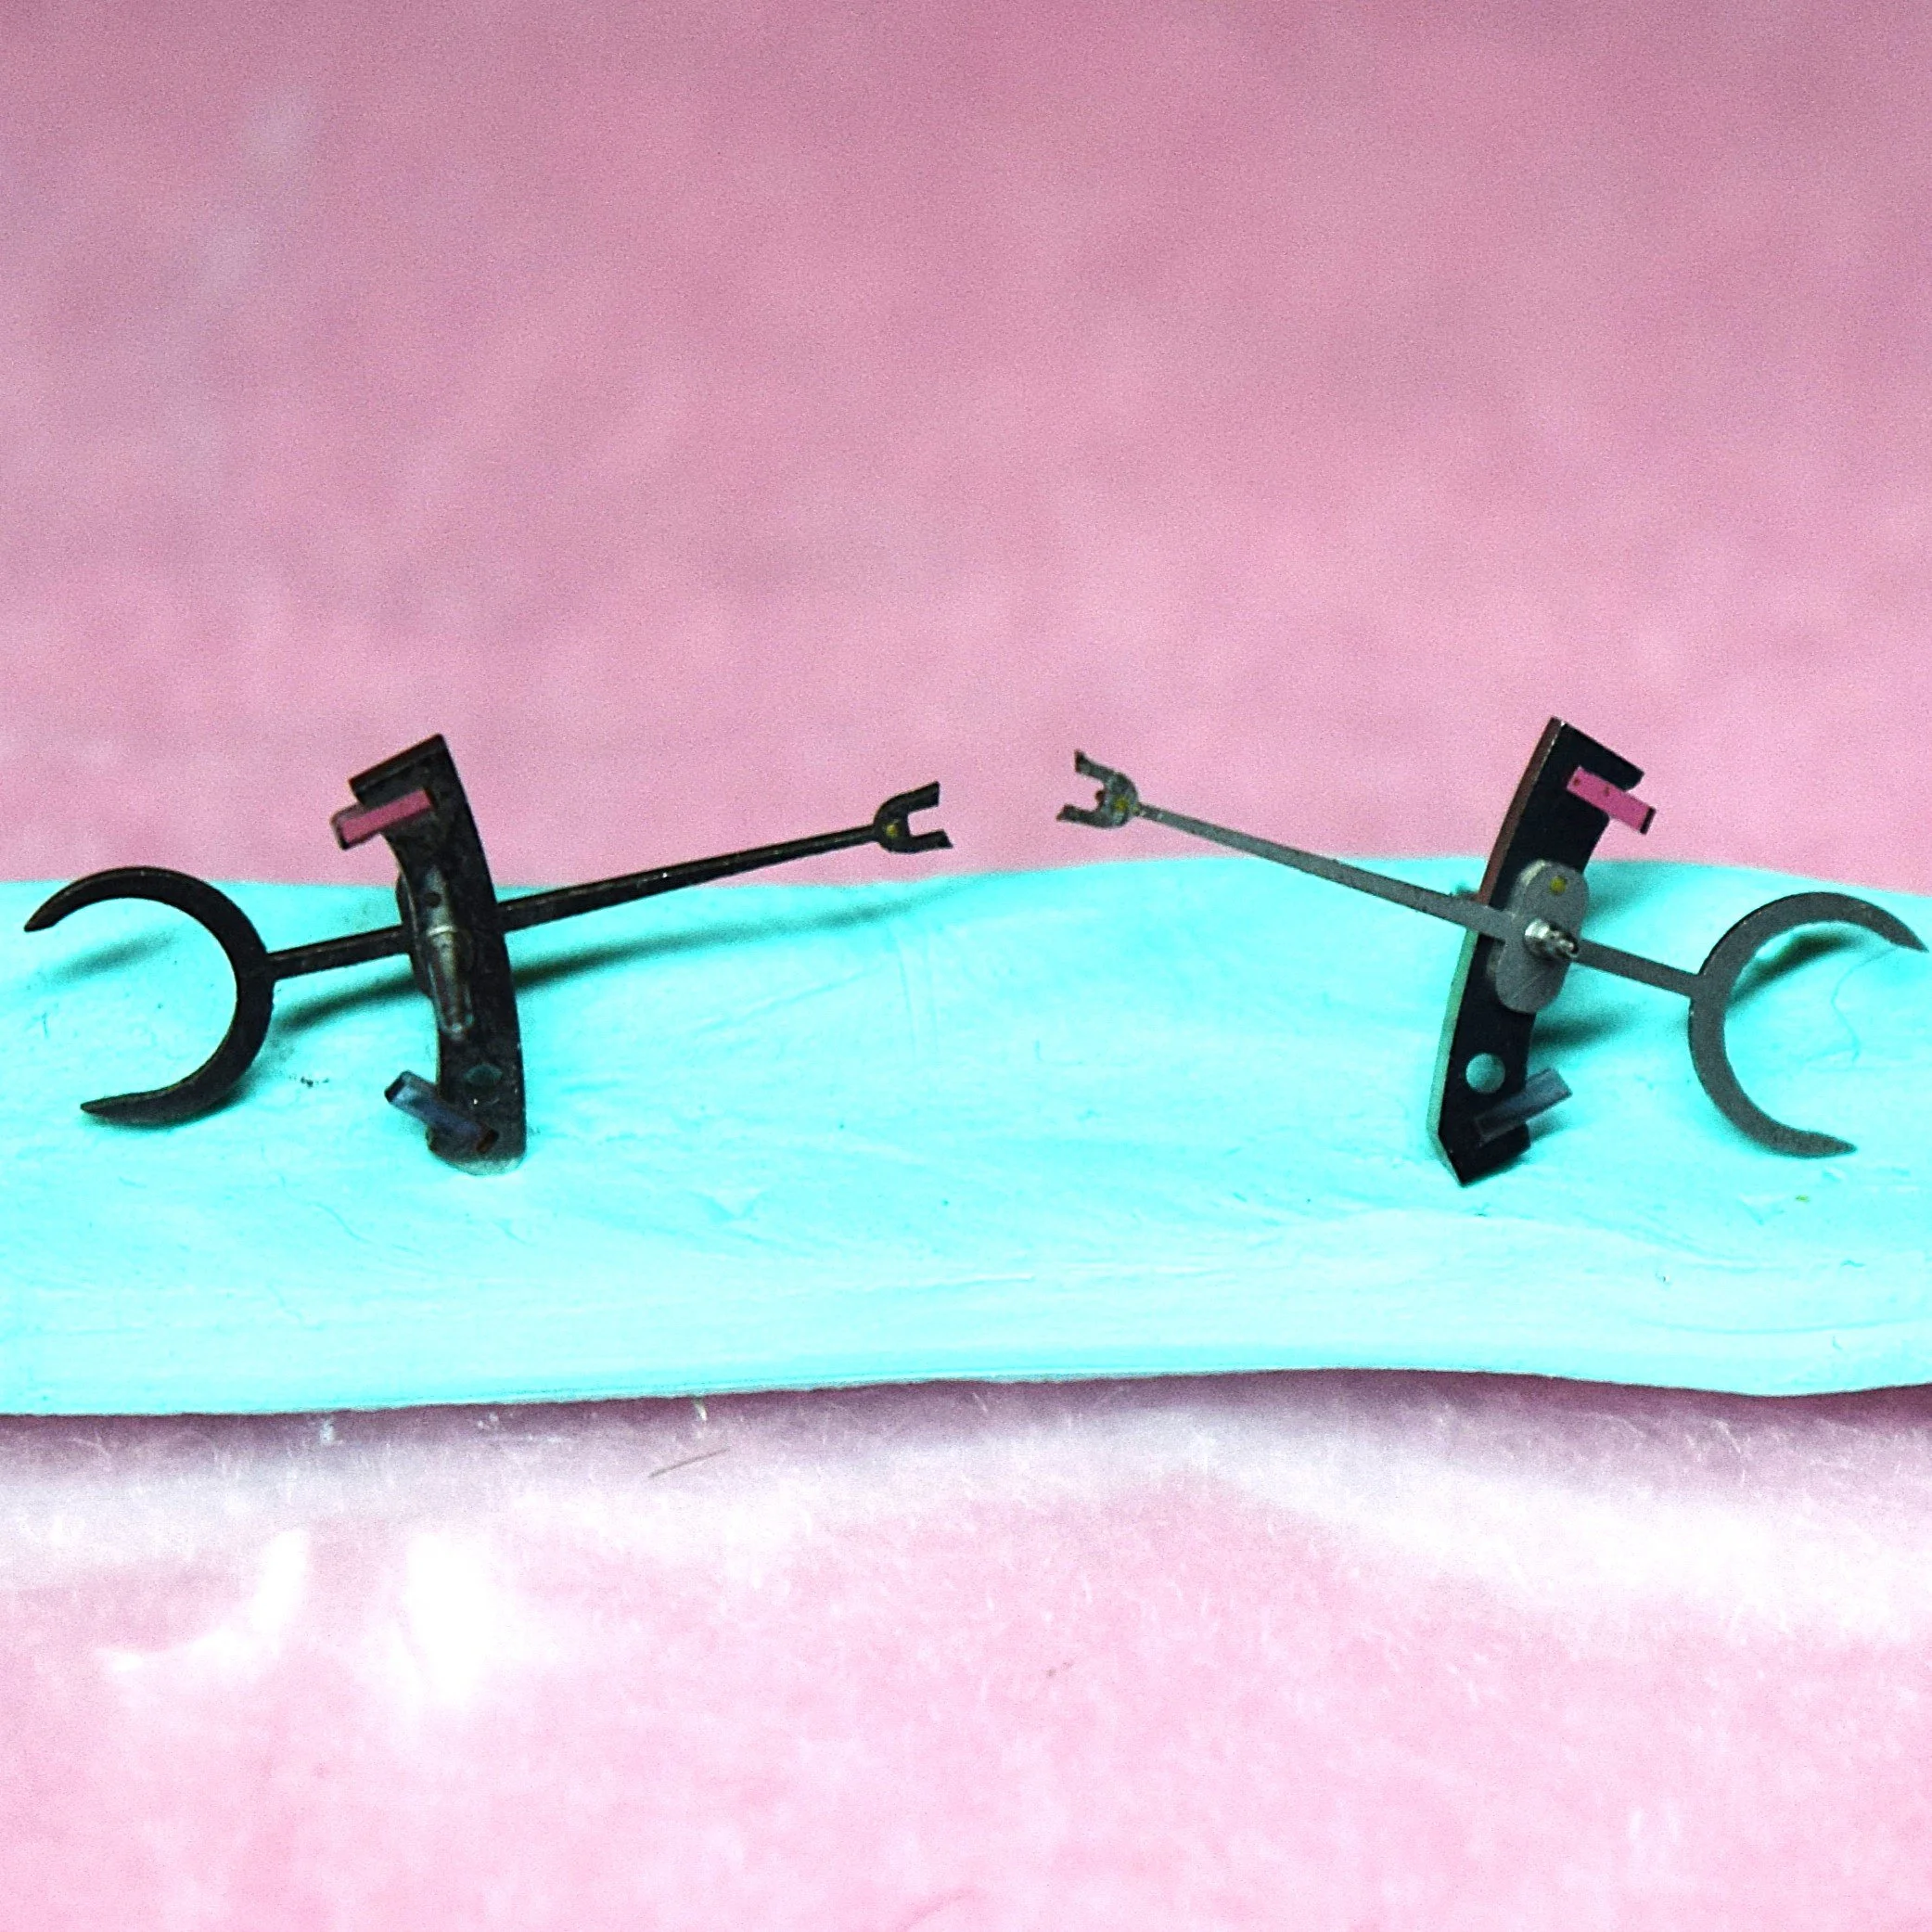
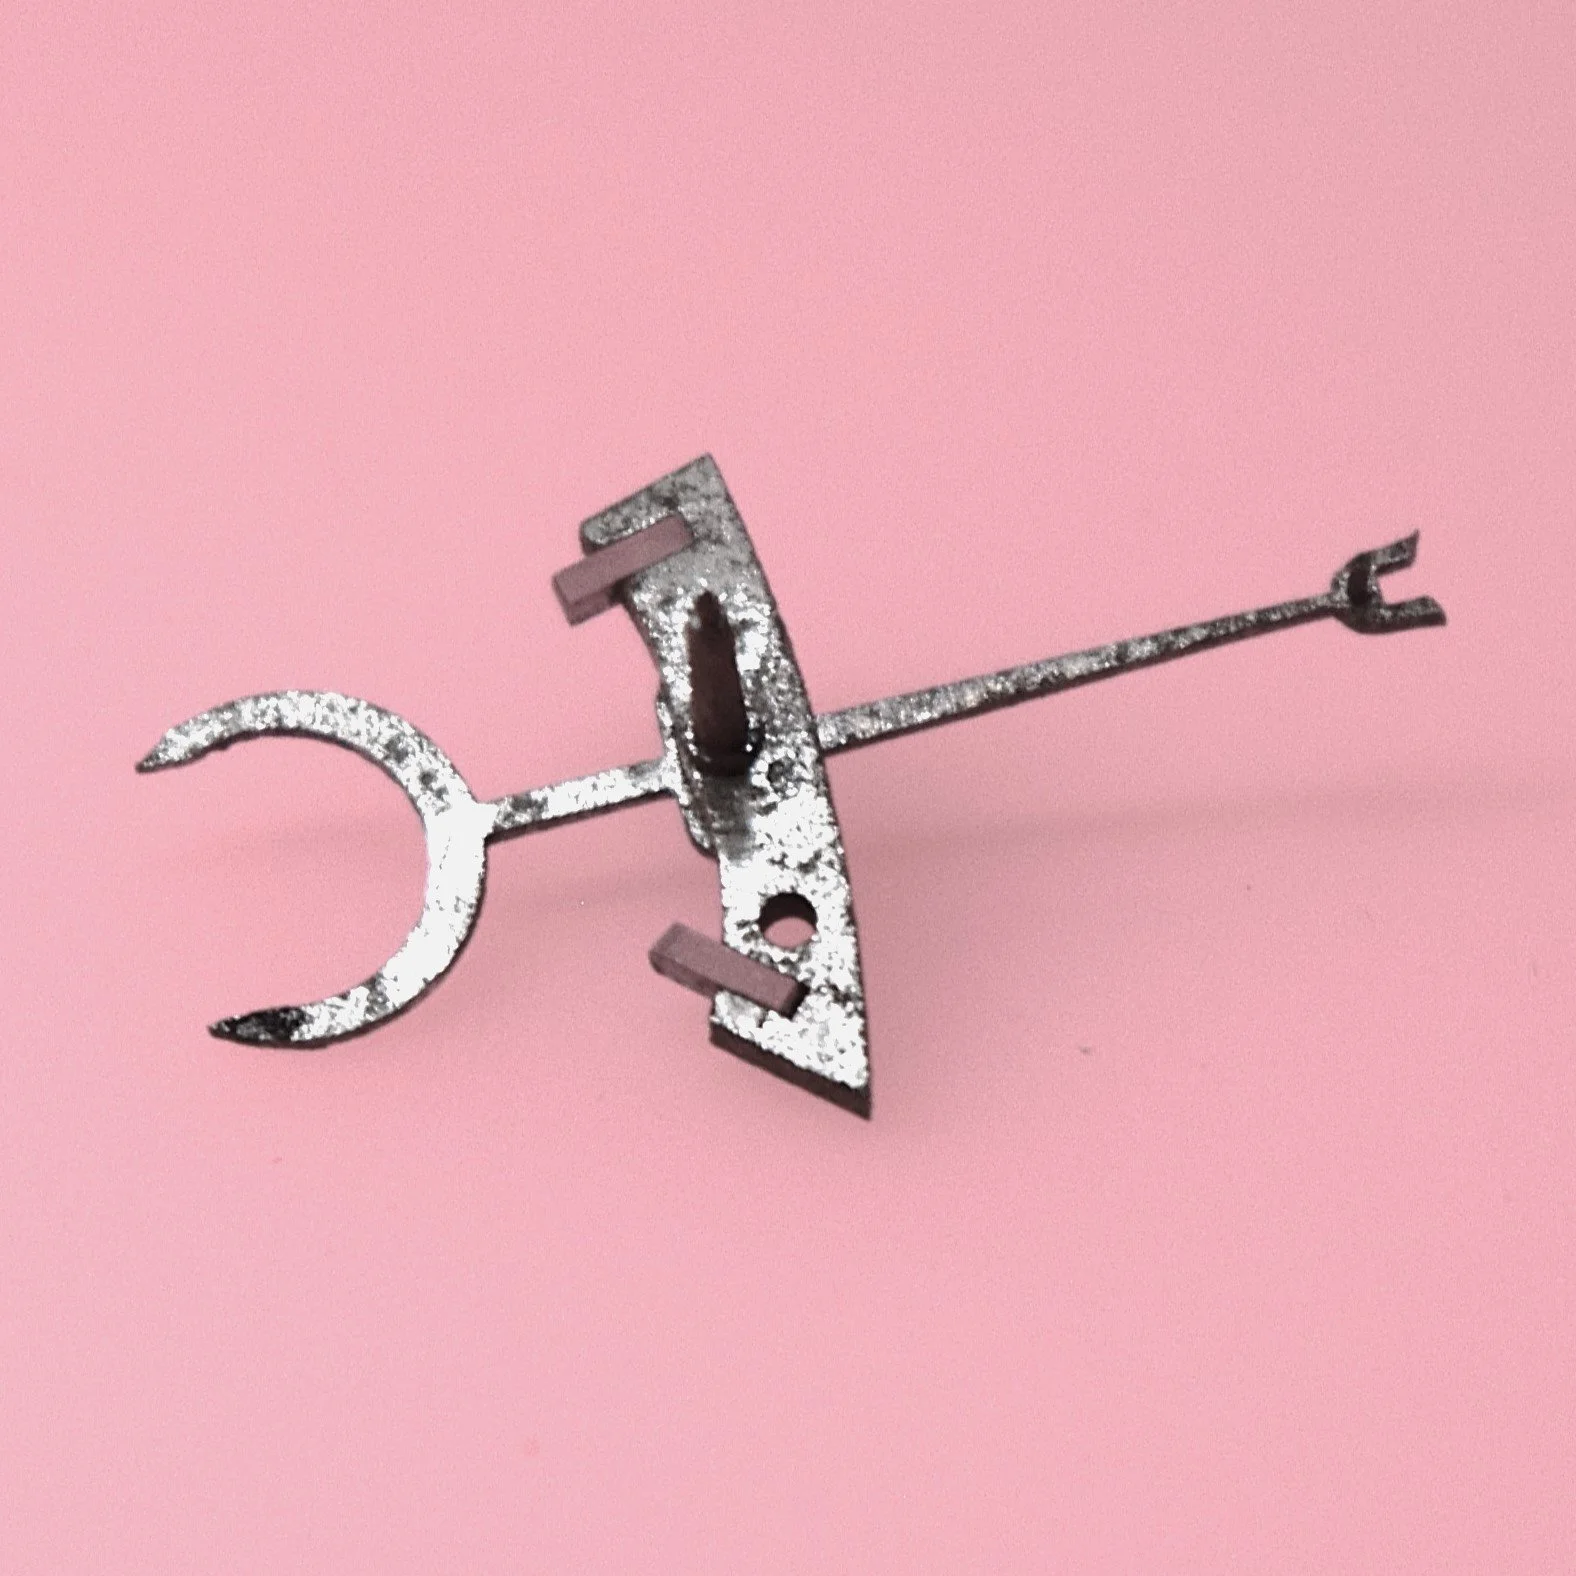
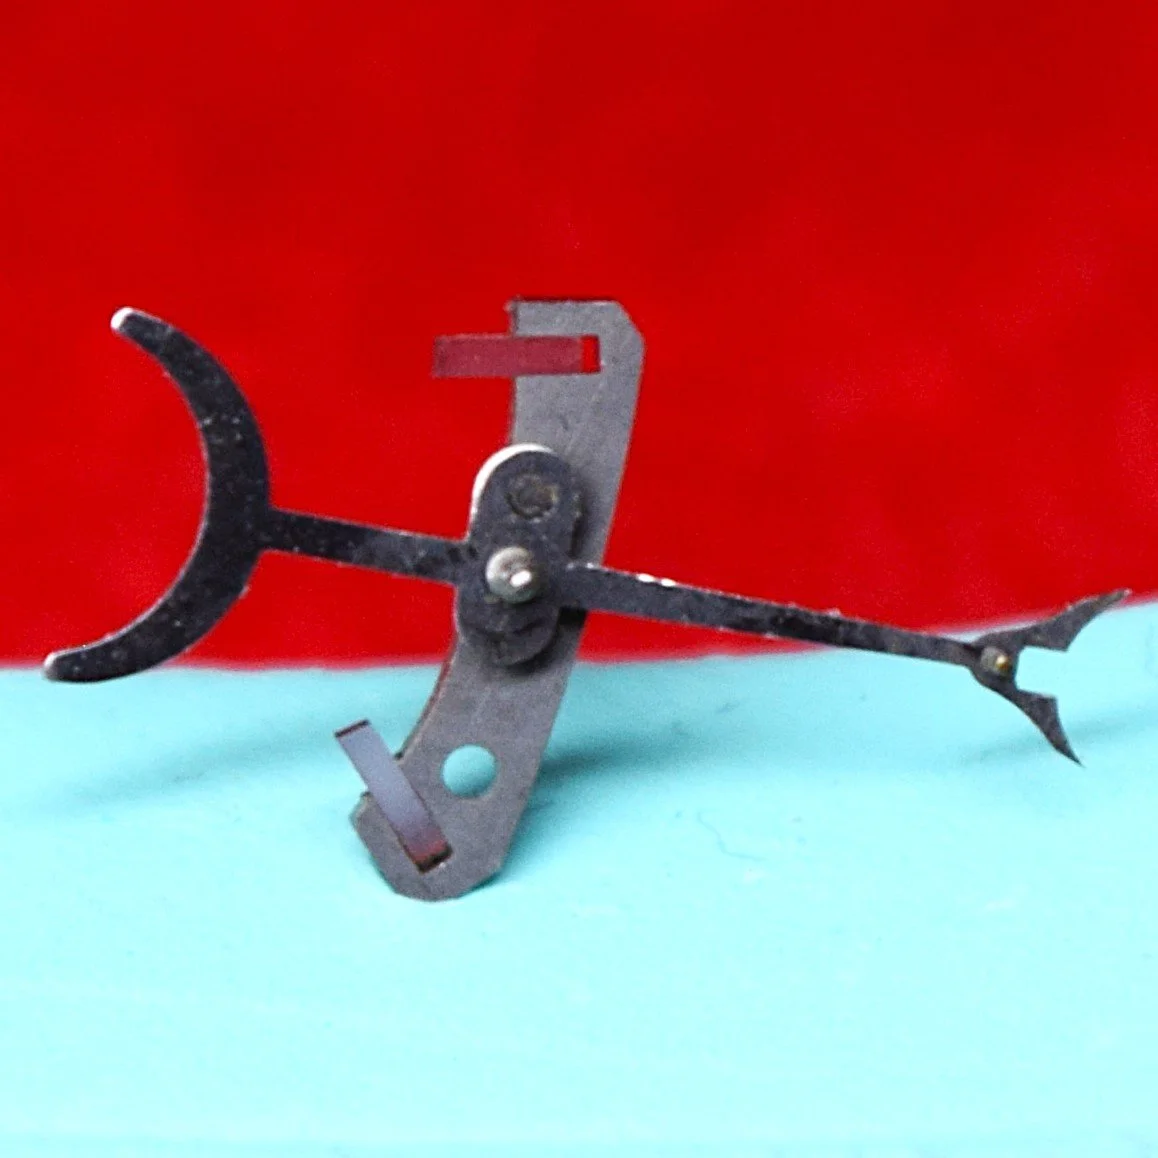
The two images below are of an impulse jewel and two pallet forks with their pallet jewels visible.
The bottom image shows how the Pallet Fork Jewels engage the Escape Wheel.
15-Jewel Movements in Model 1
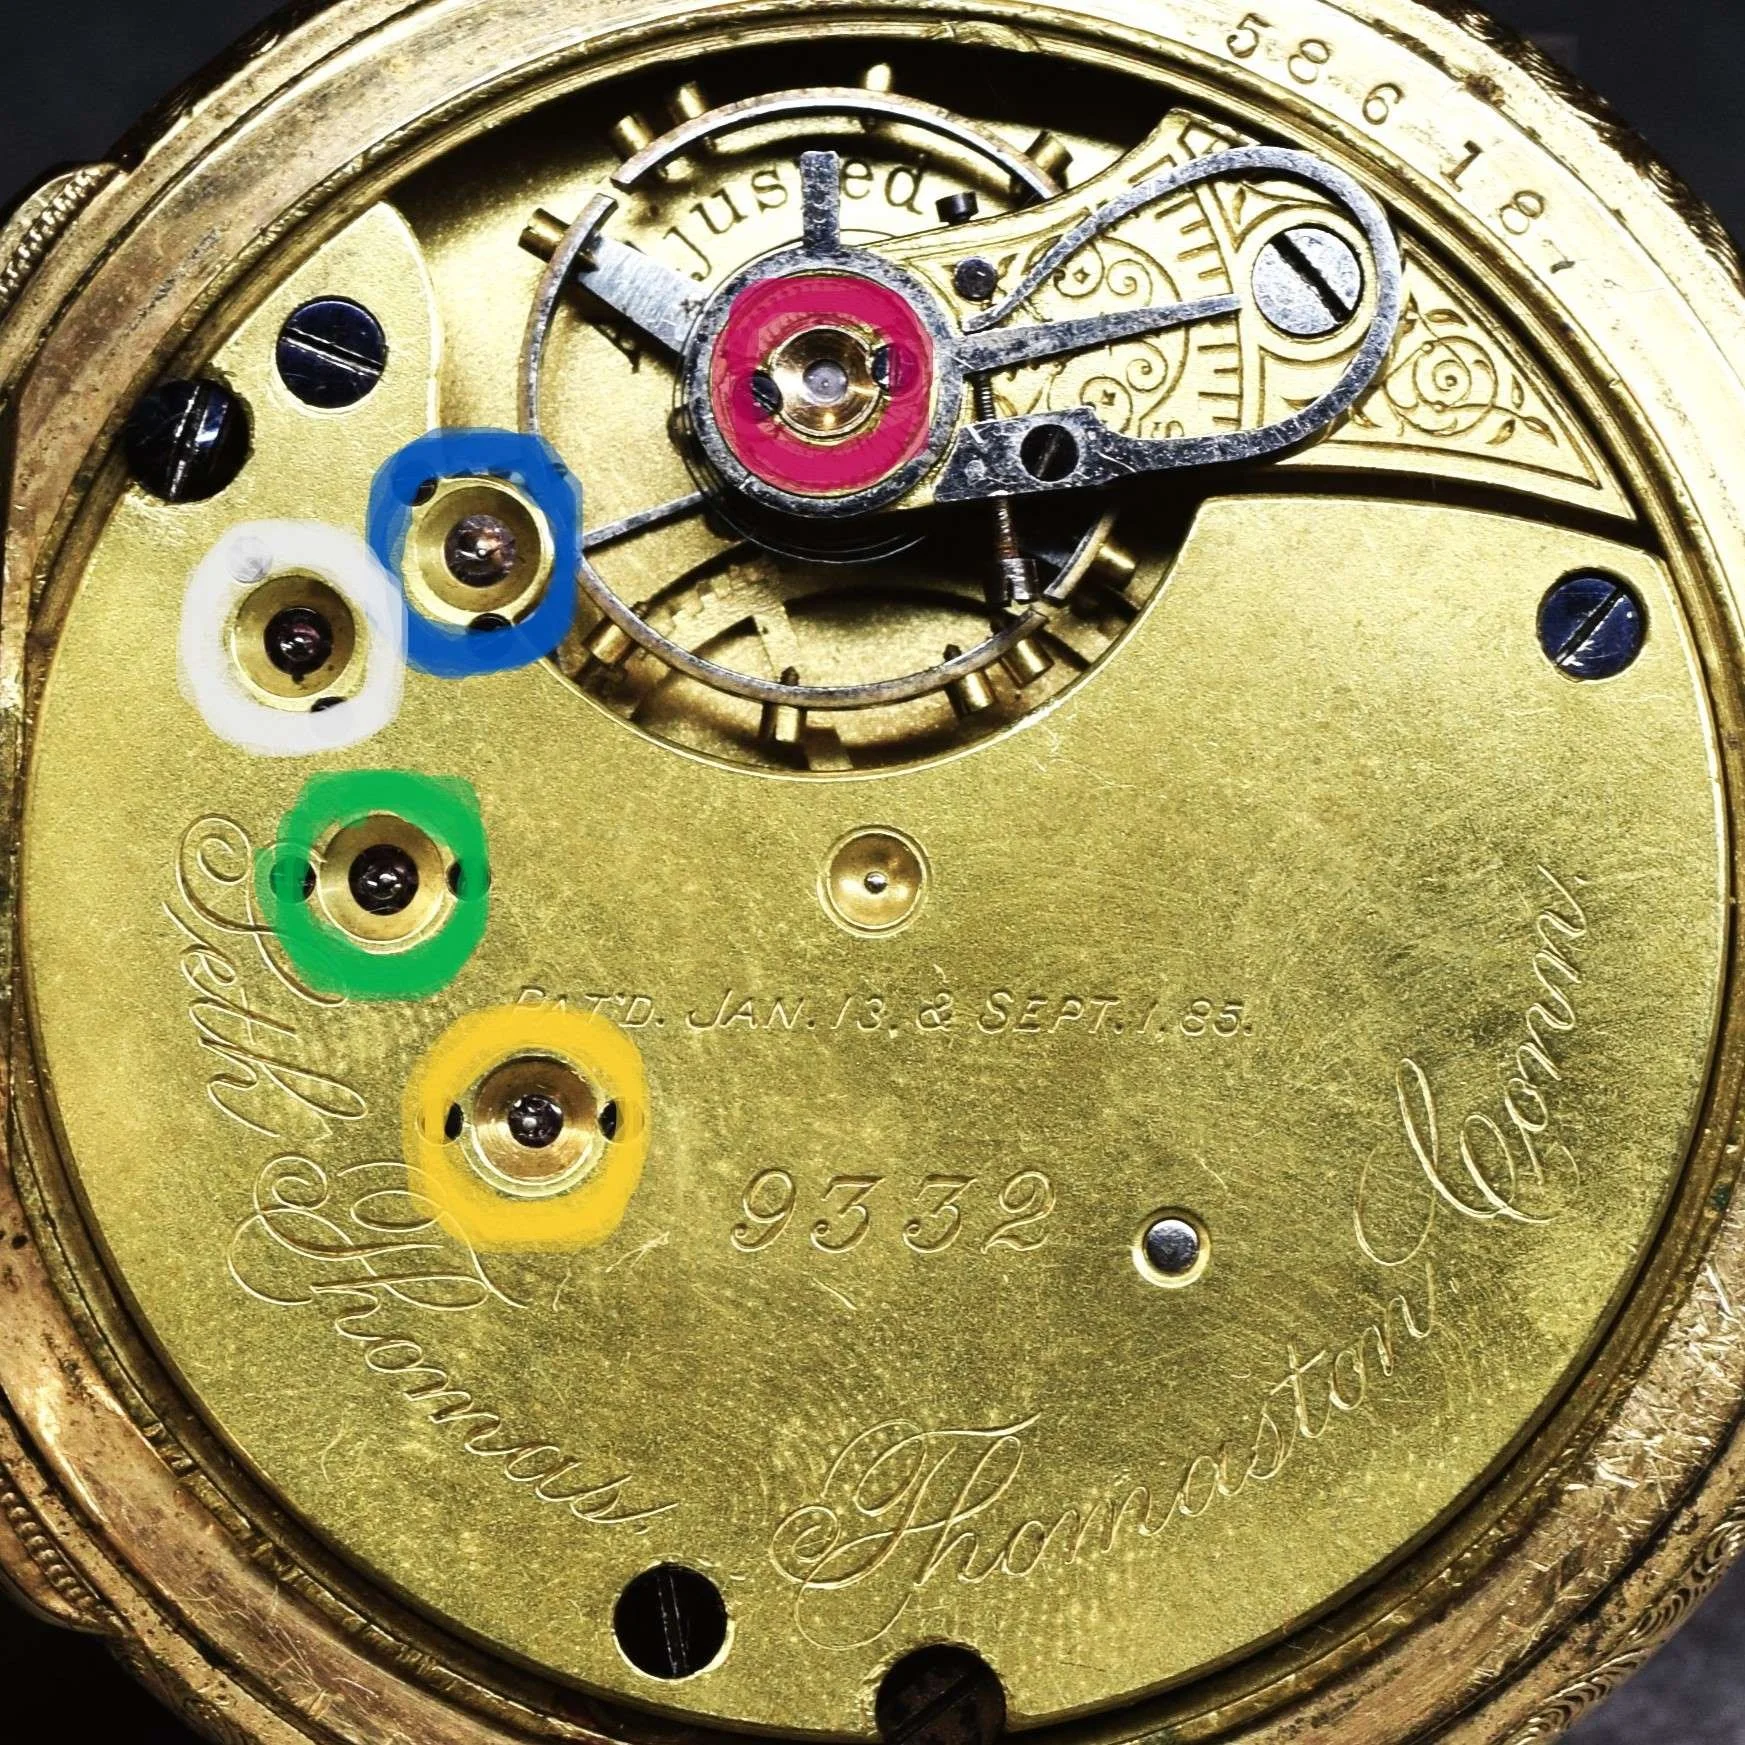
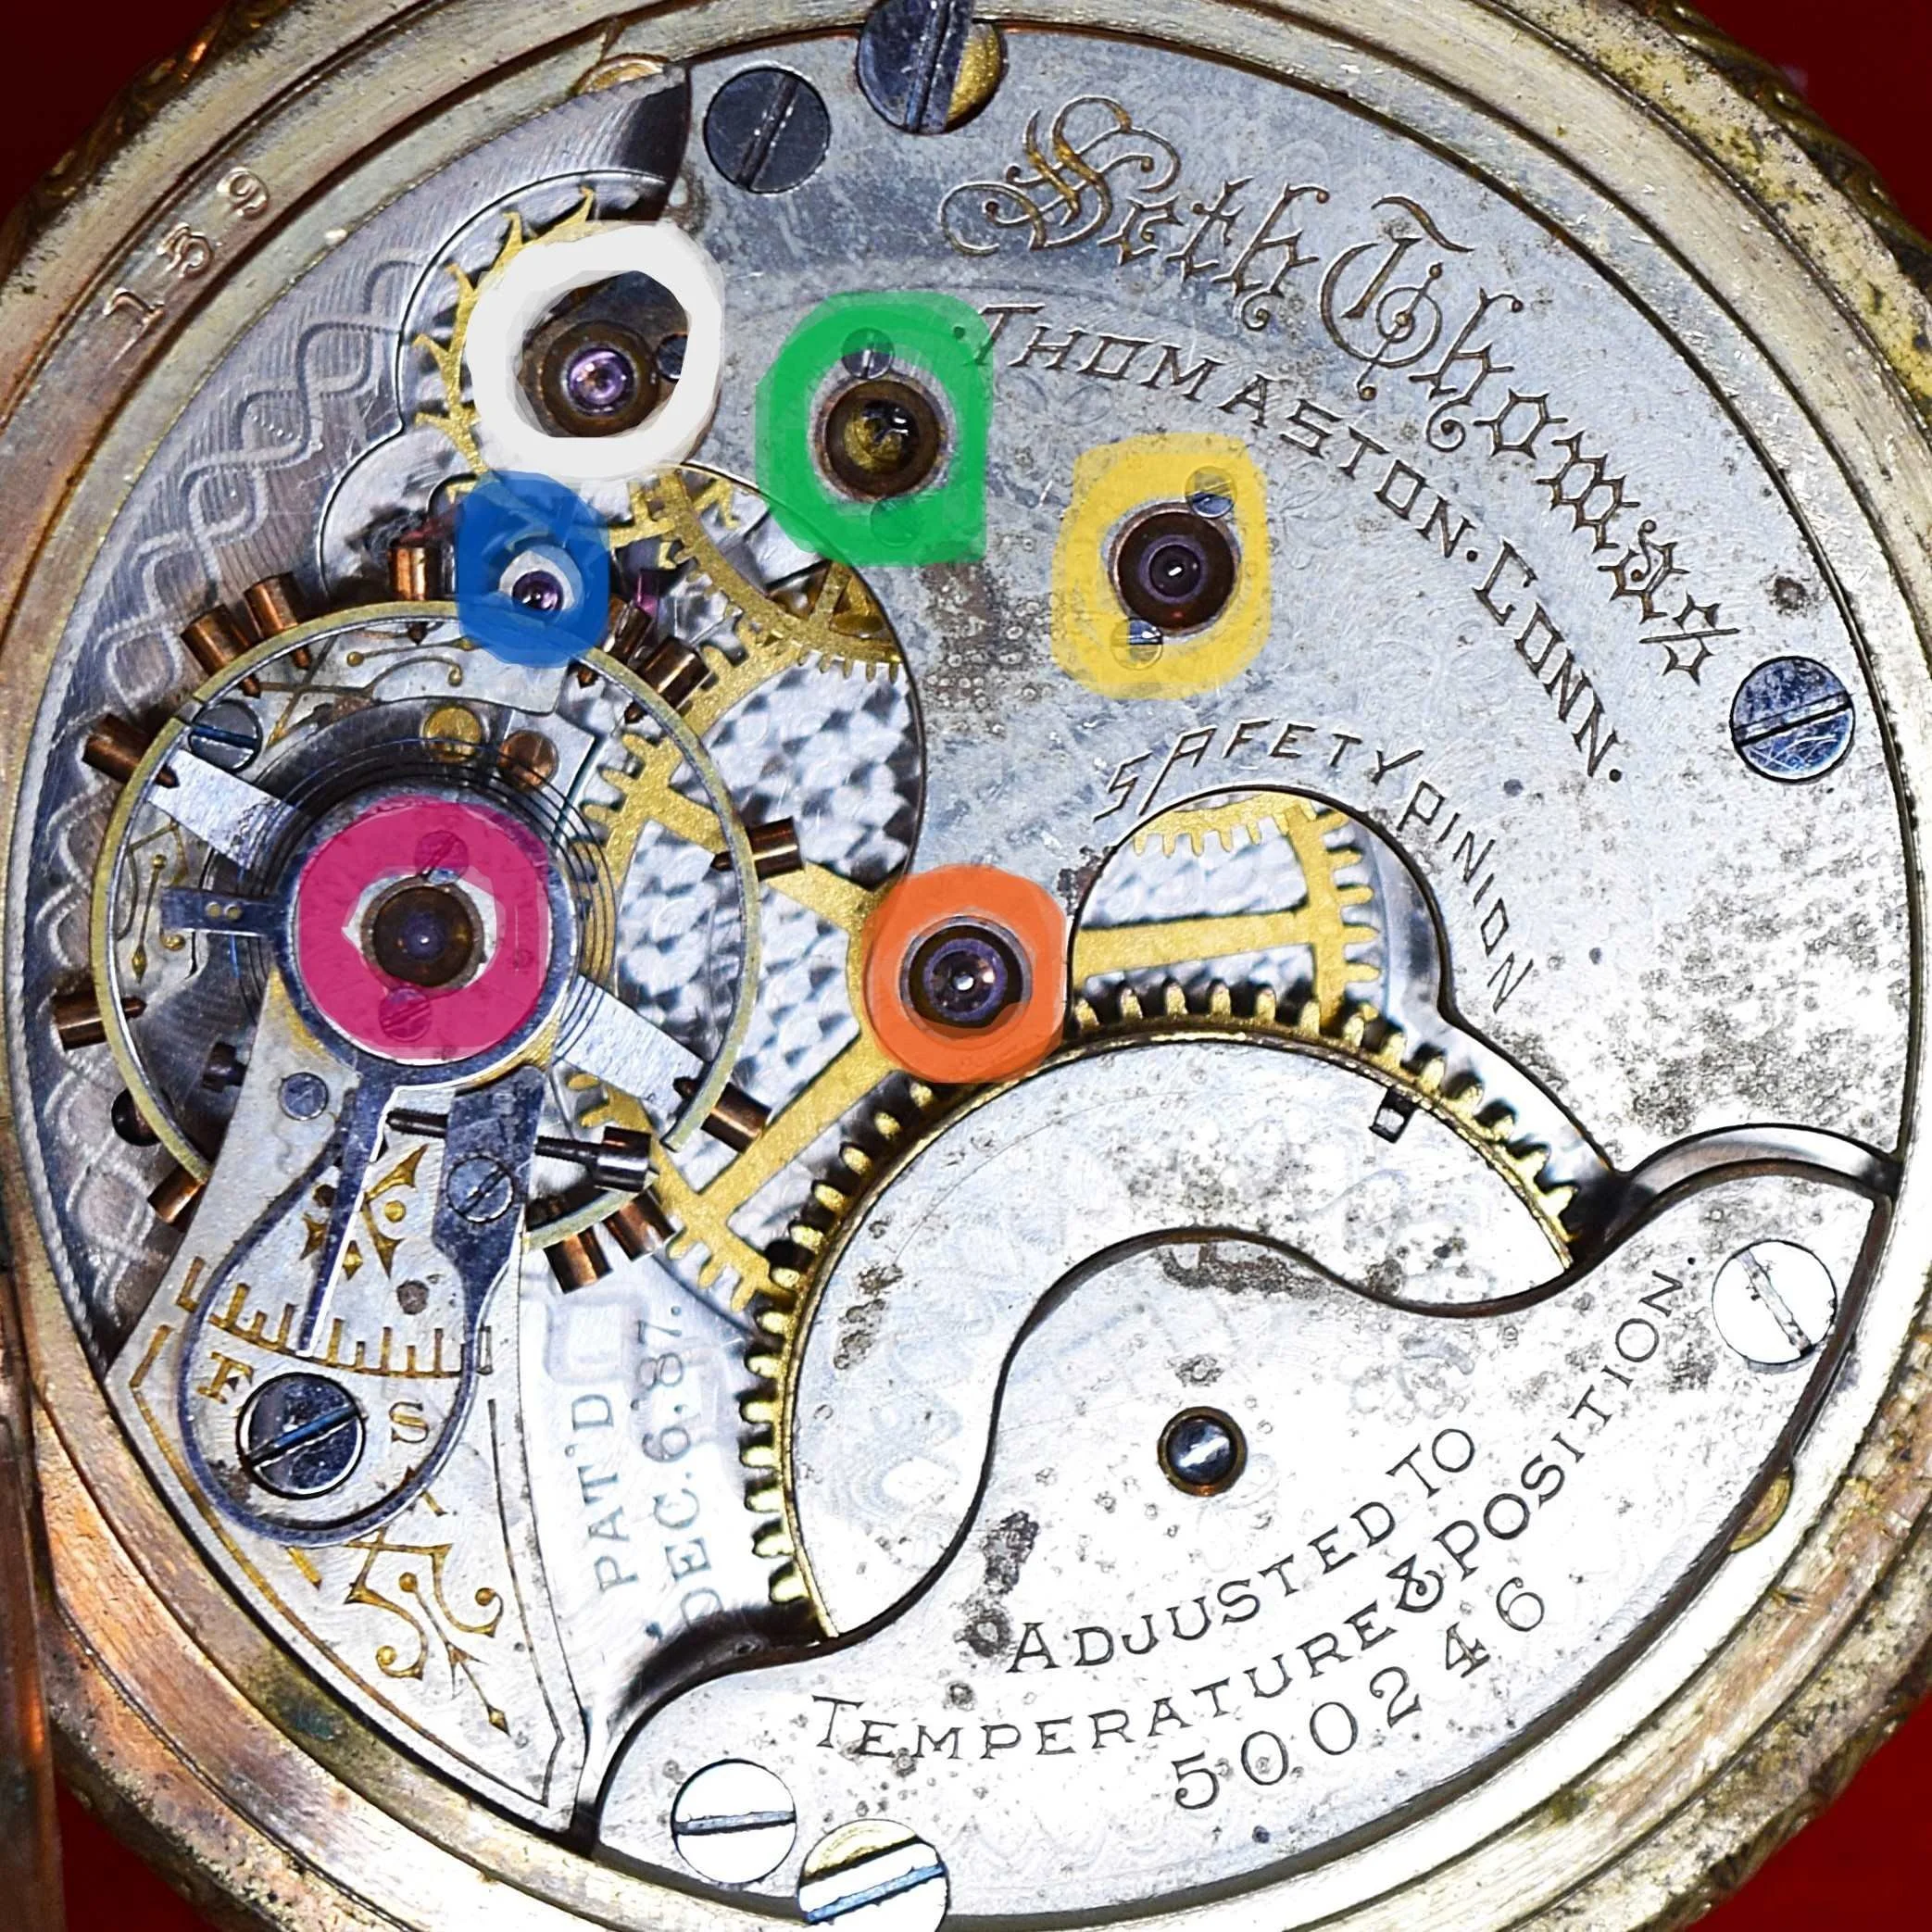
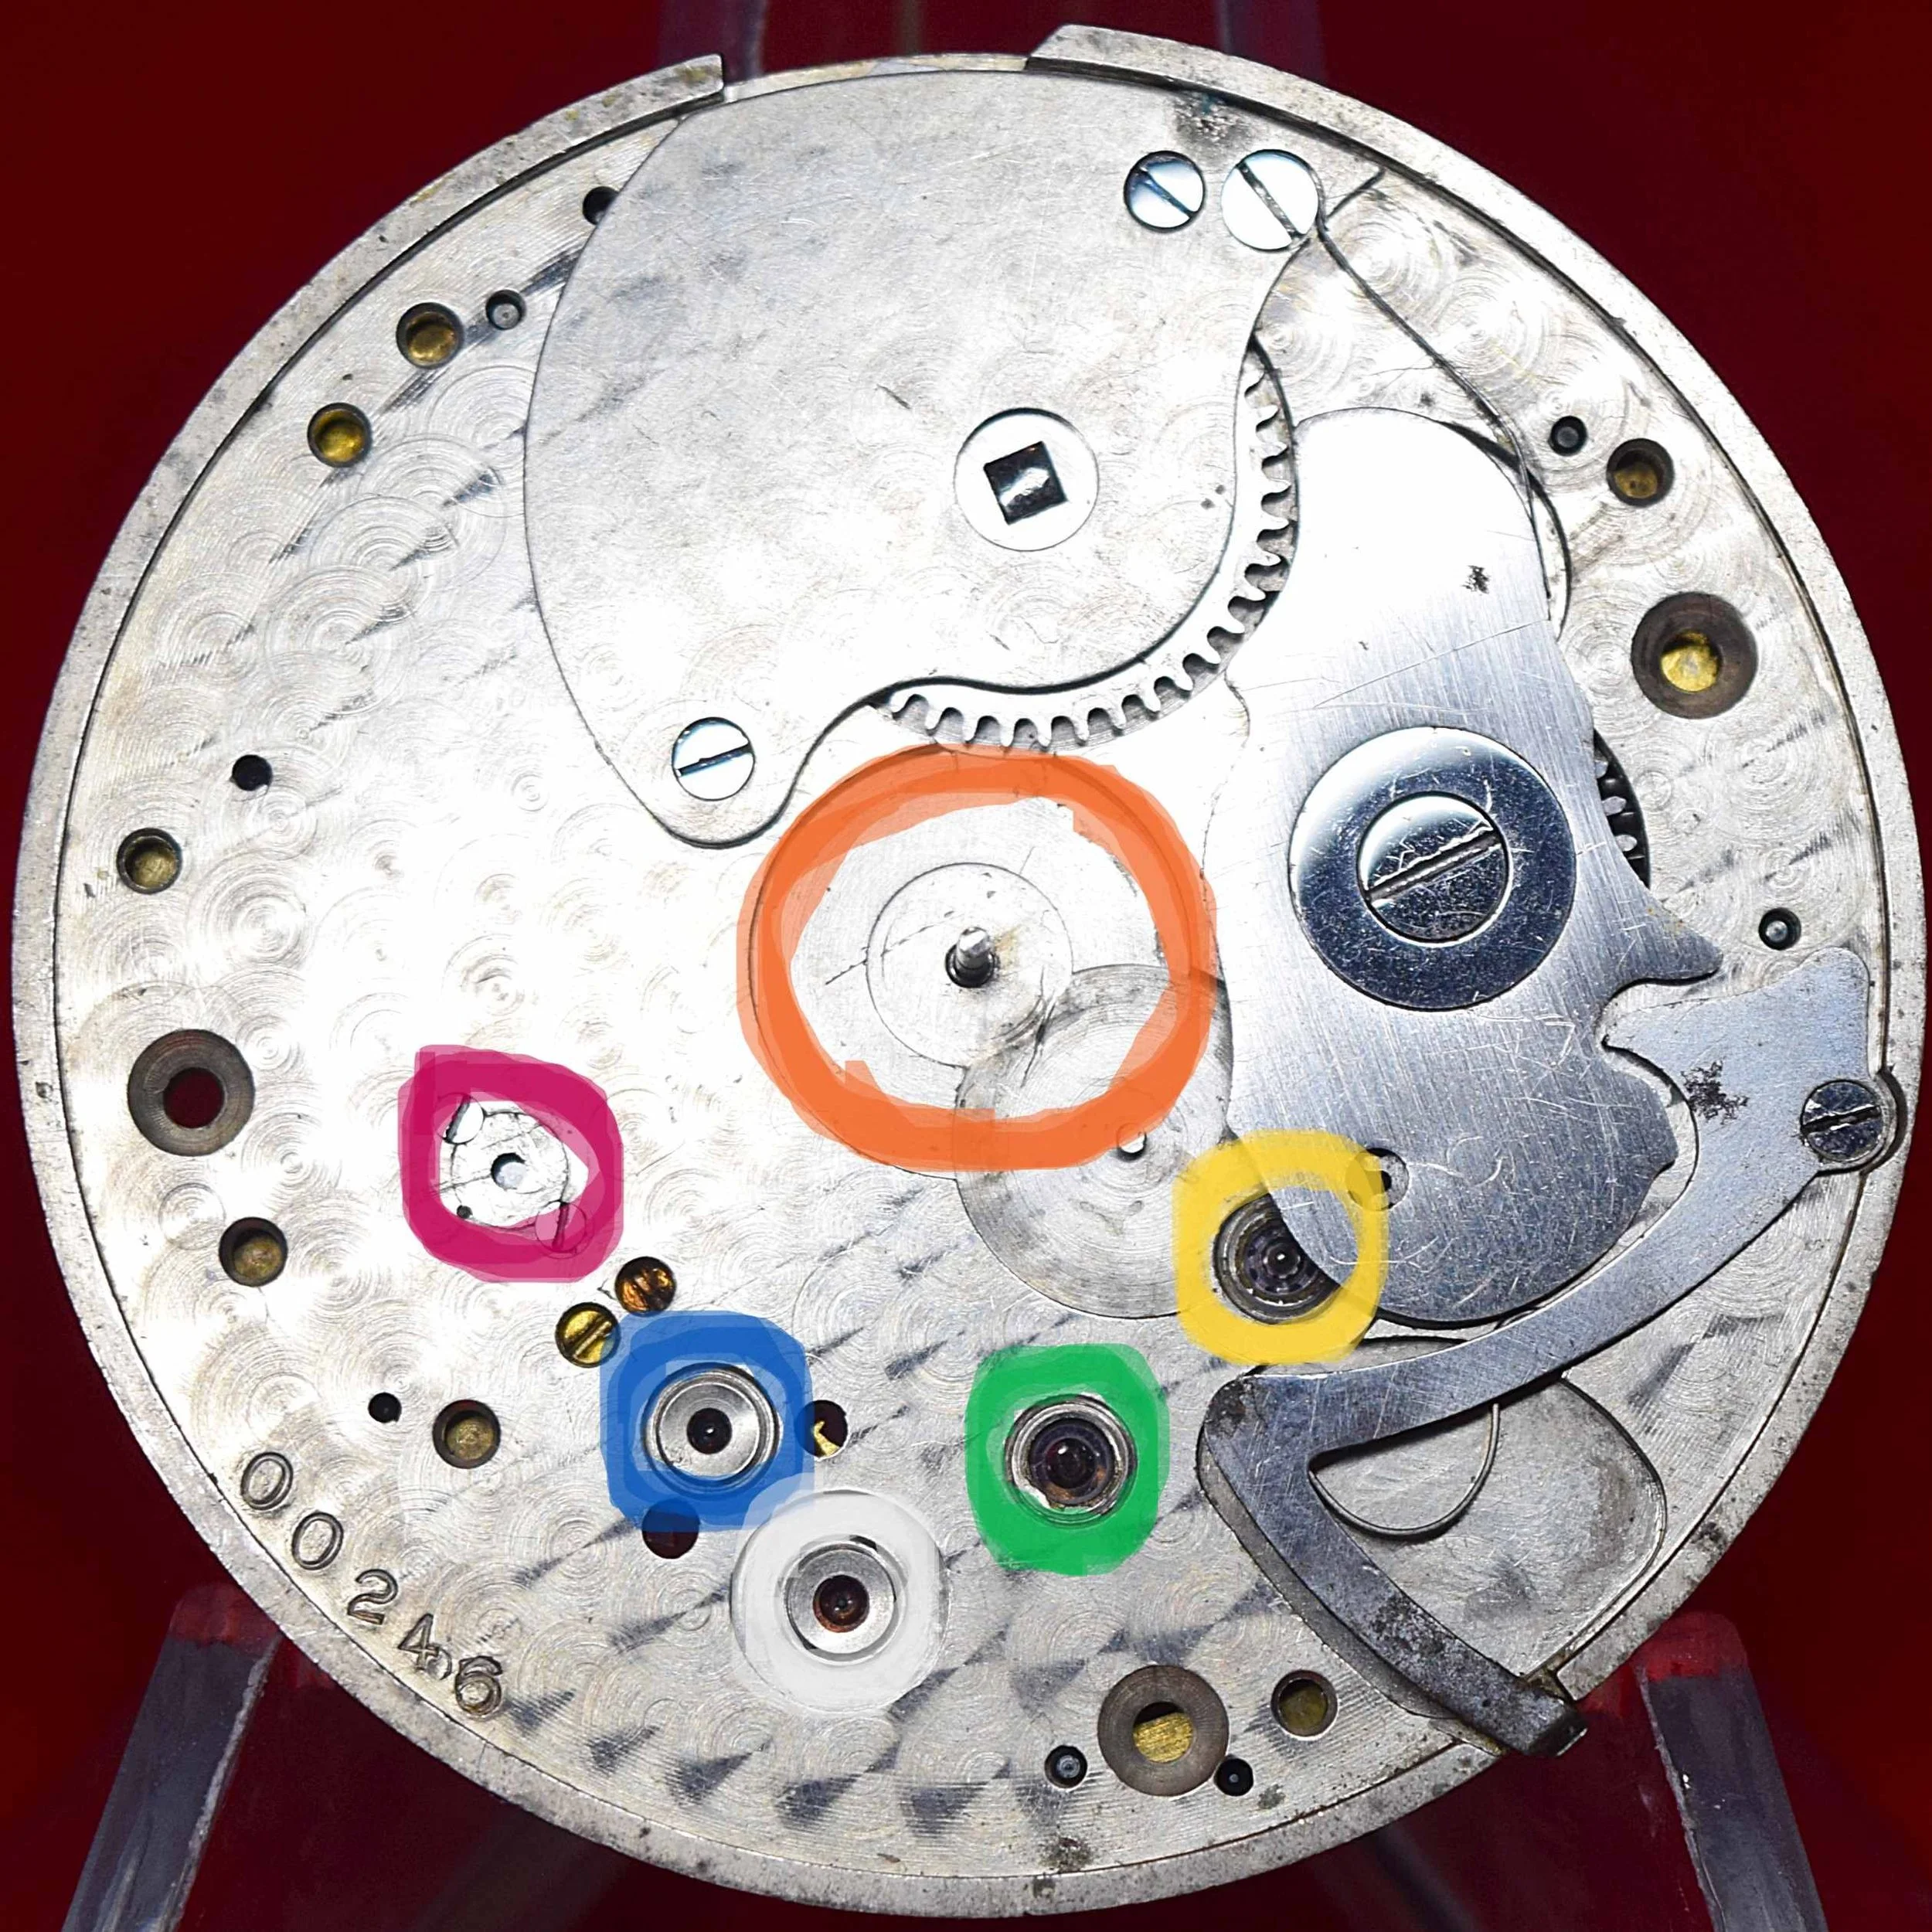
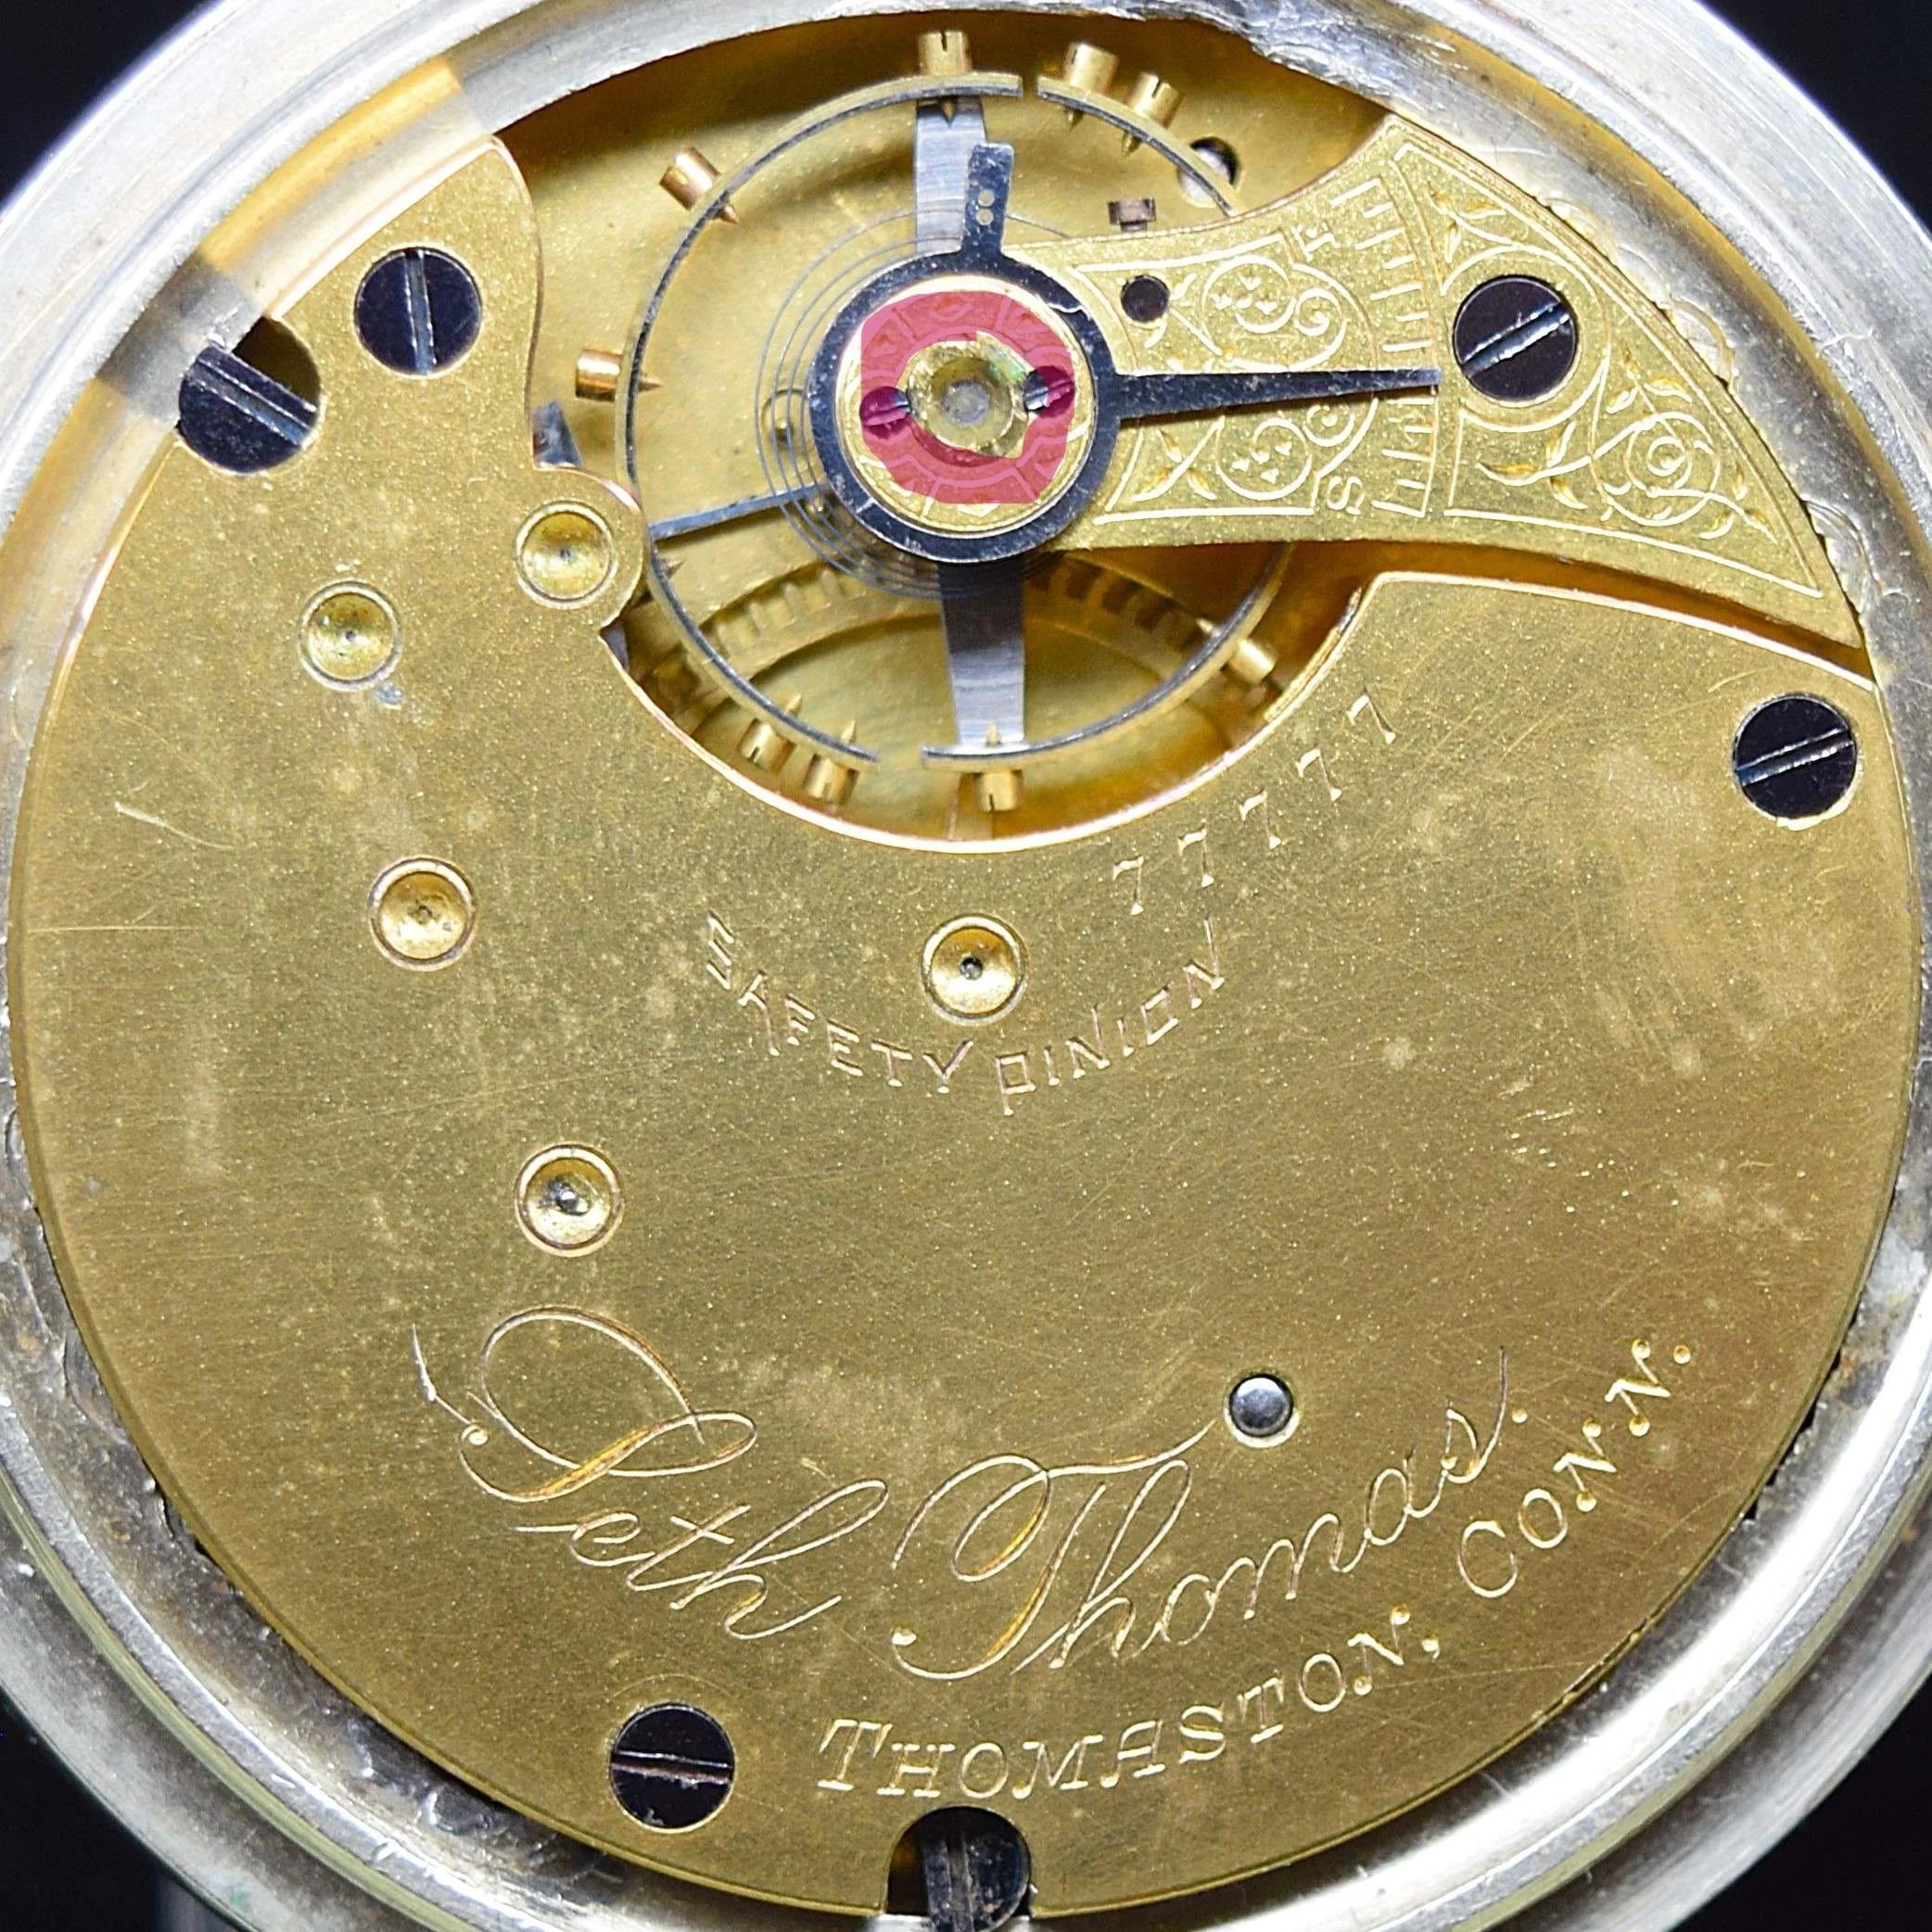
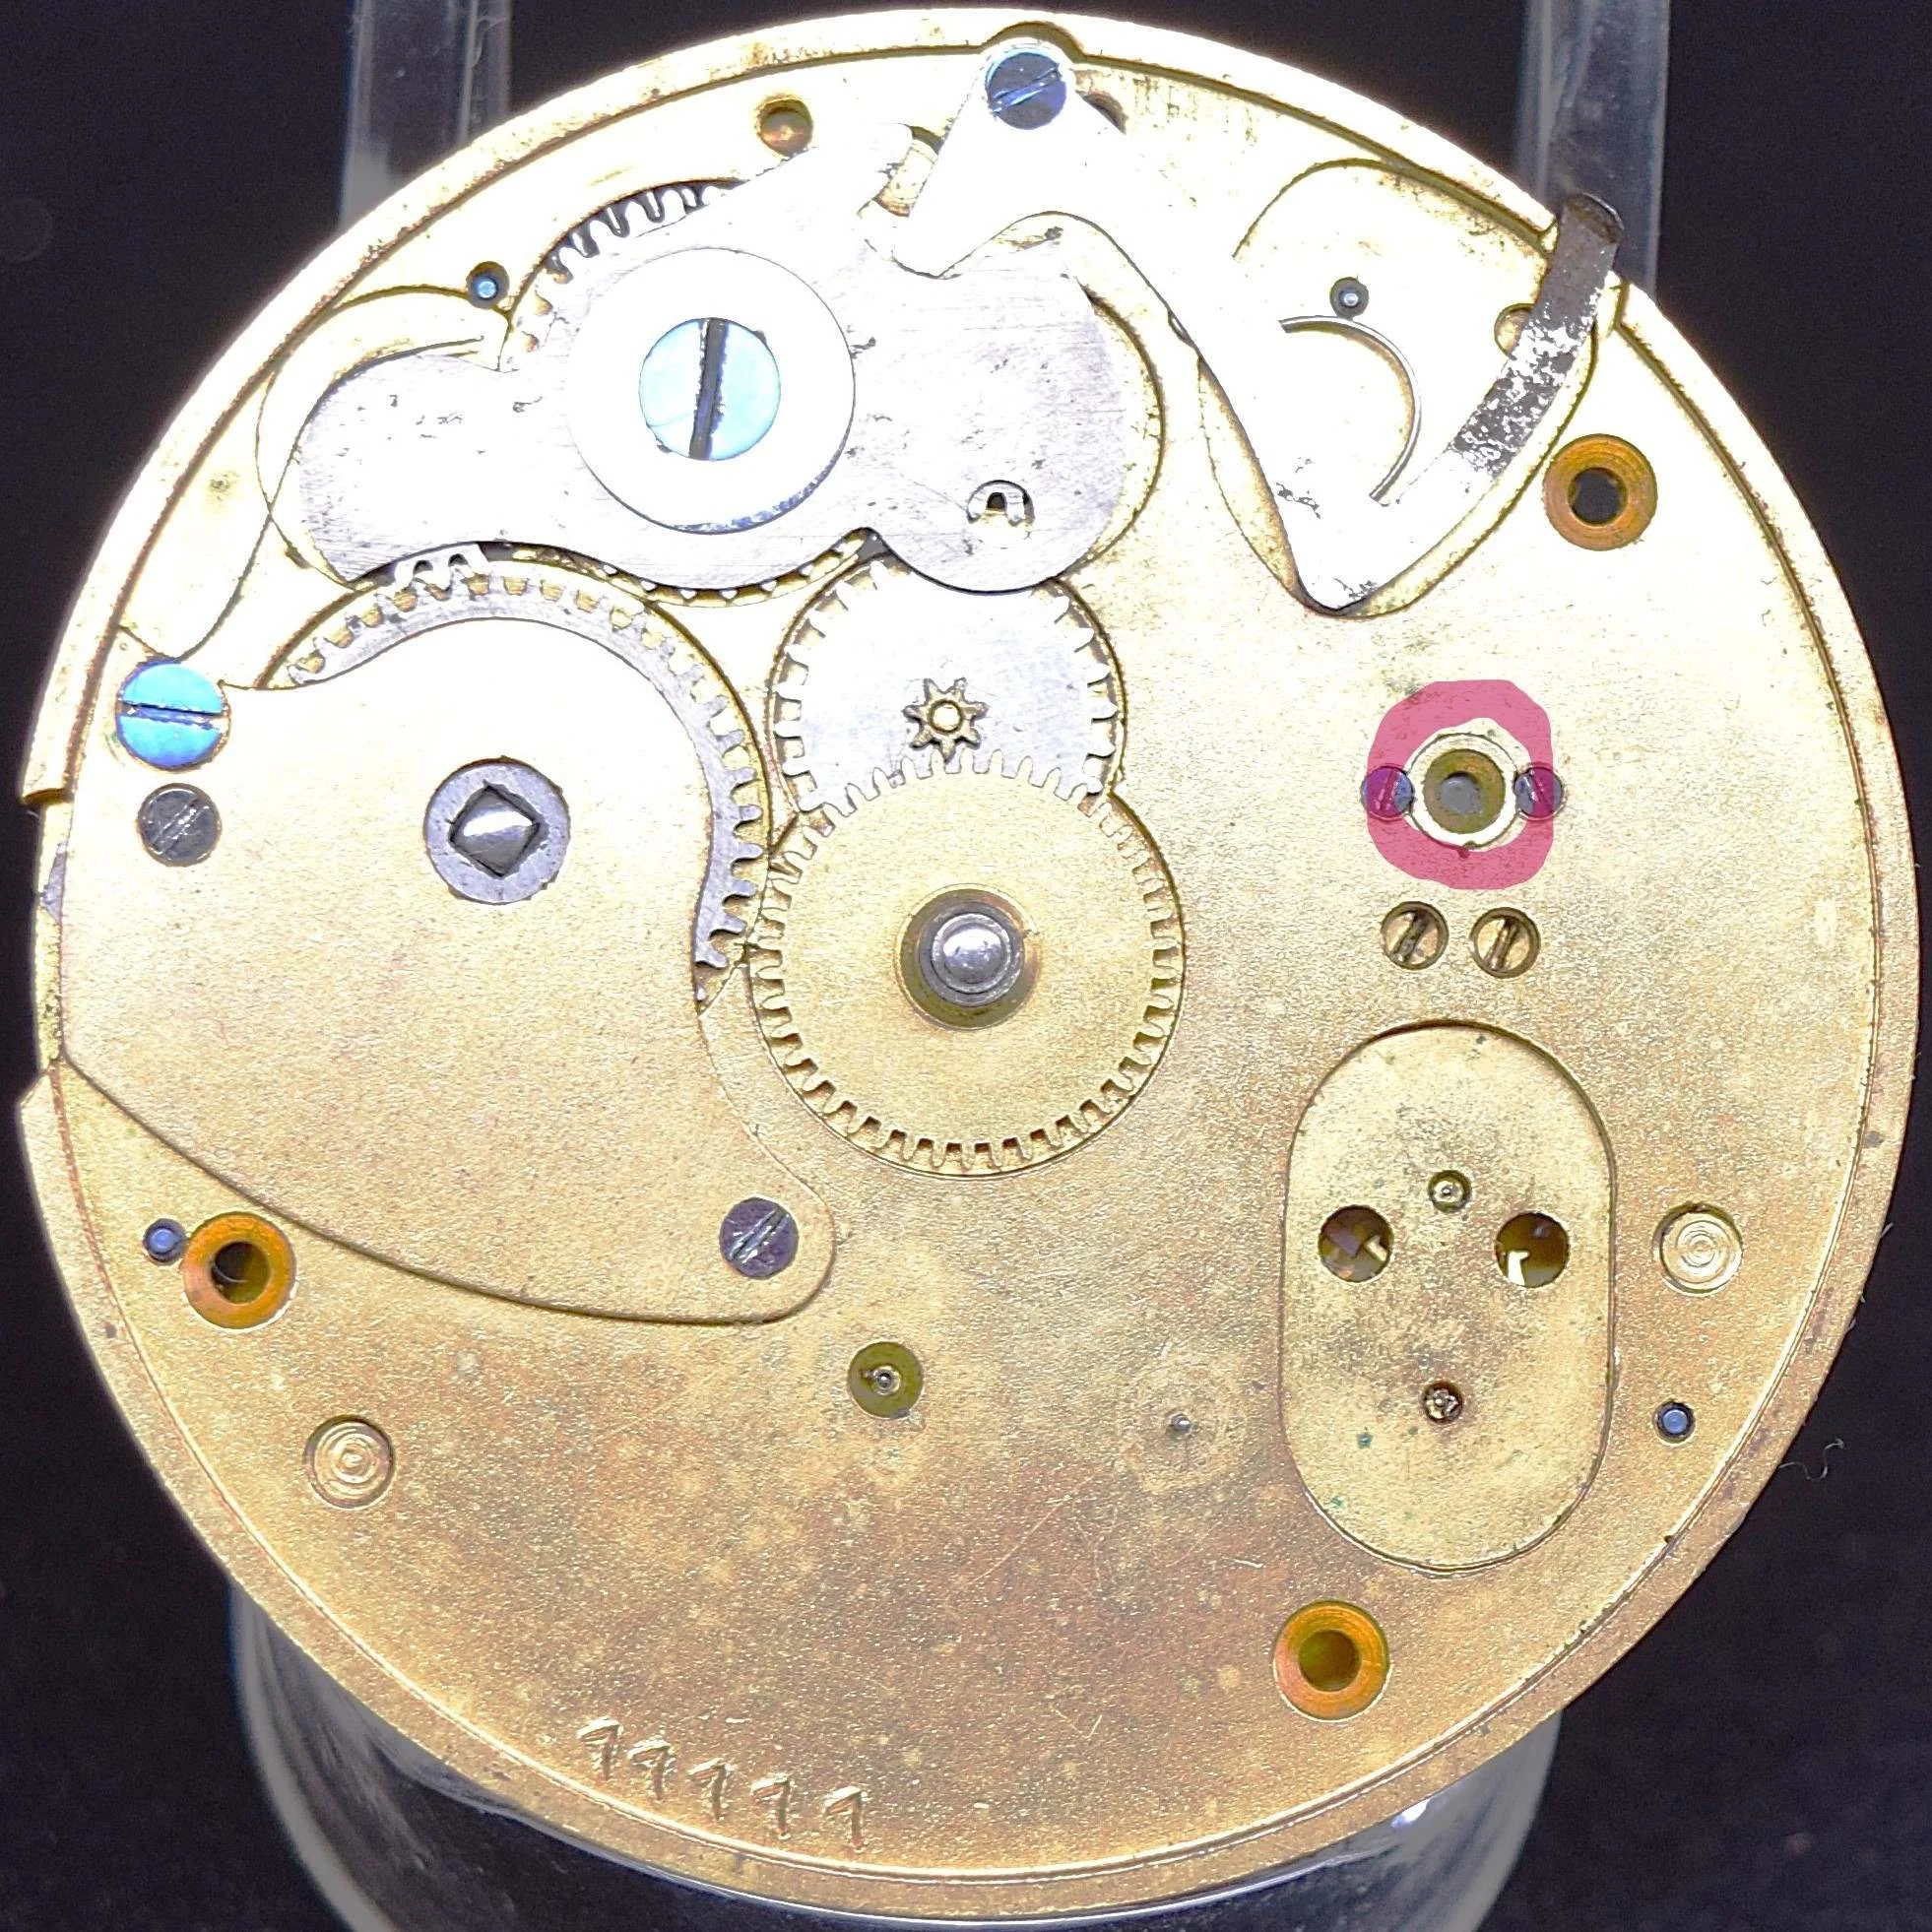
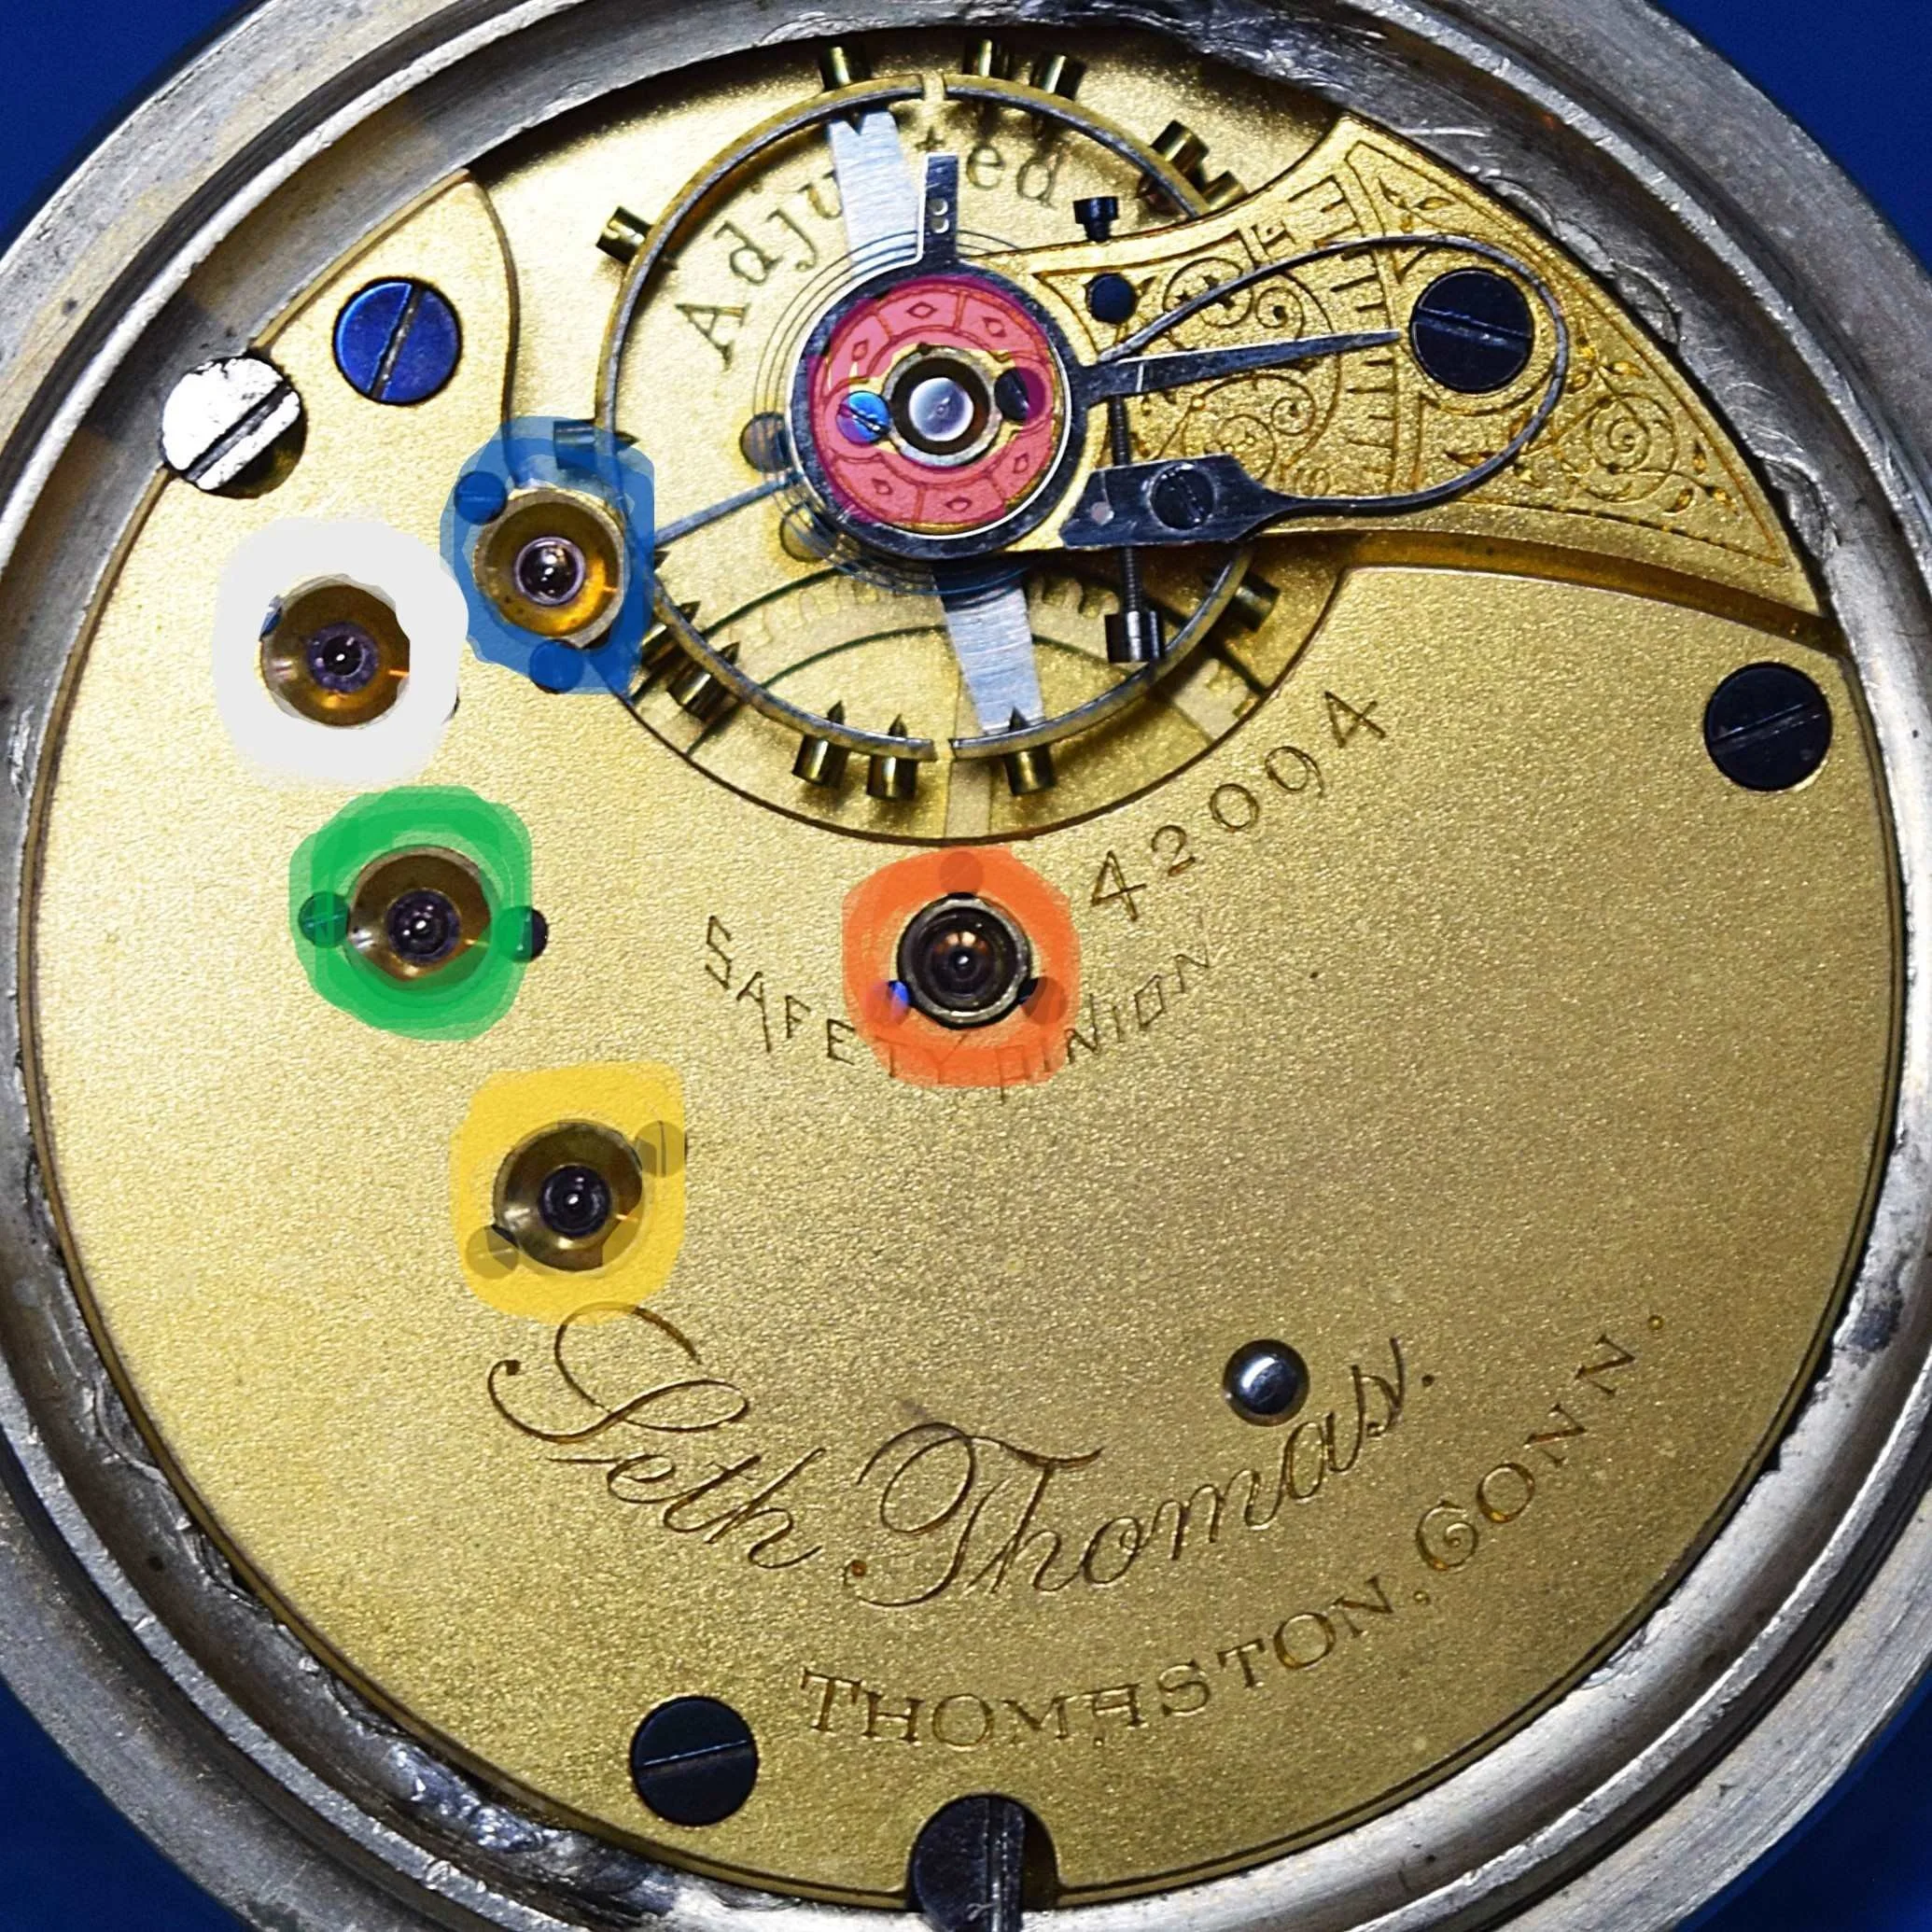
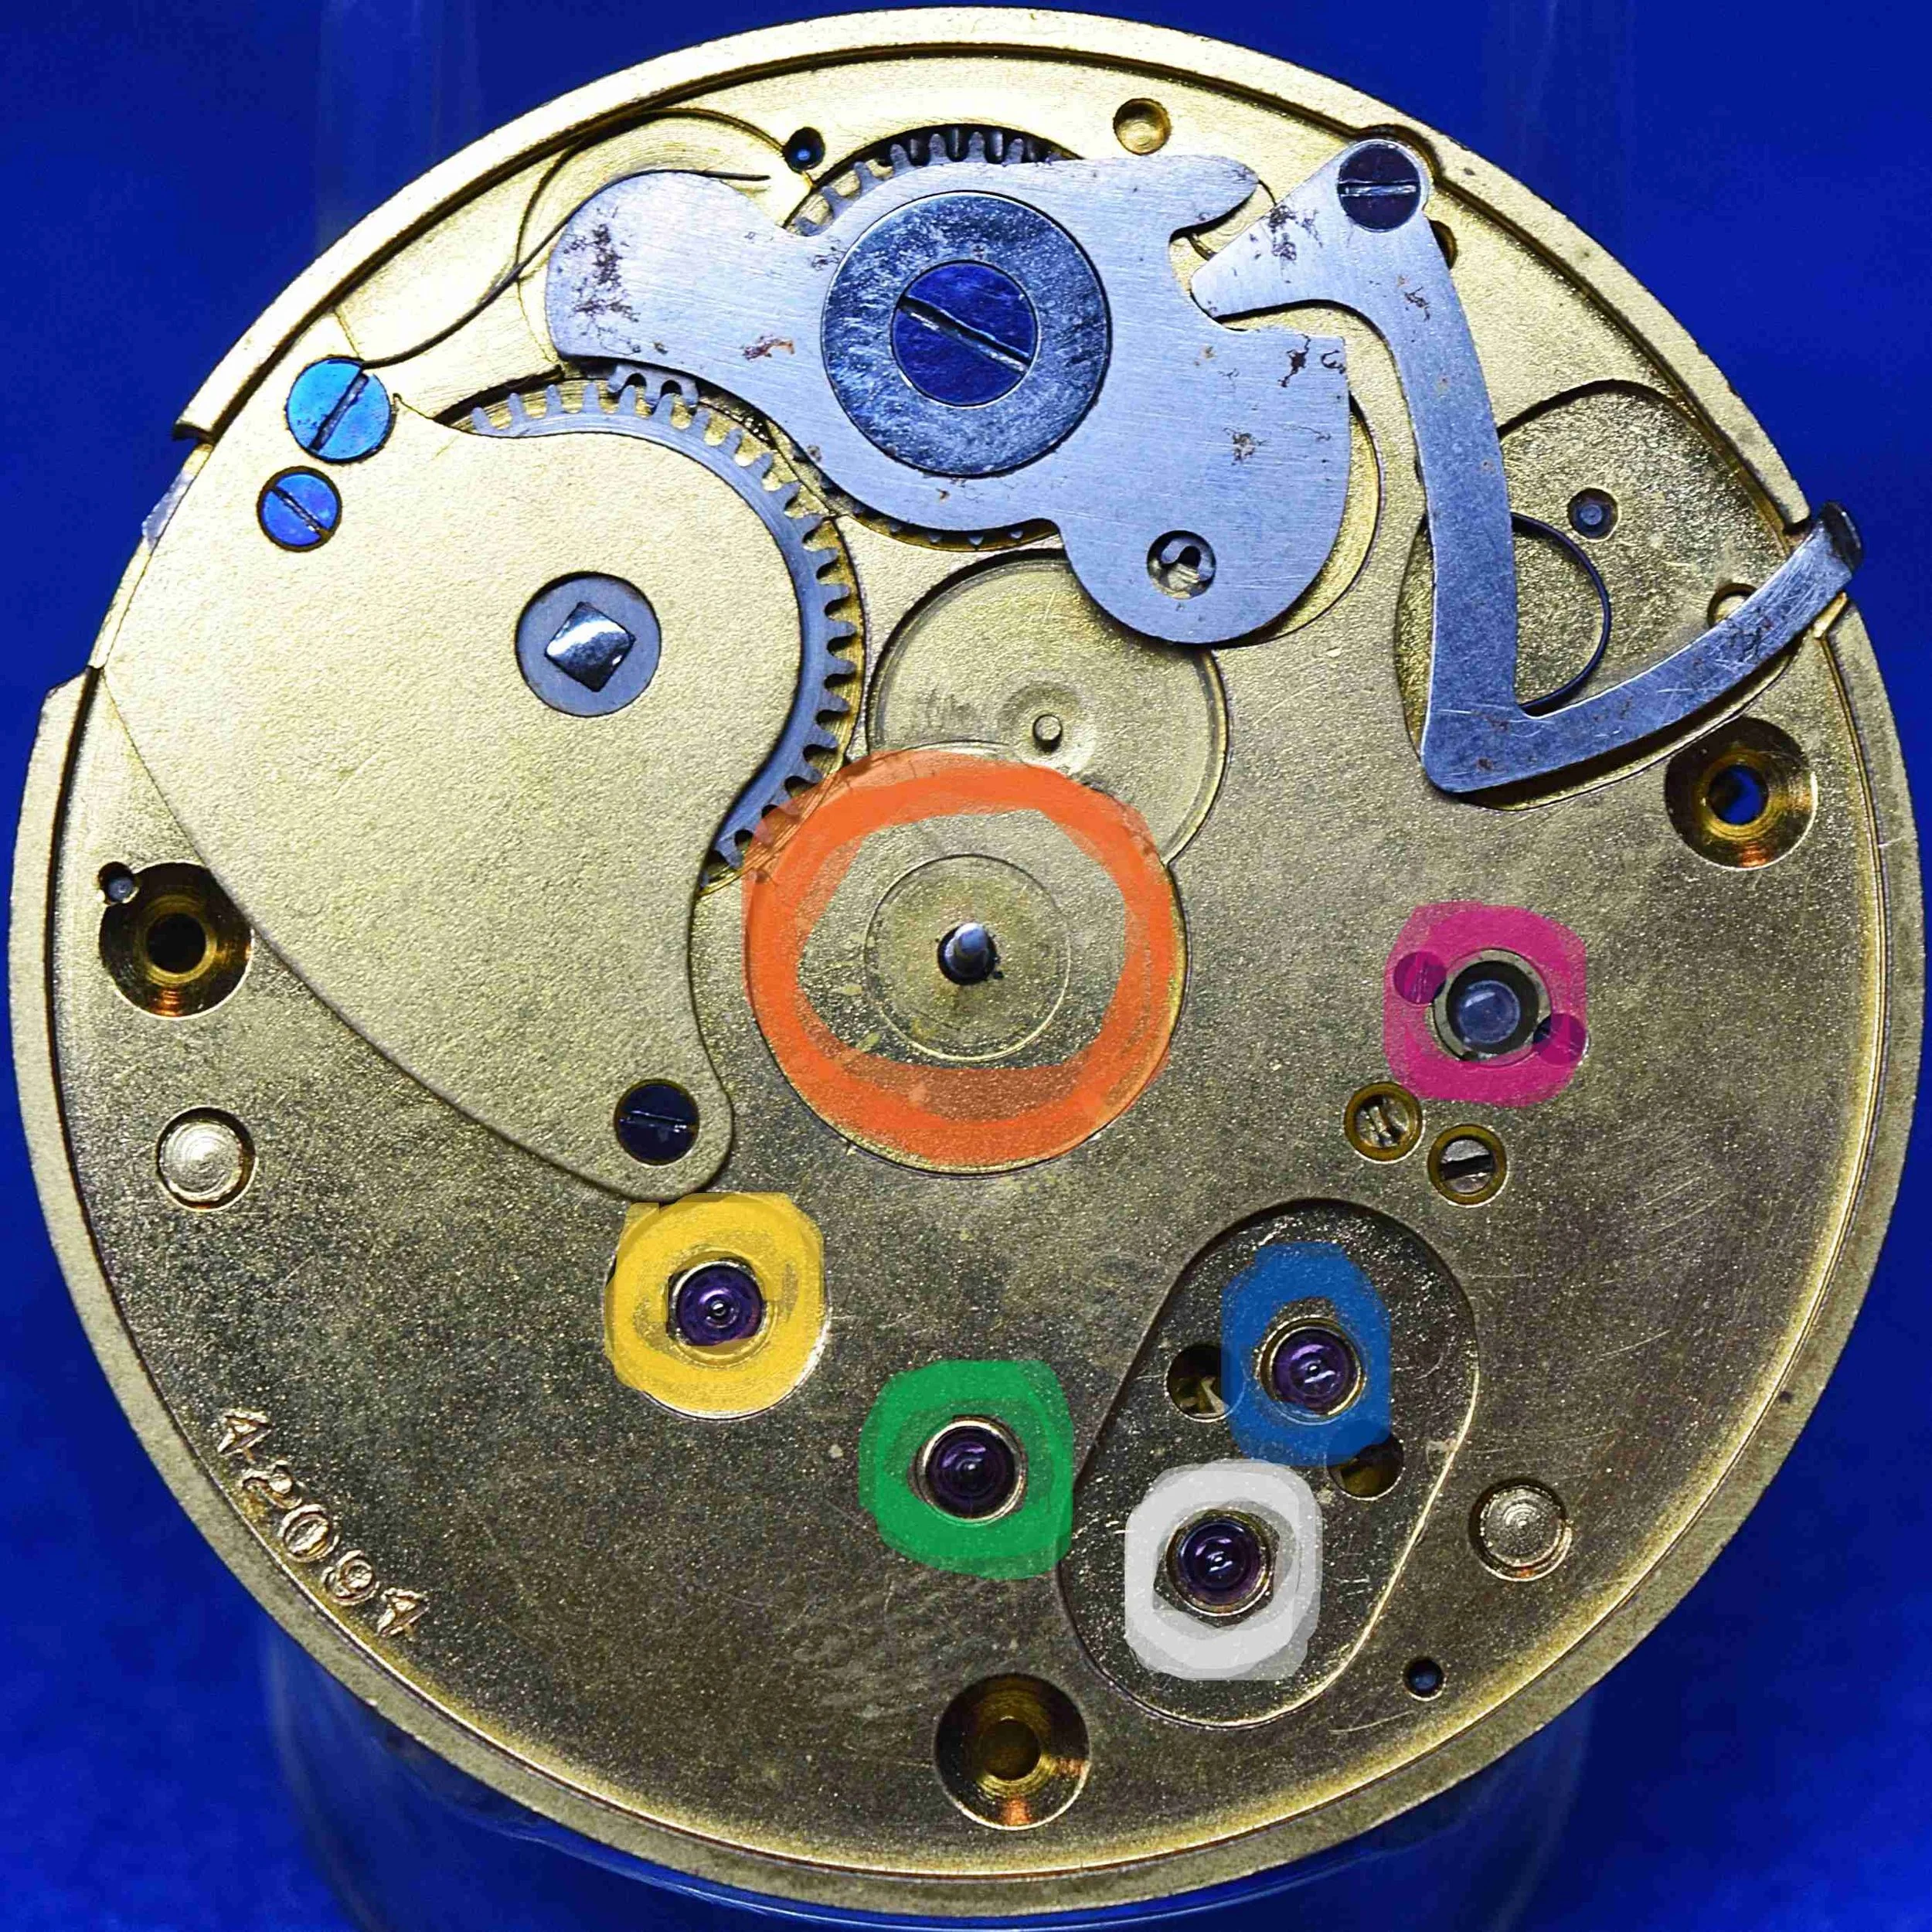
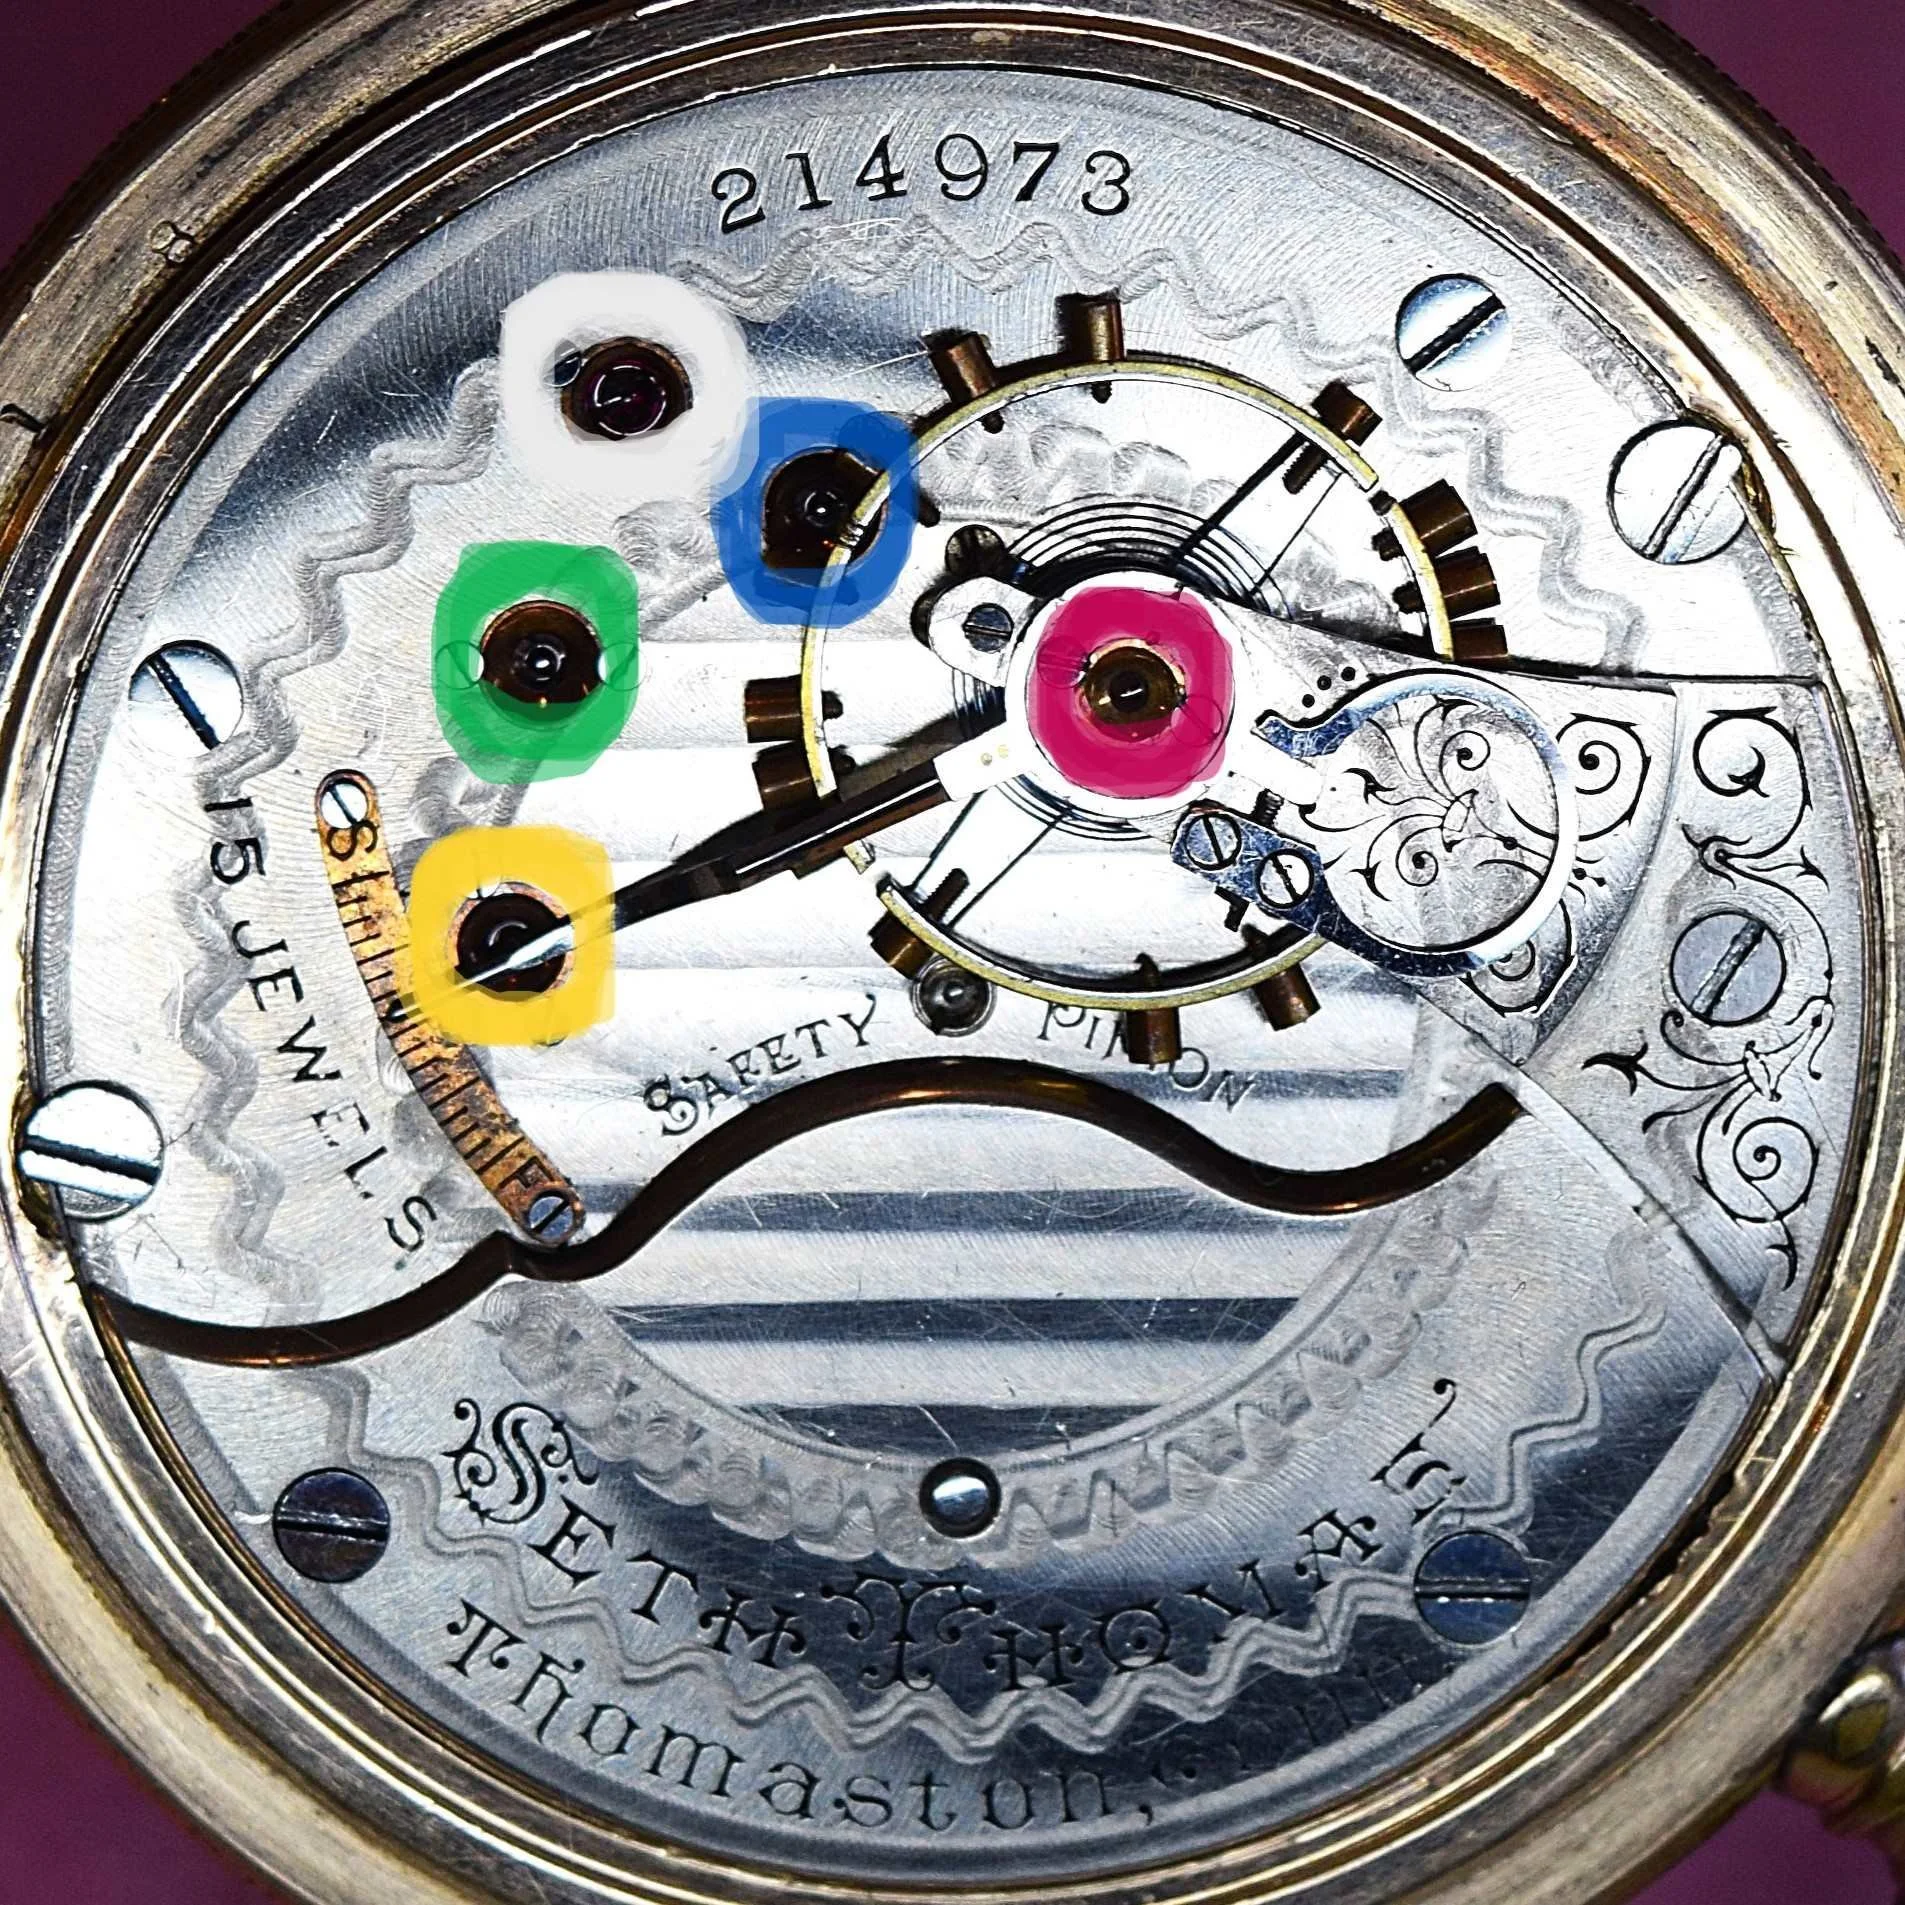
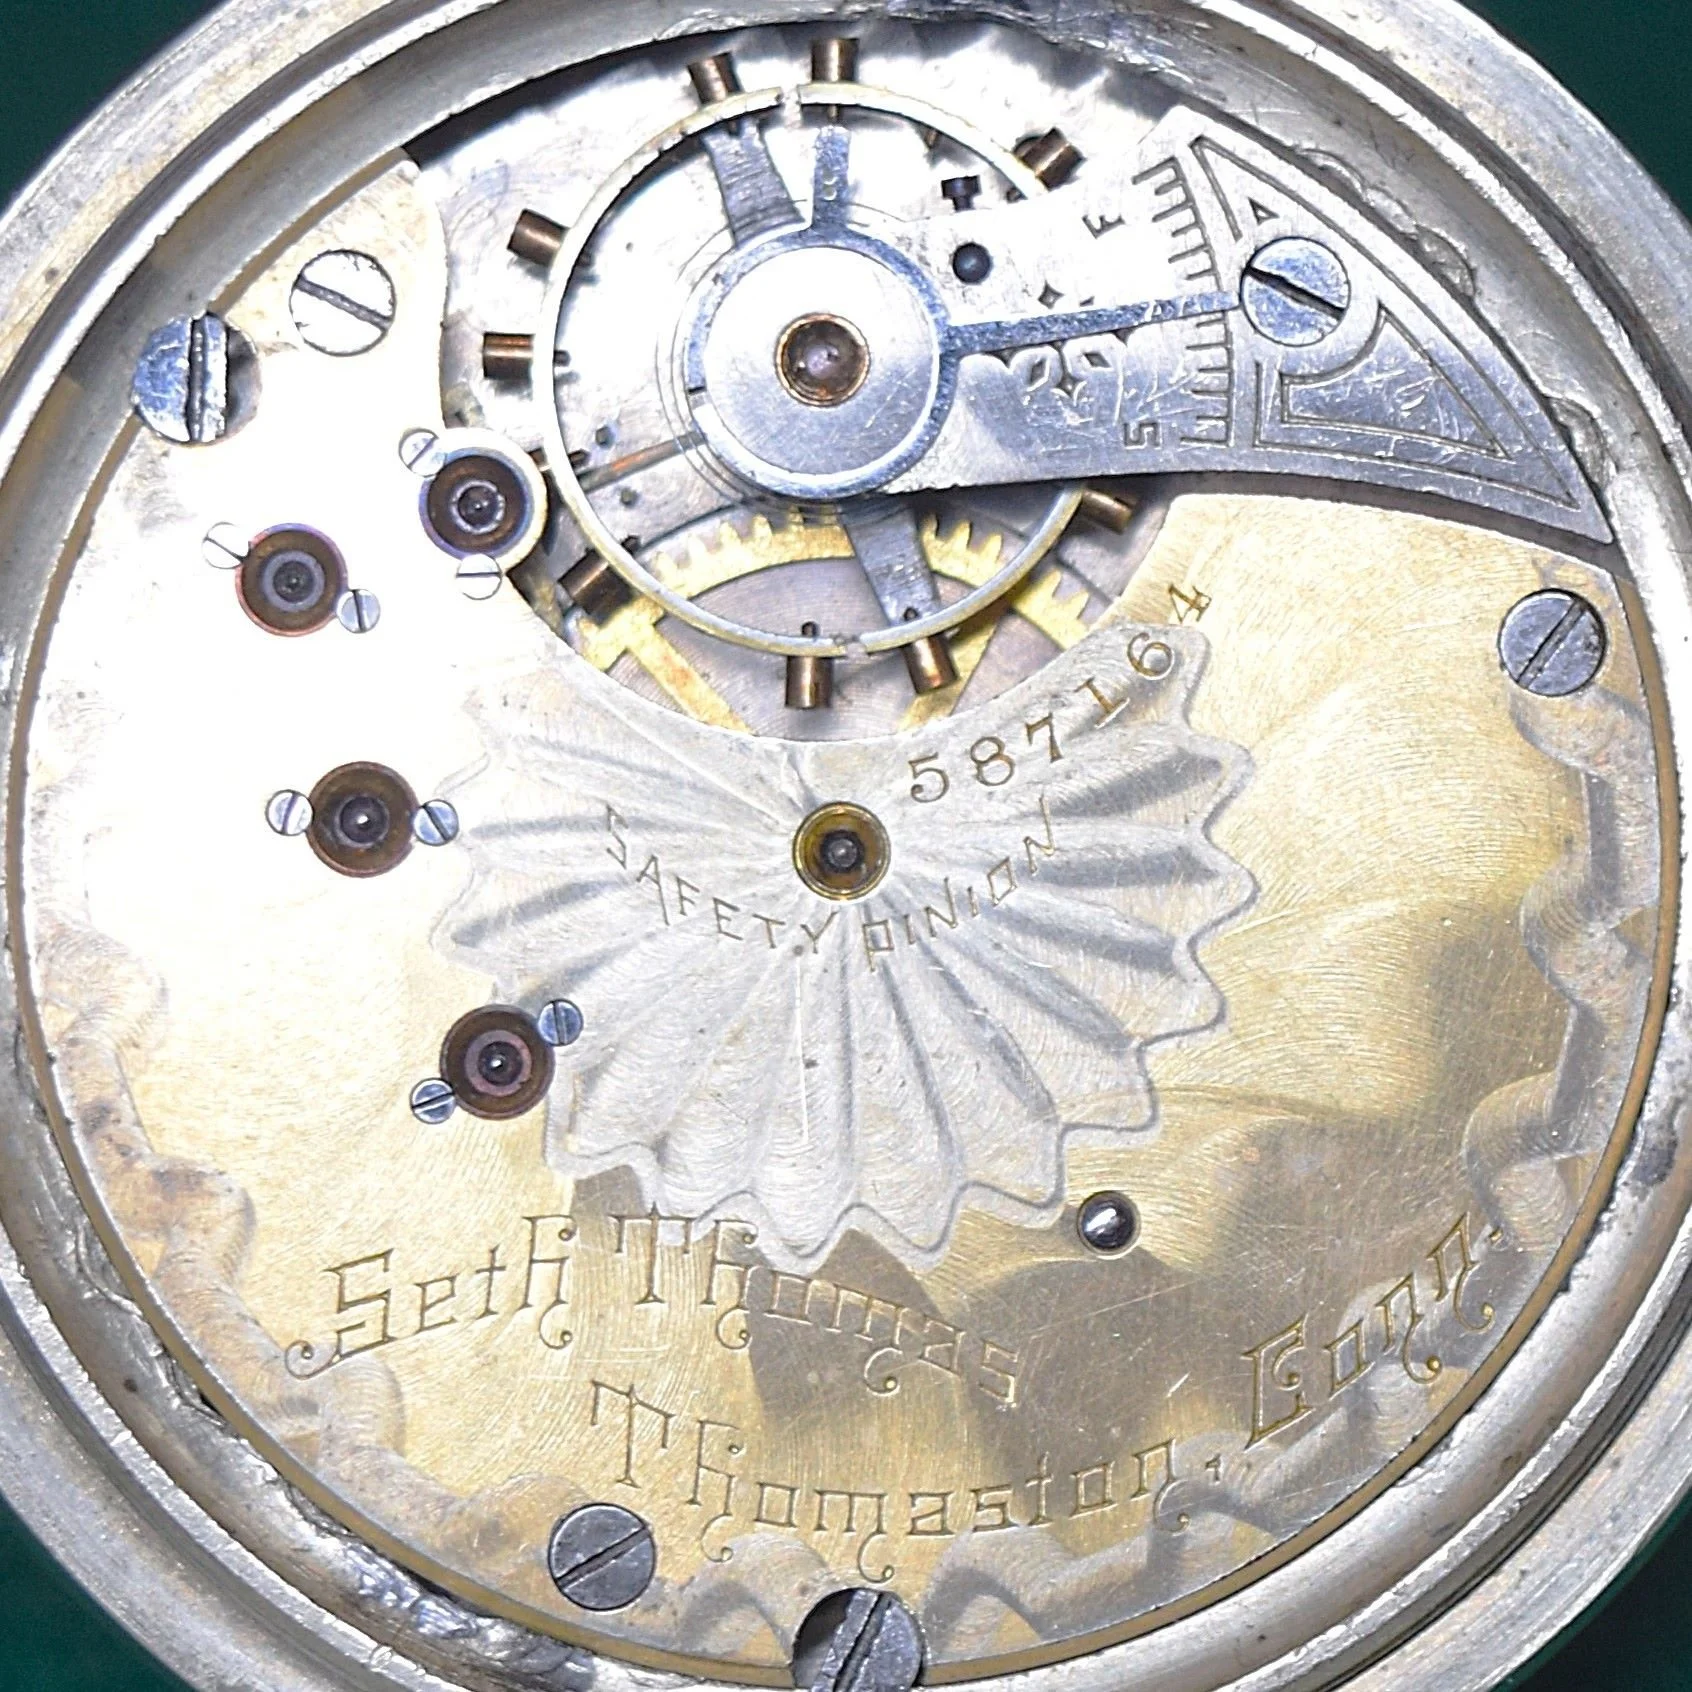
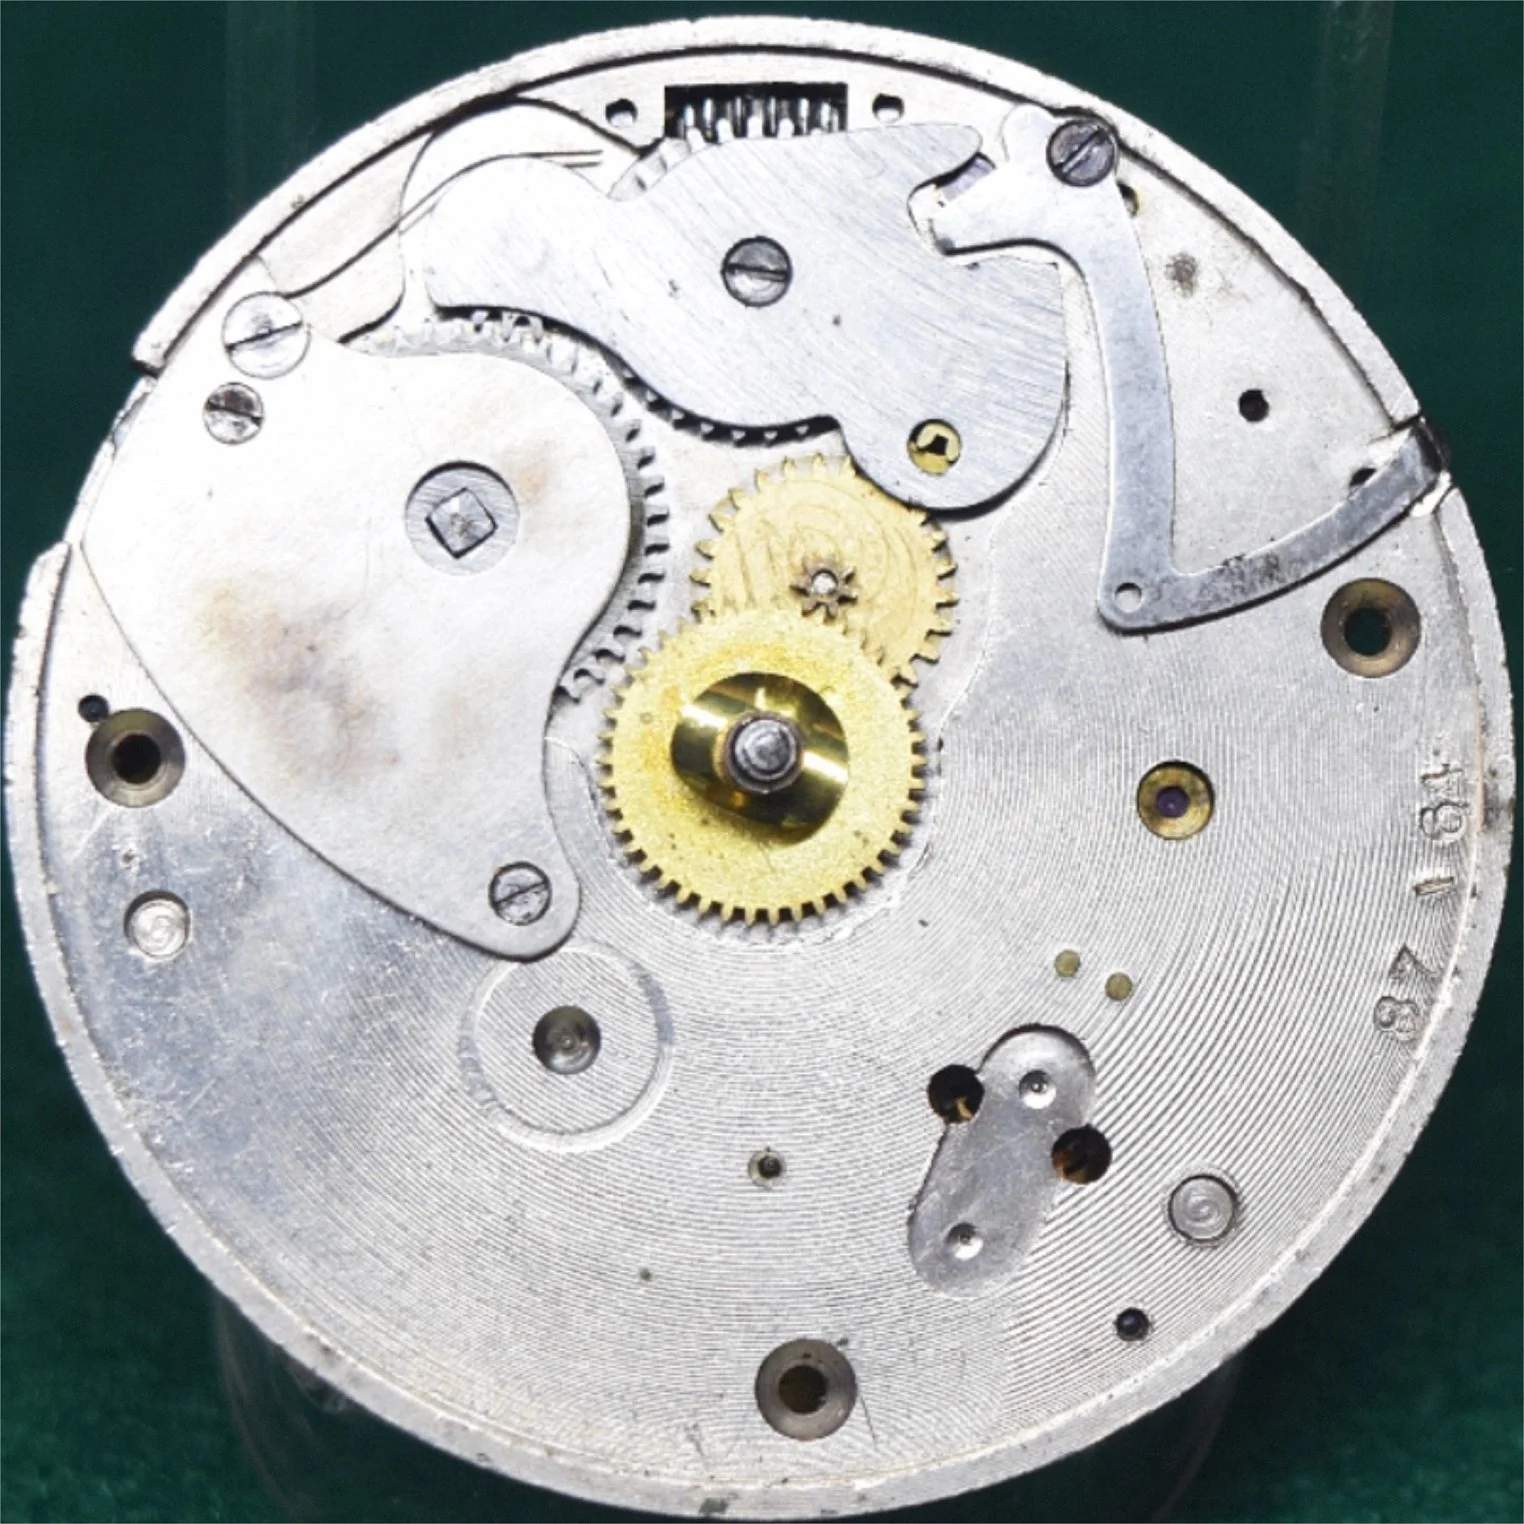
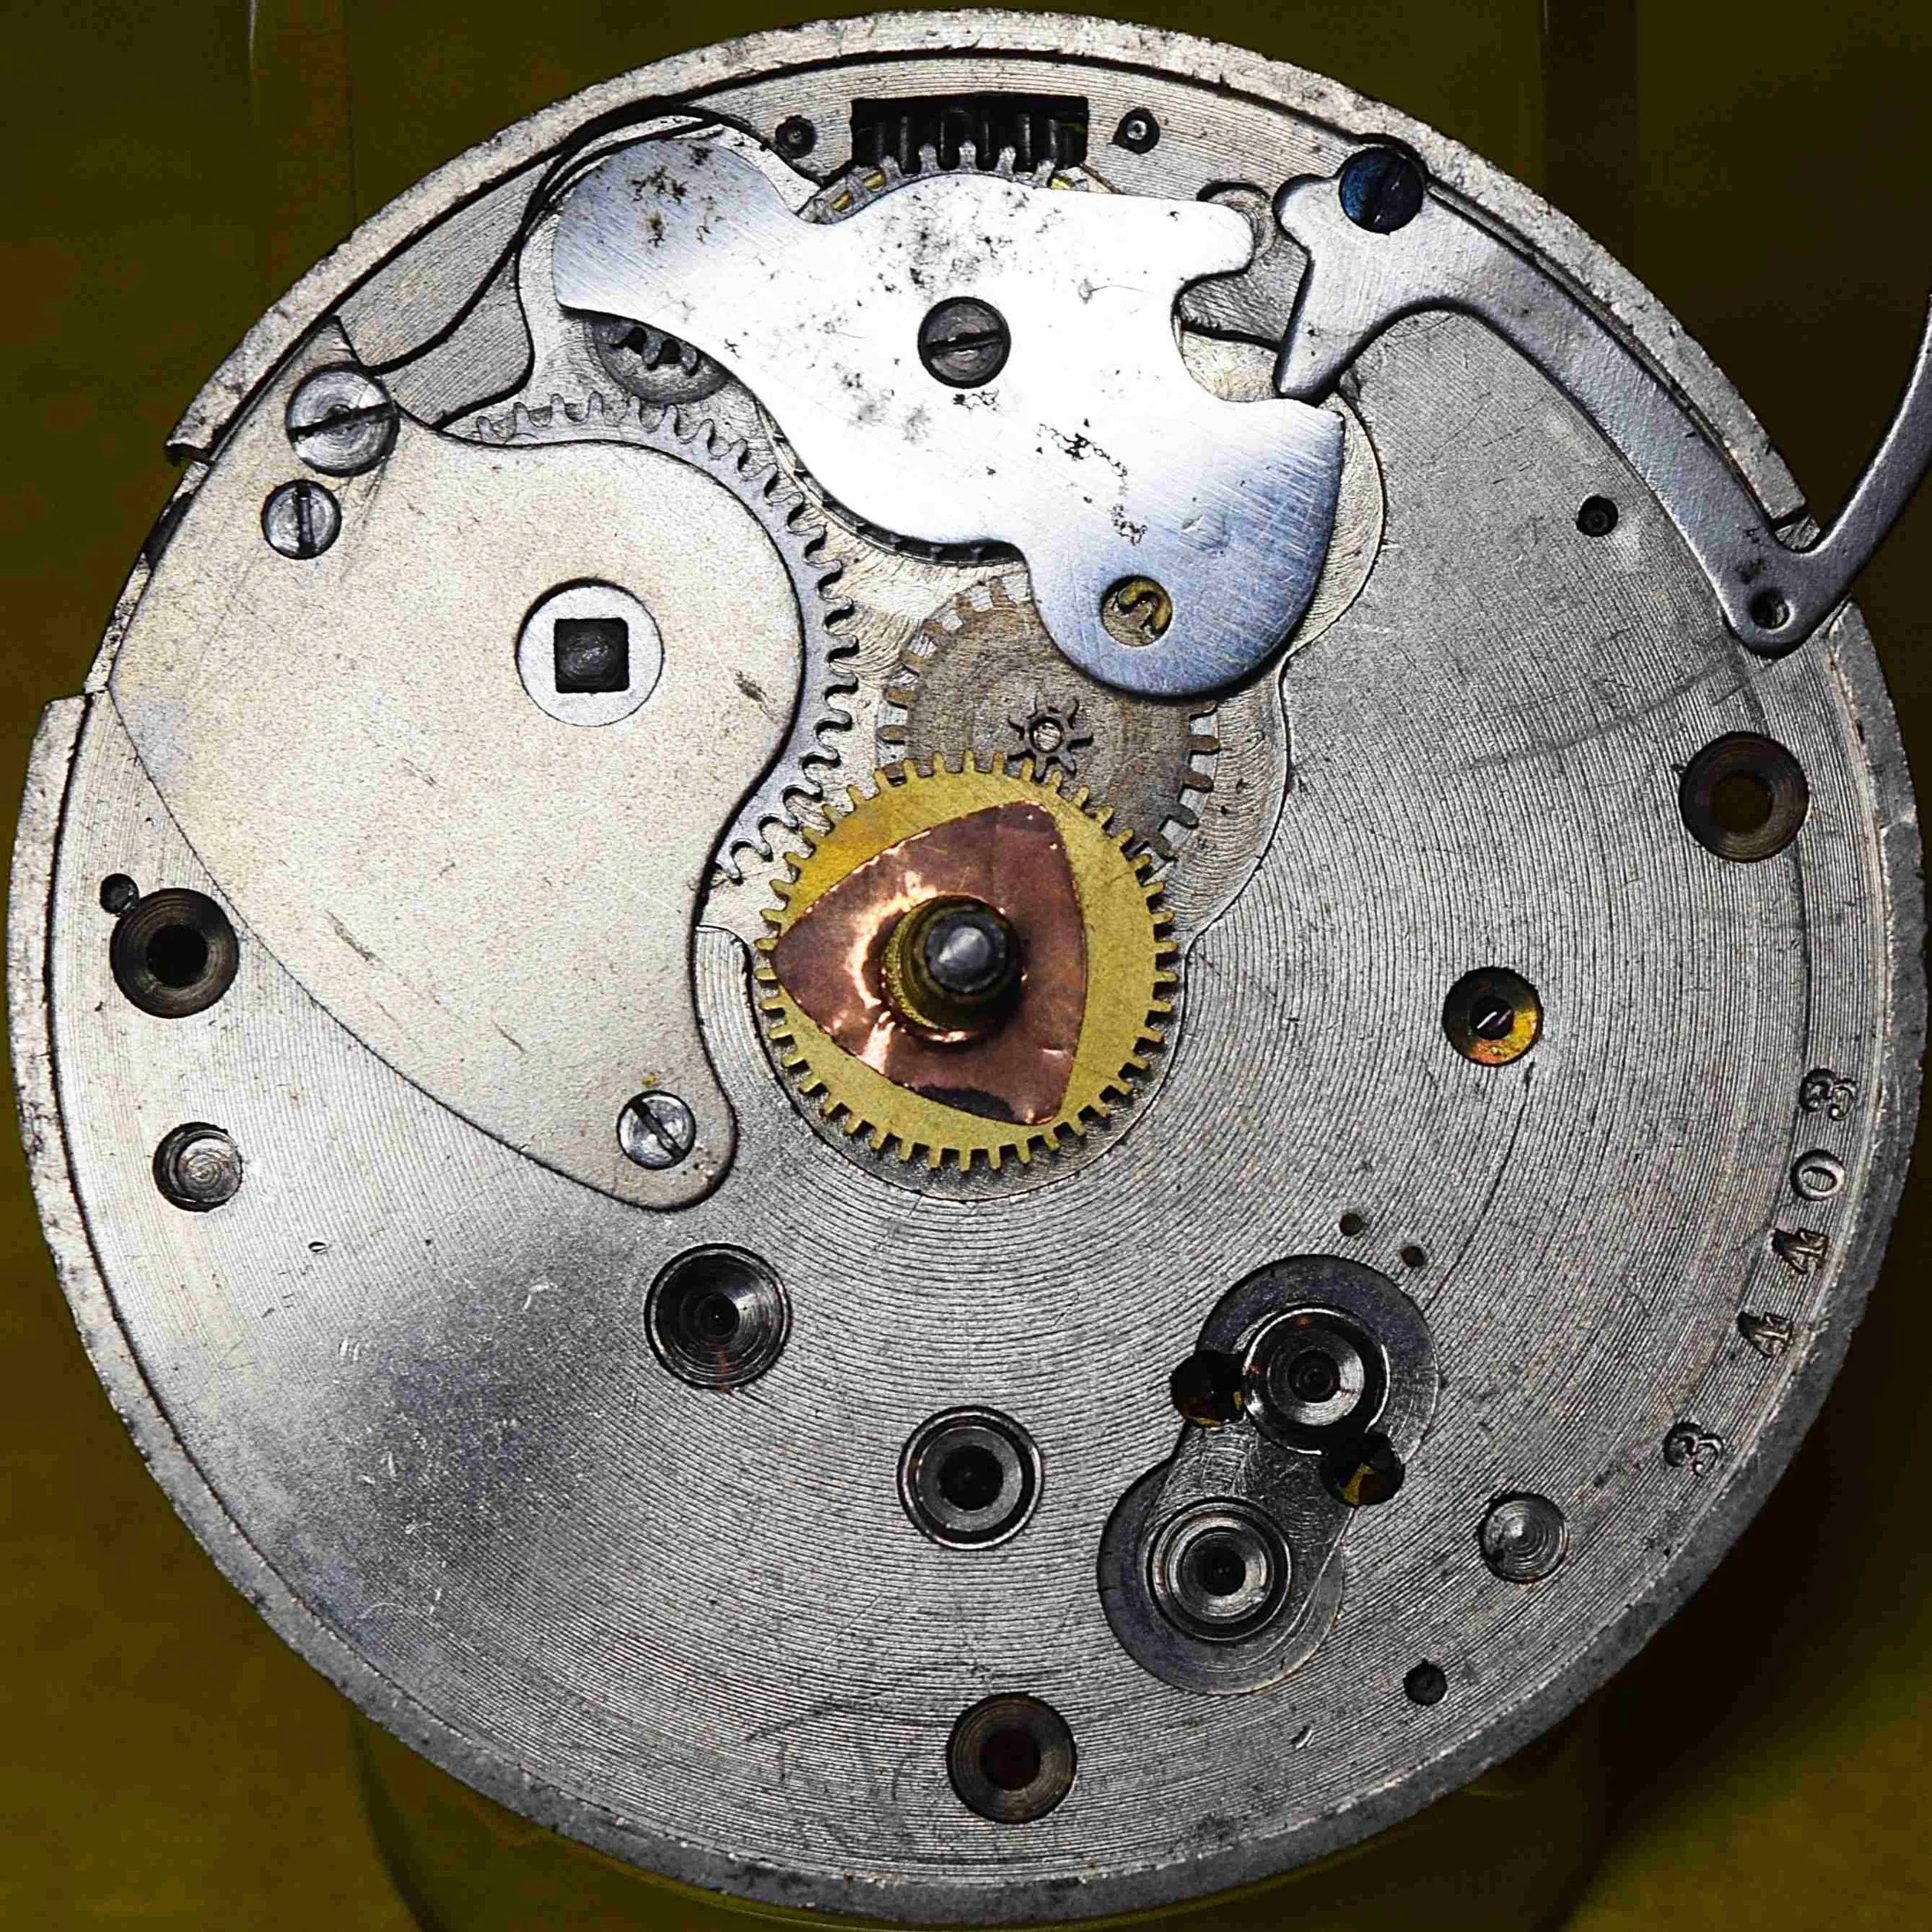
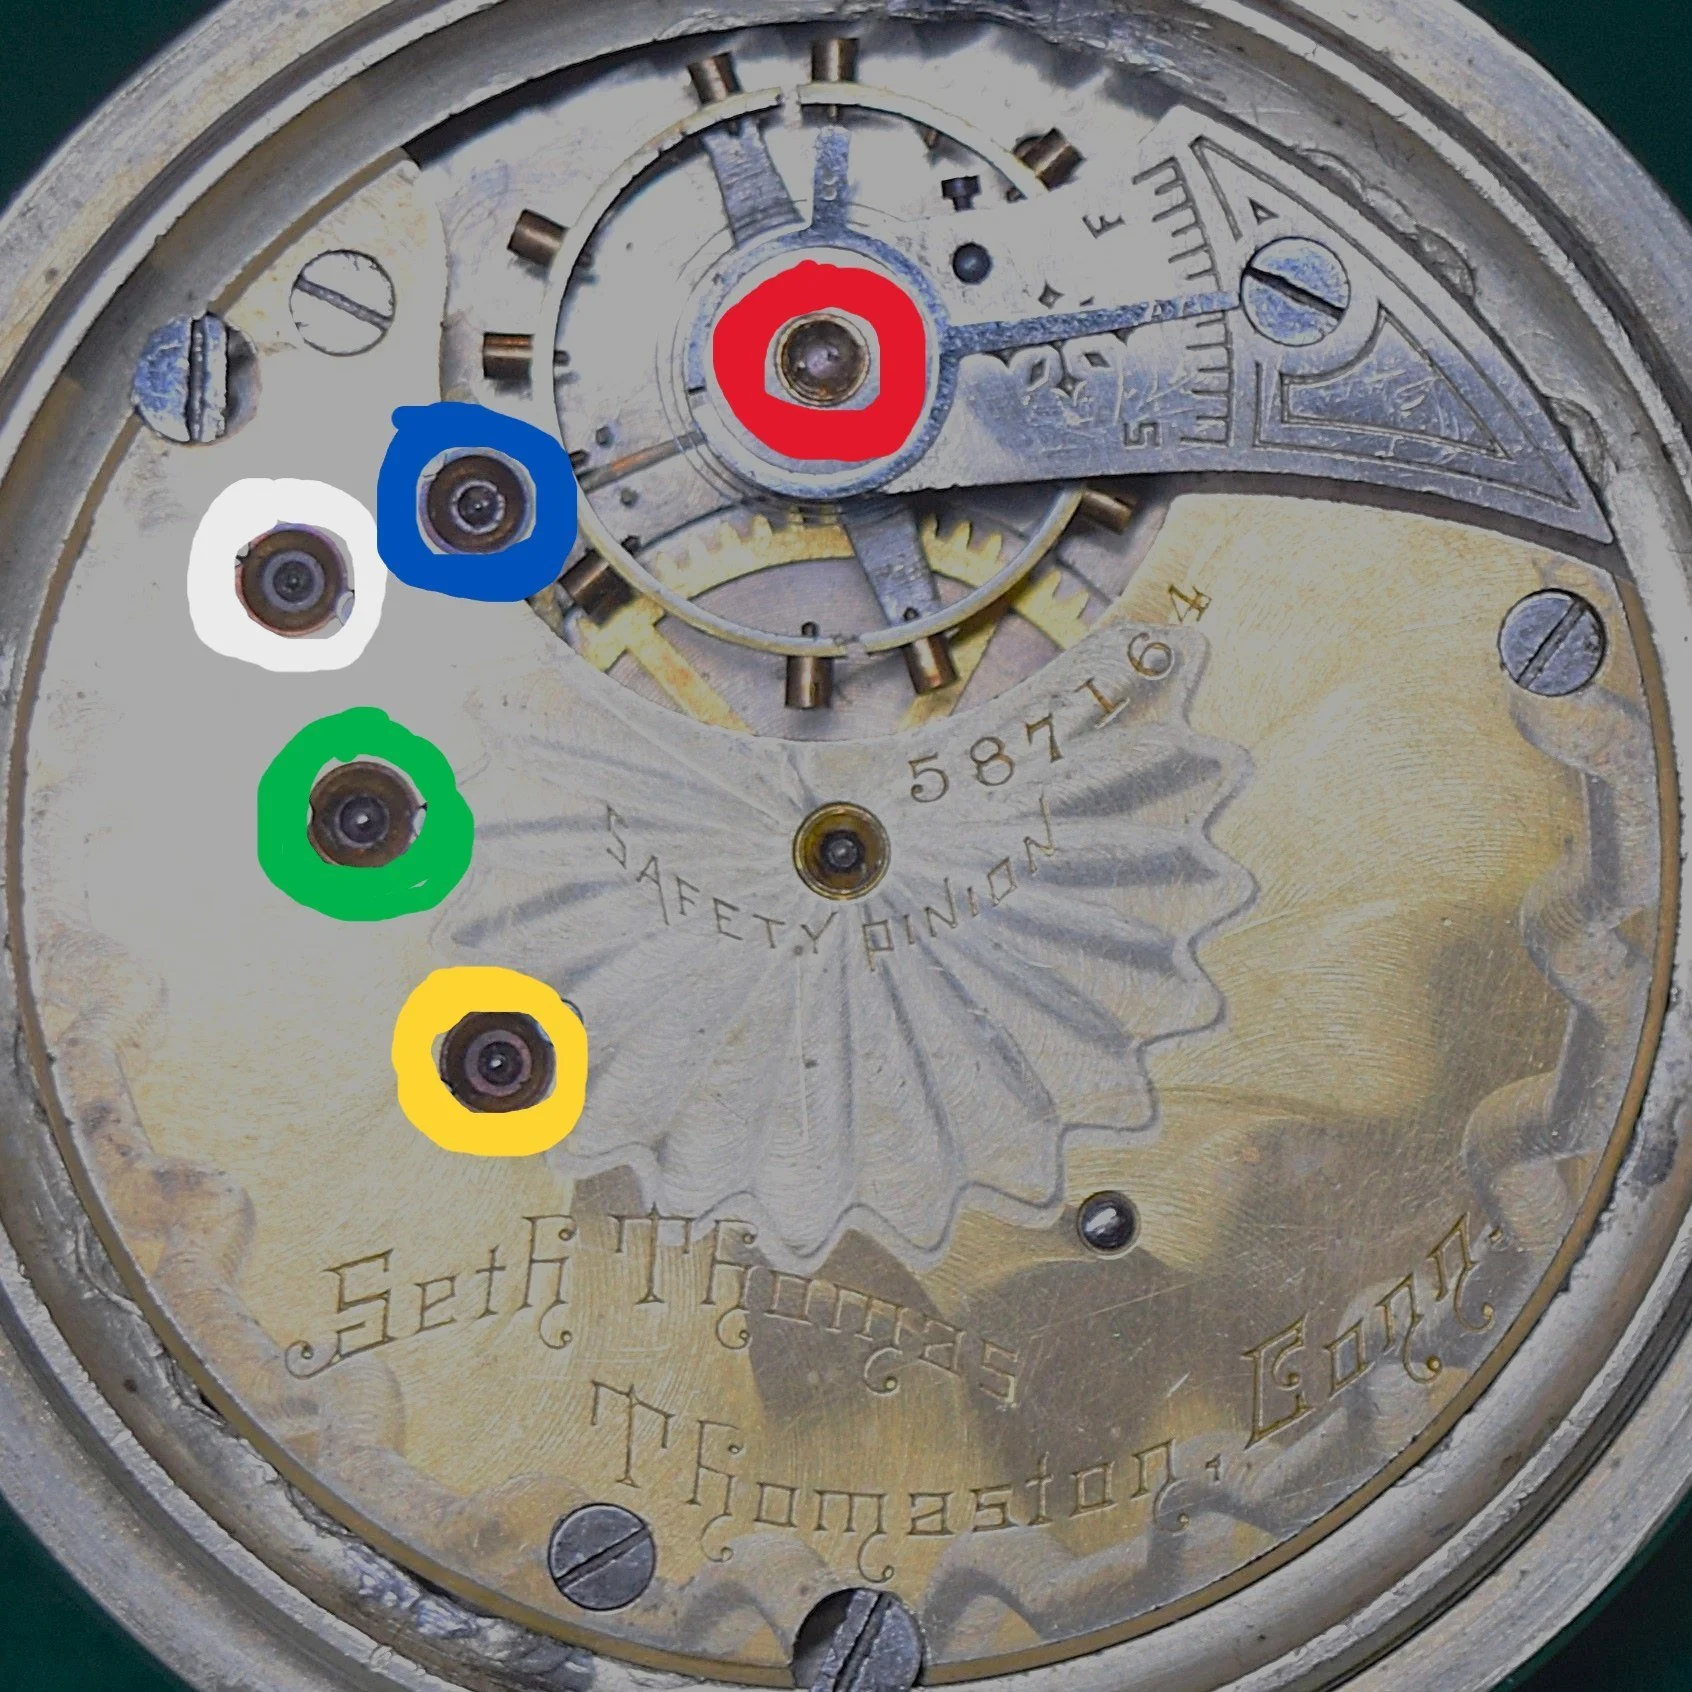
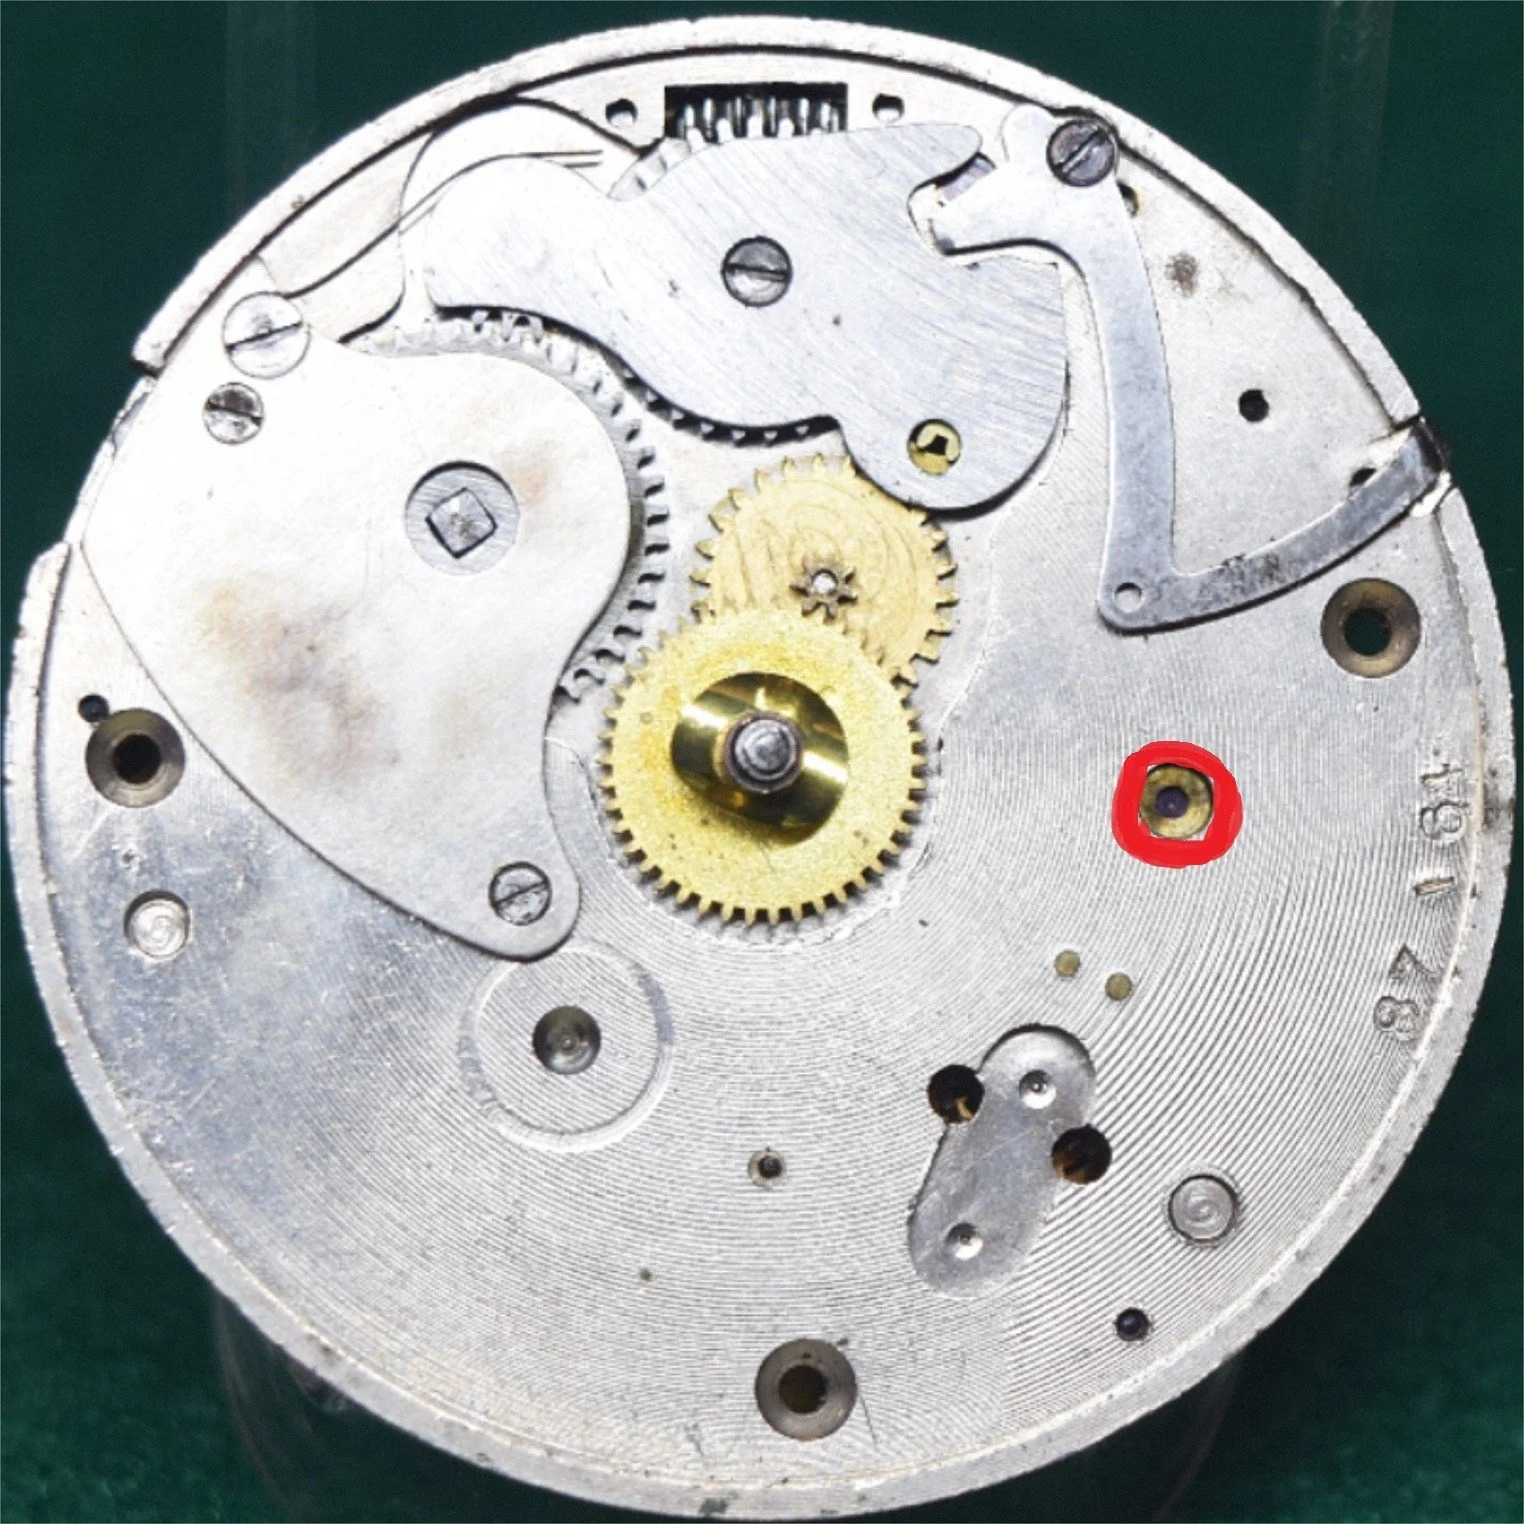
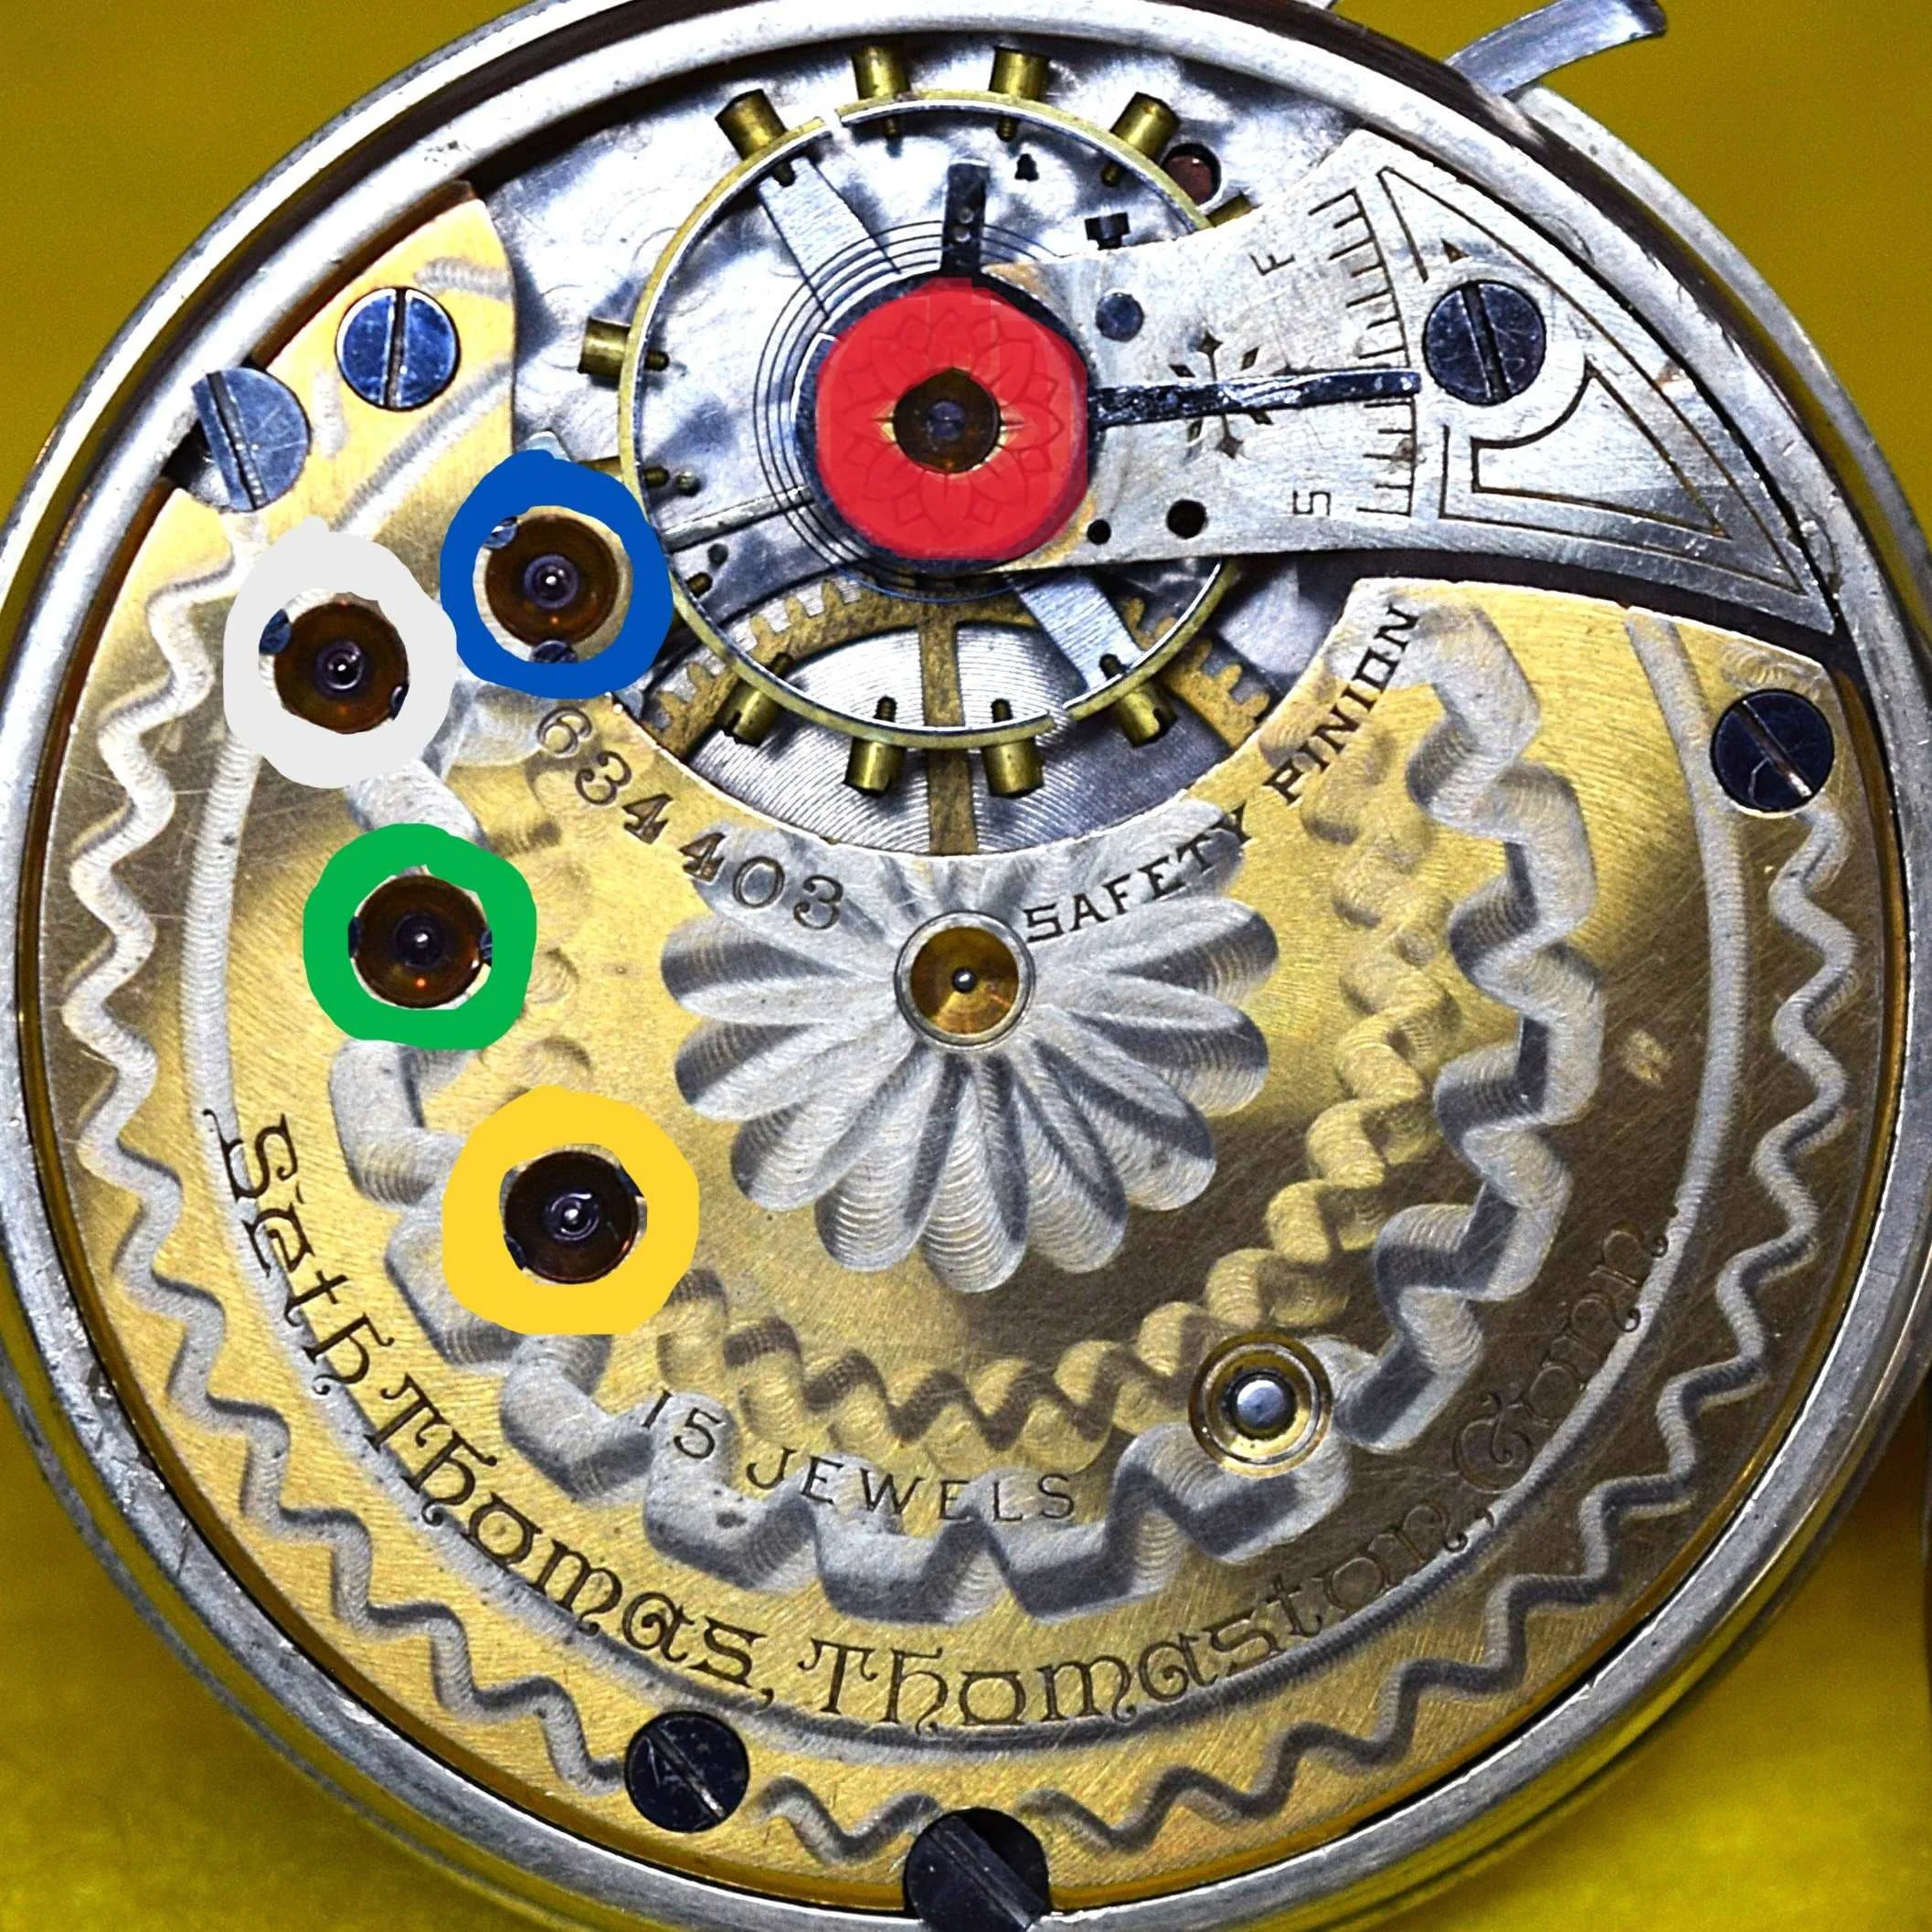
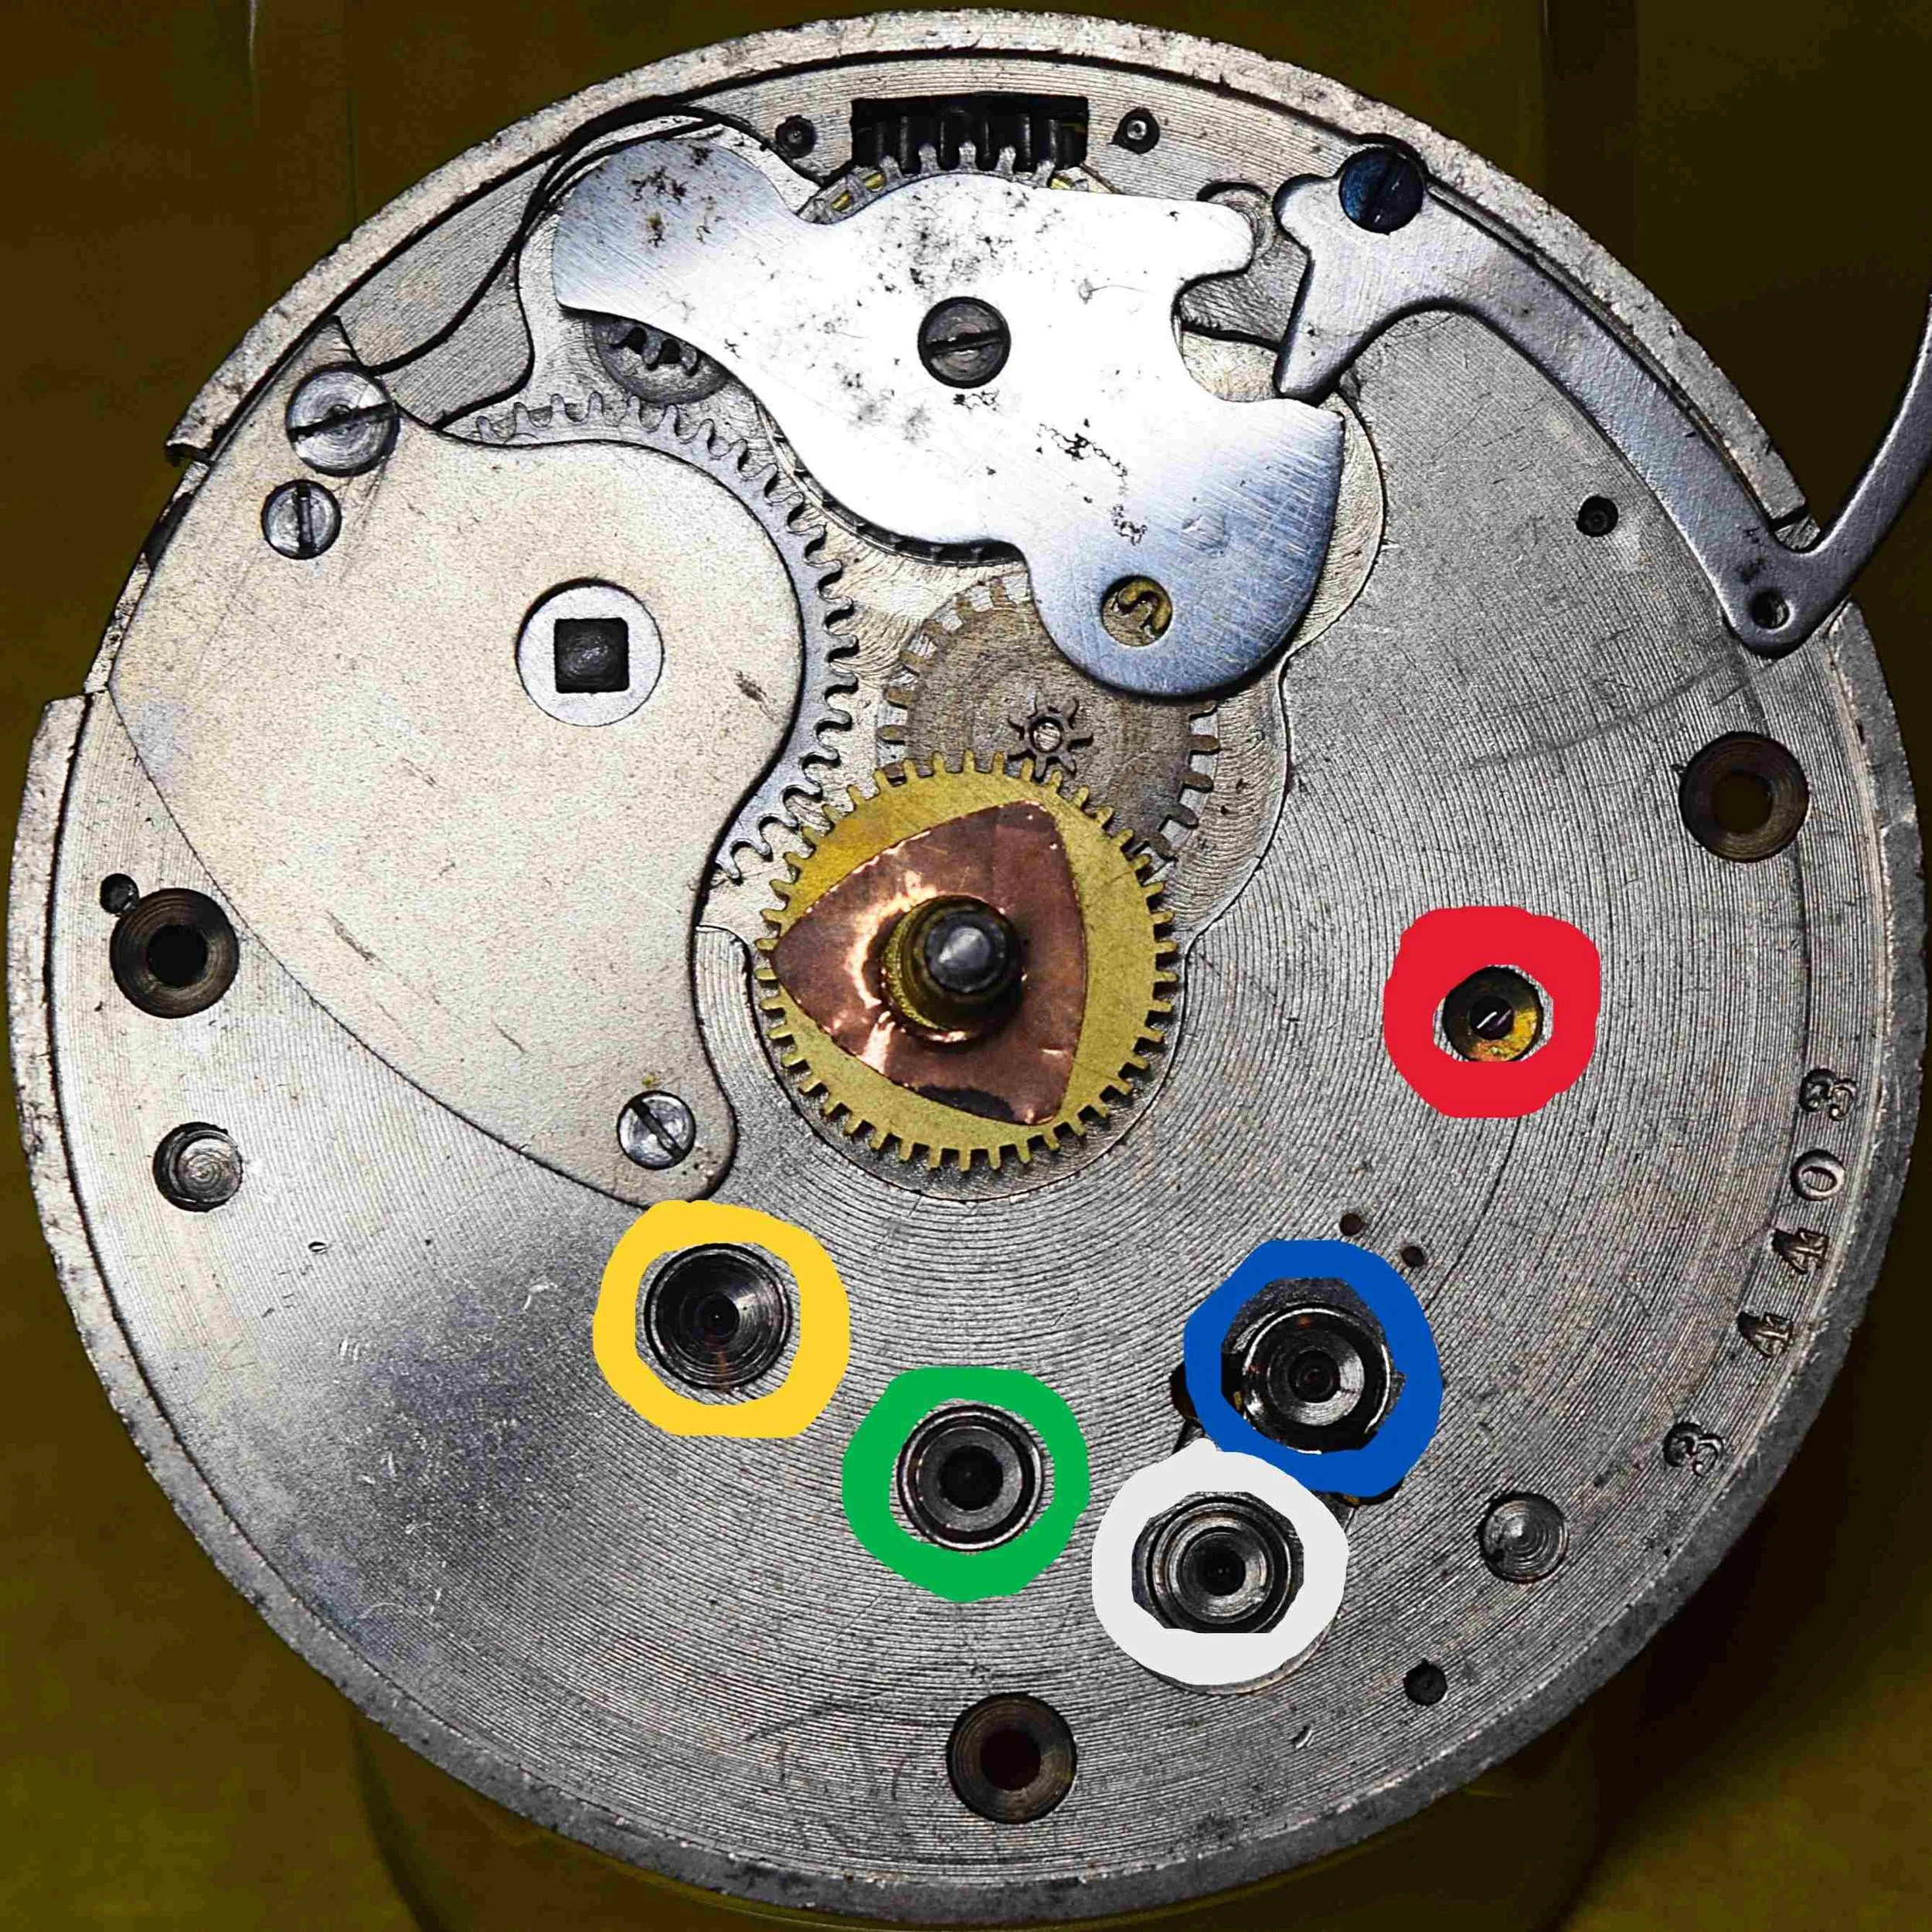
The two images below show the 15-jewel movement with its twelve visible jewels highlighted.
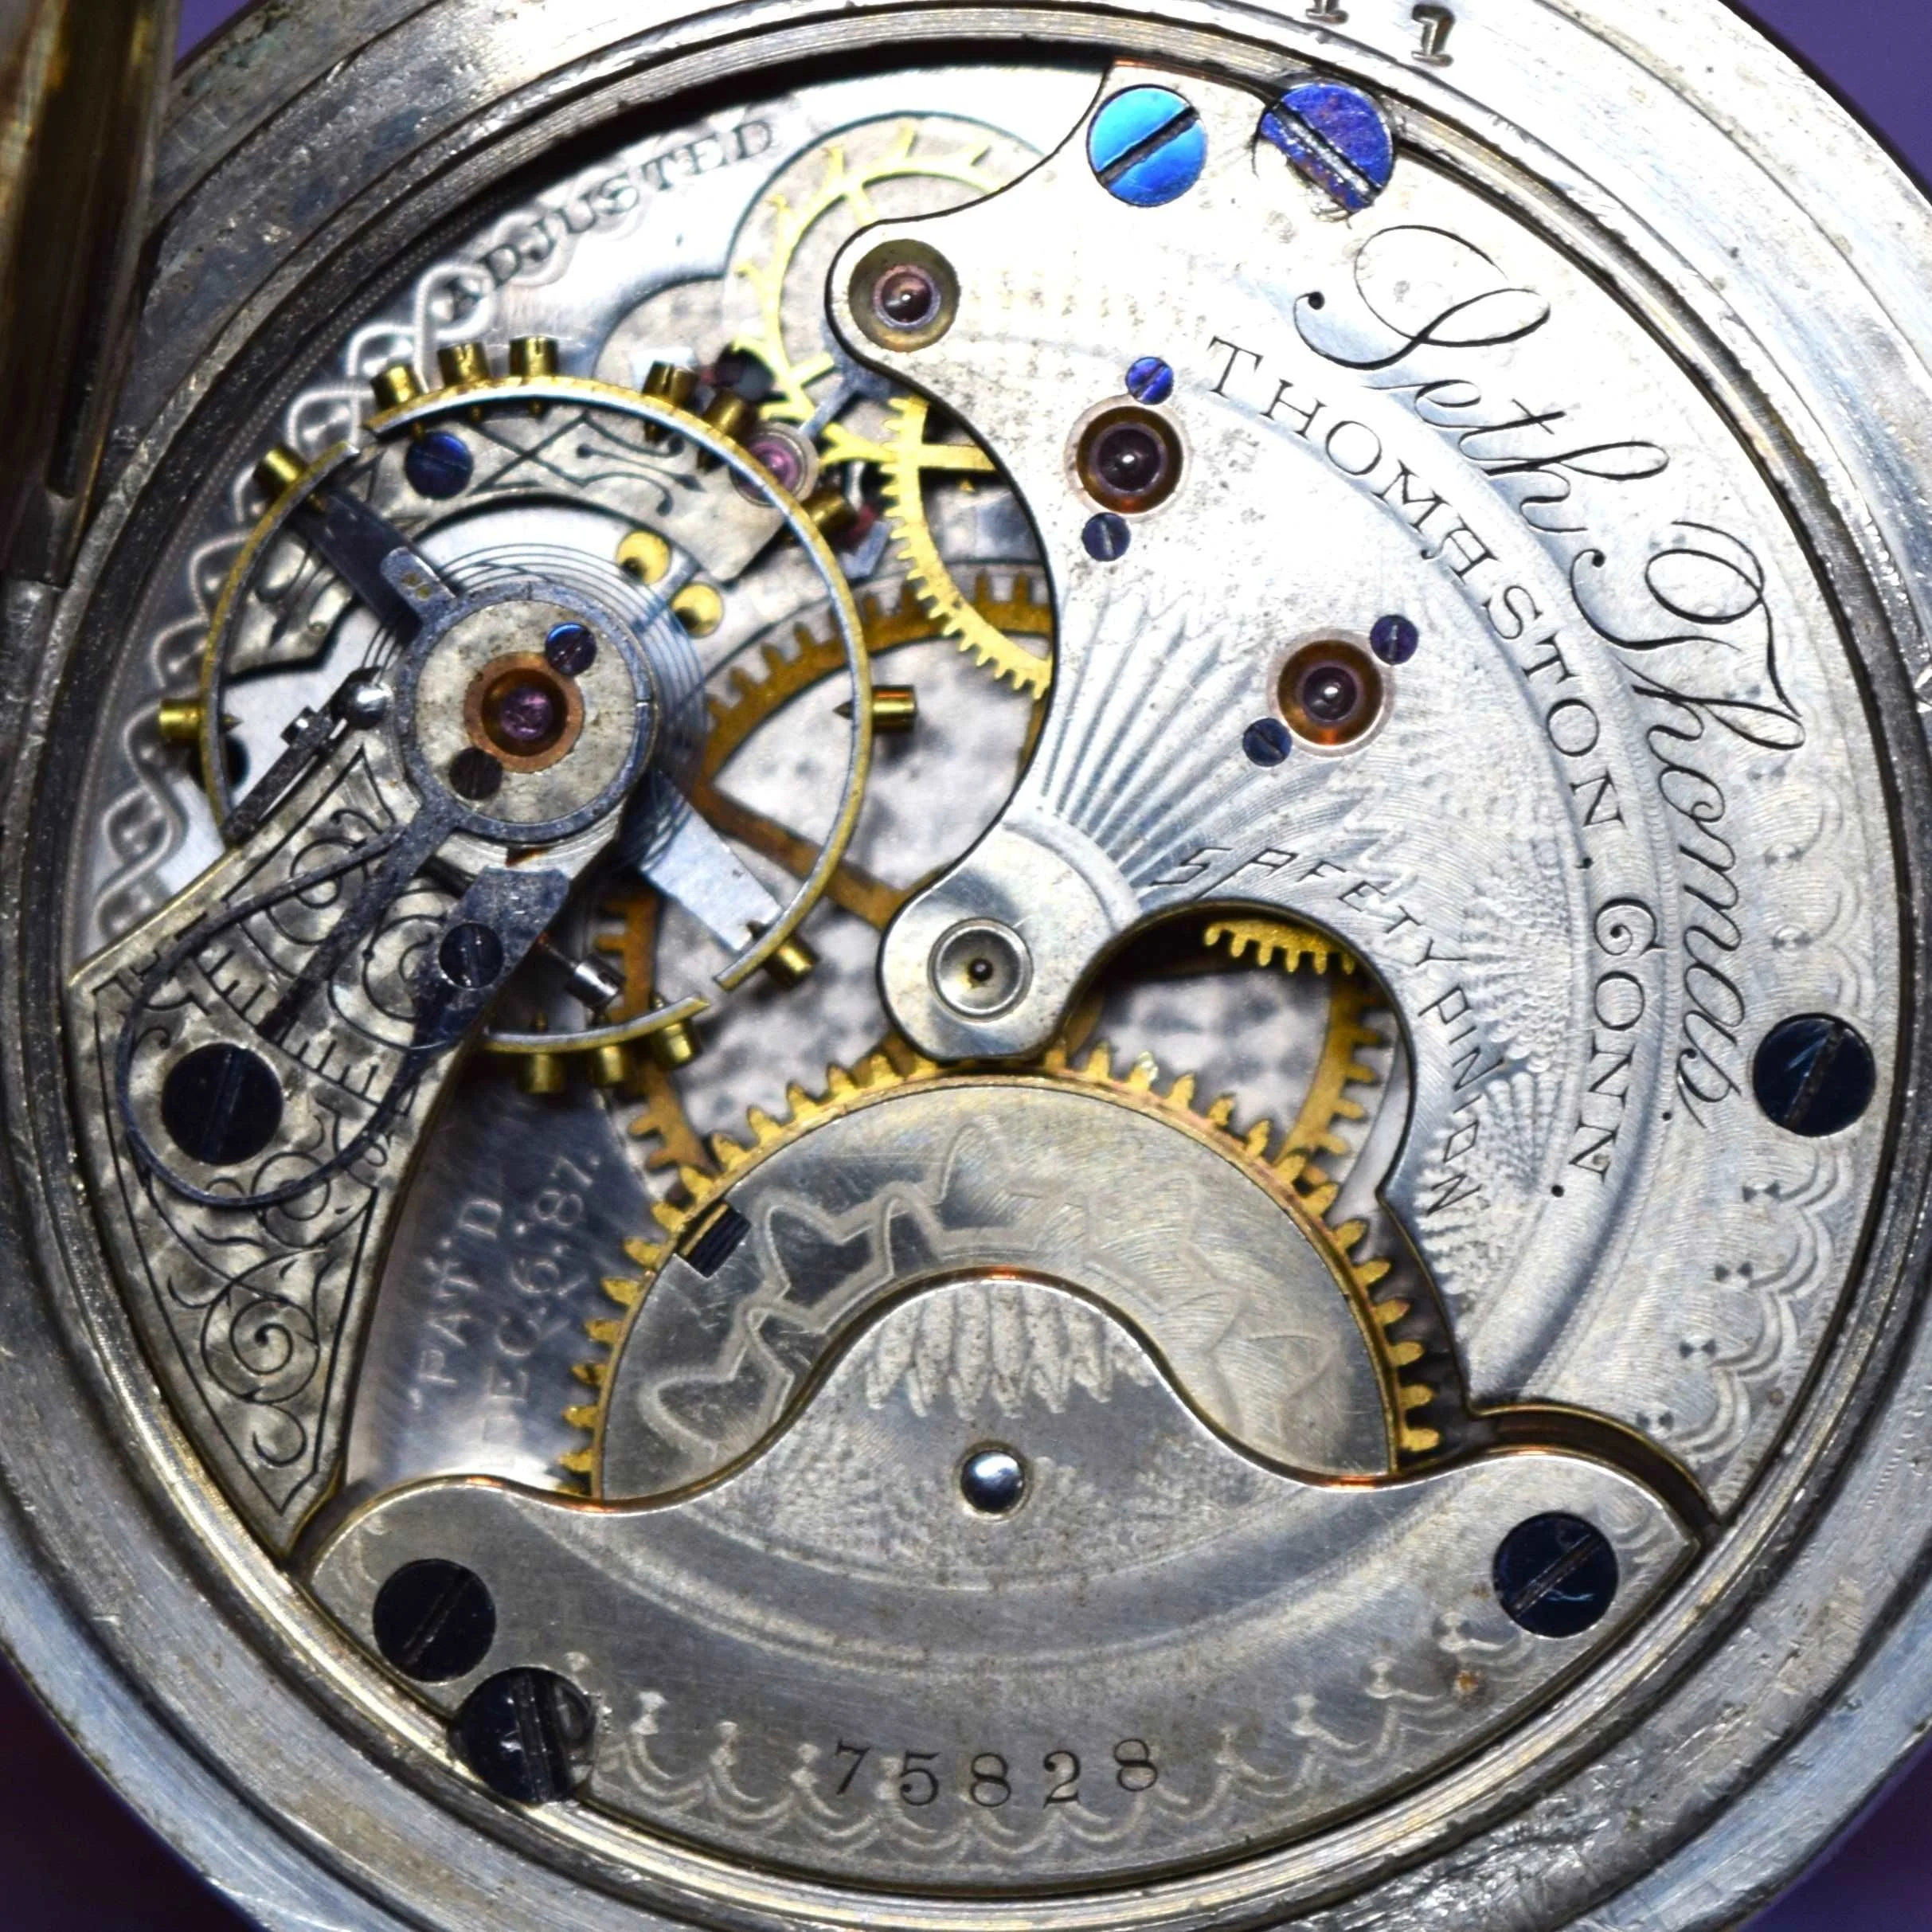
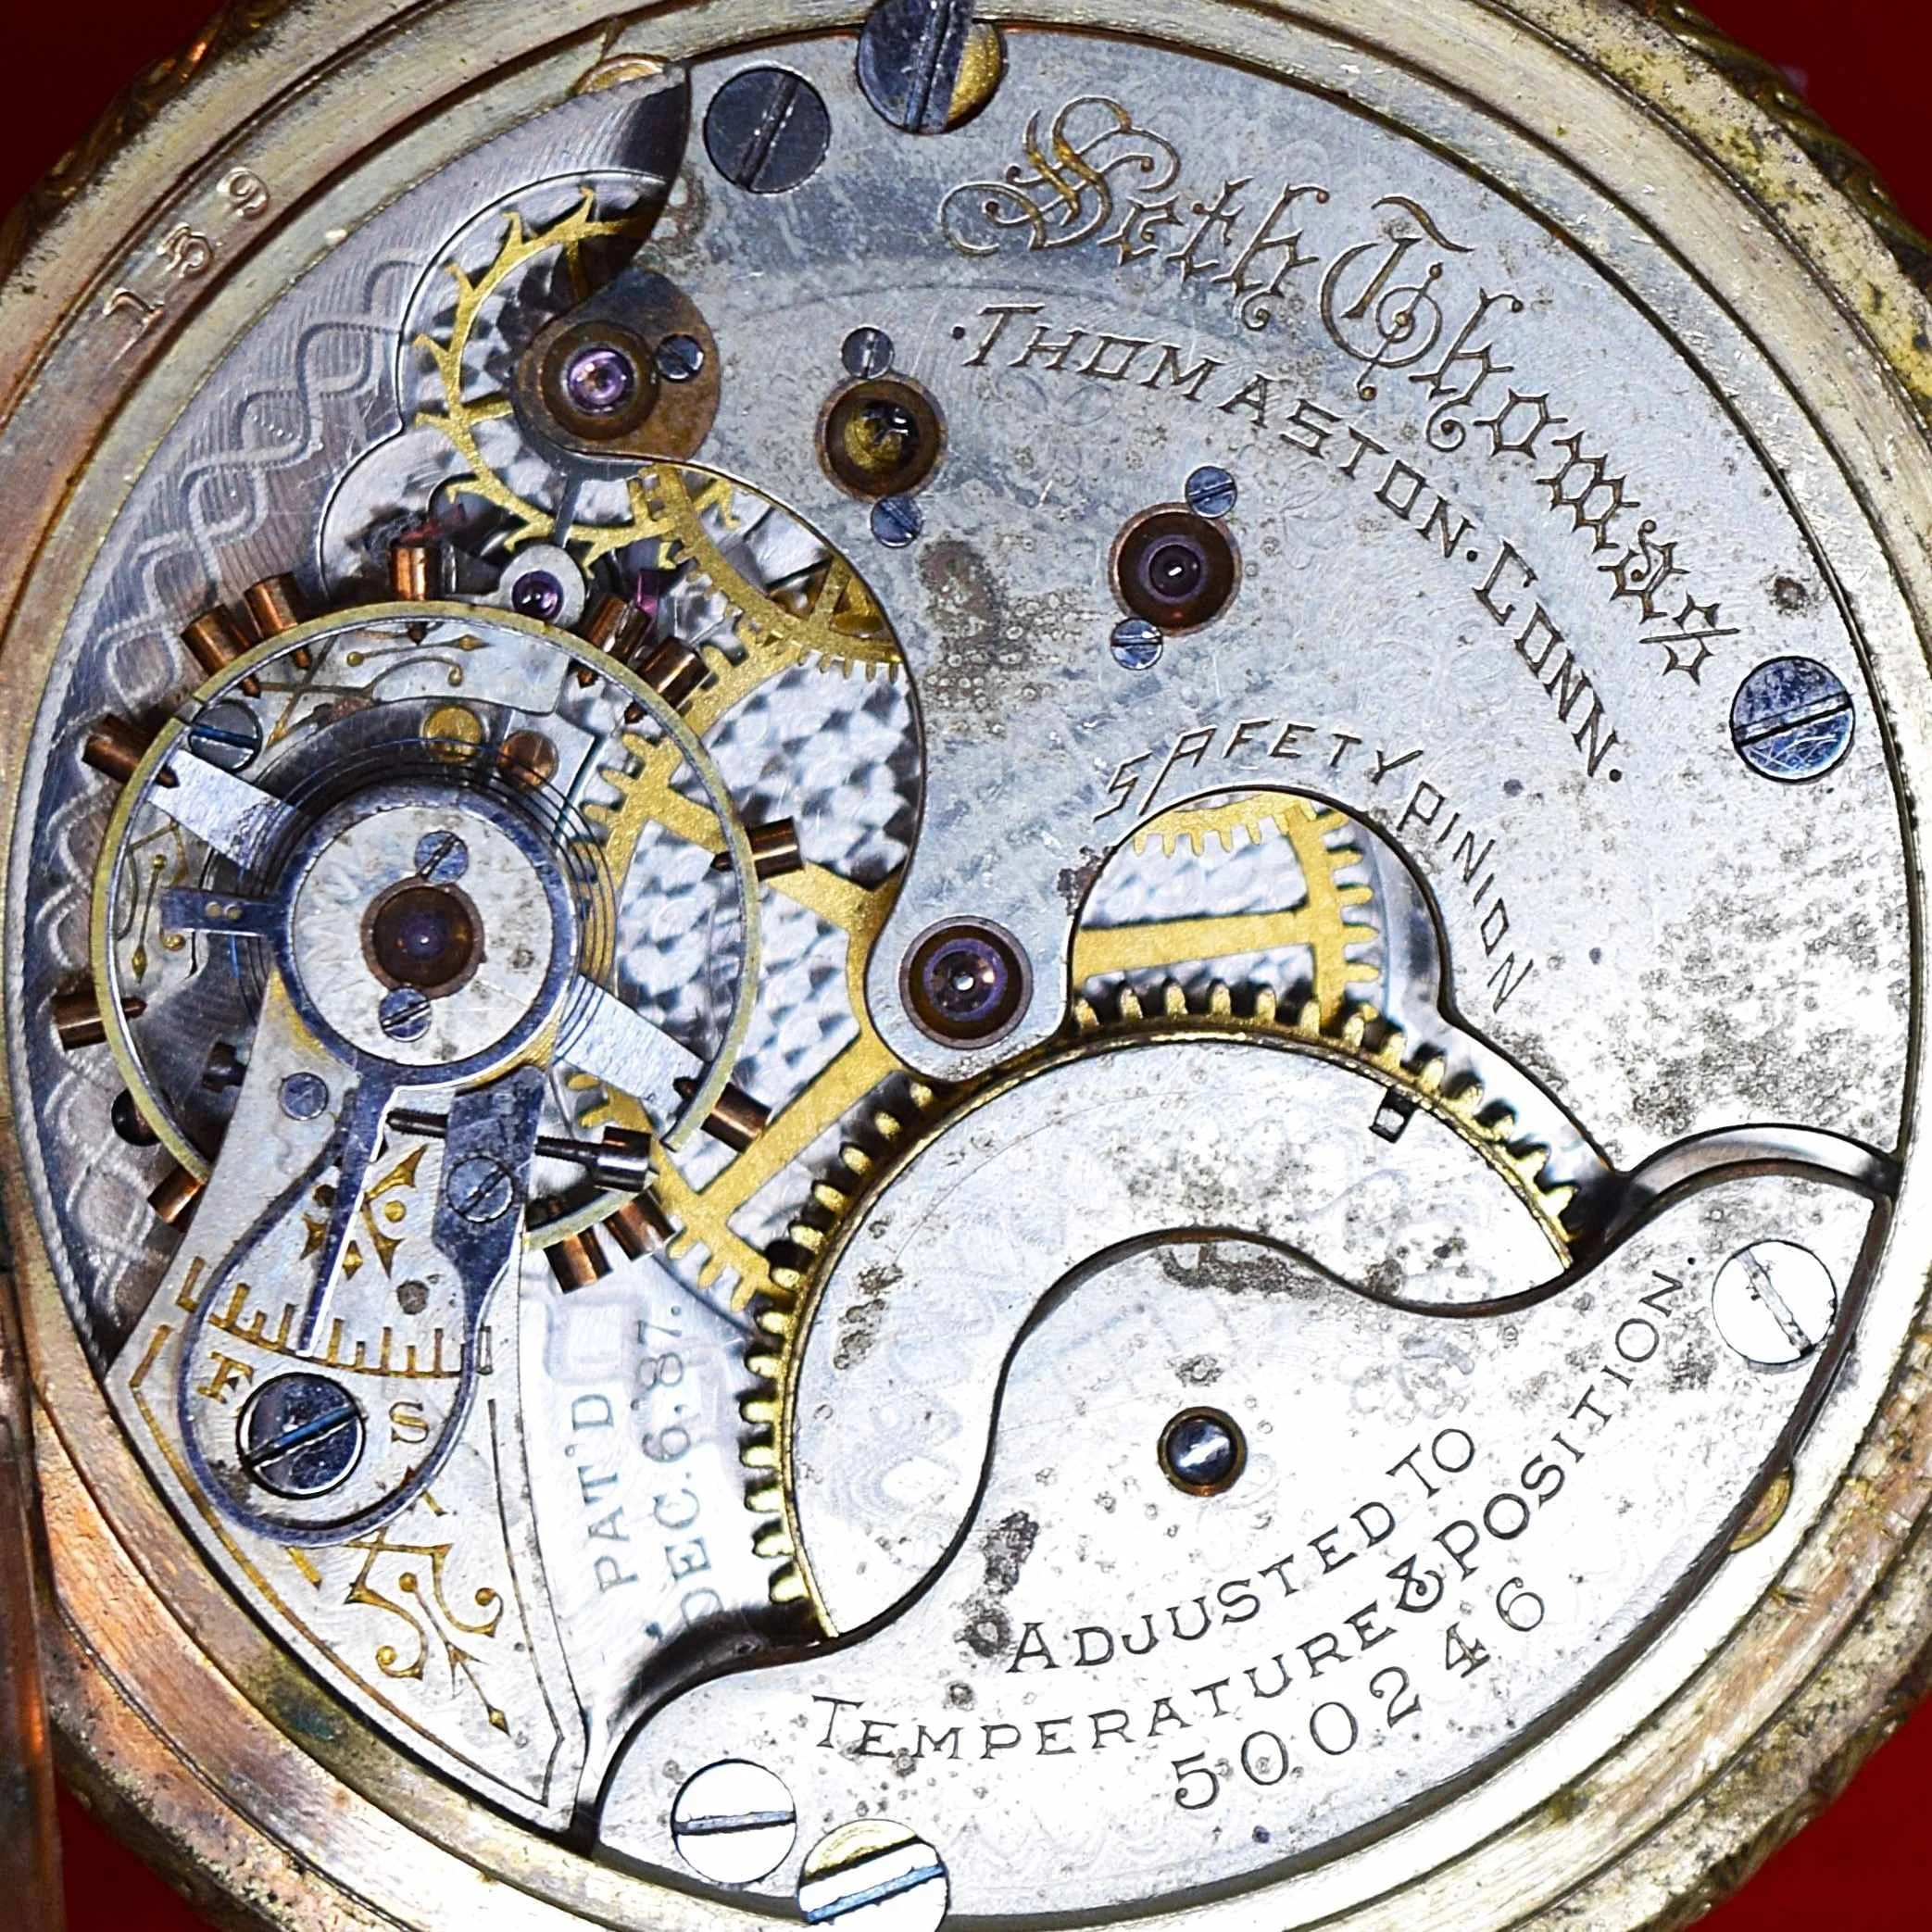
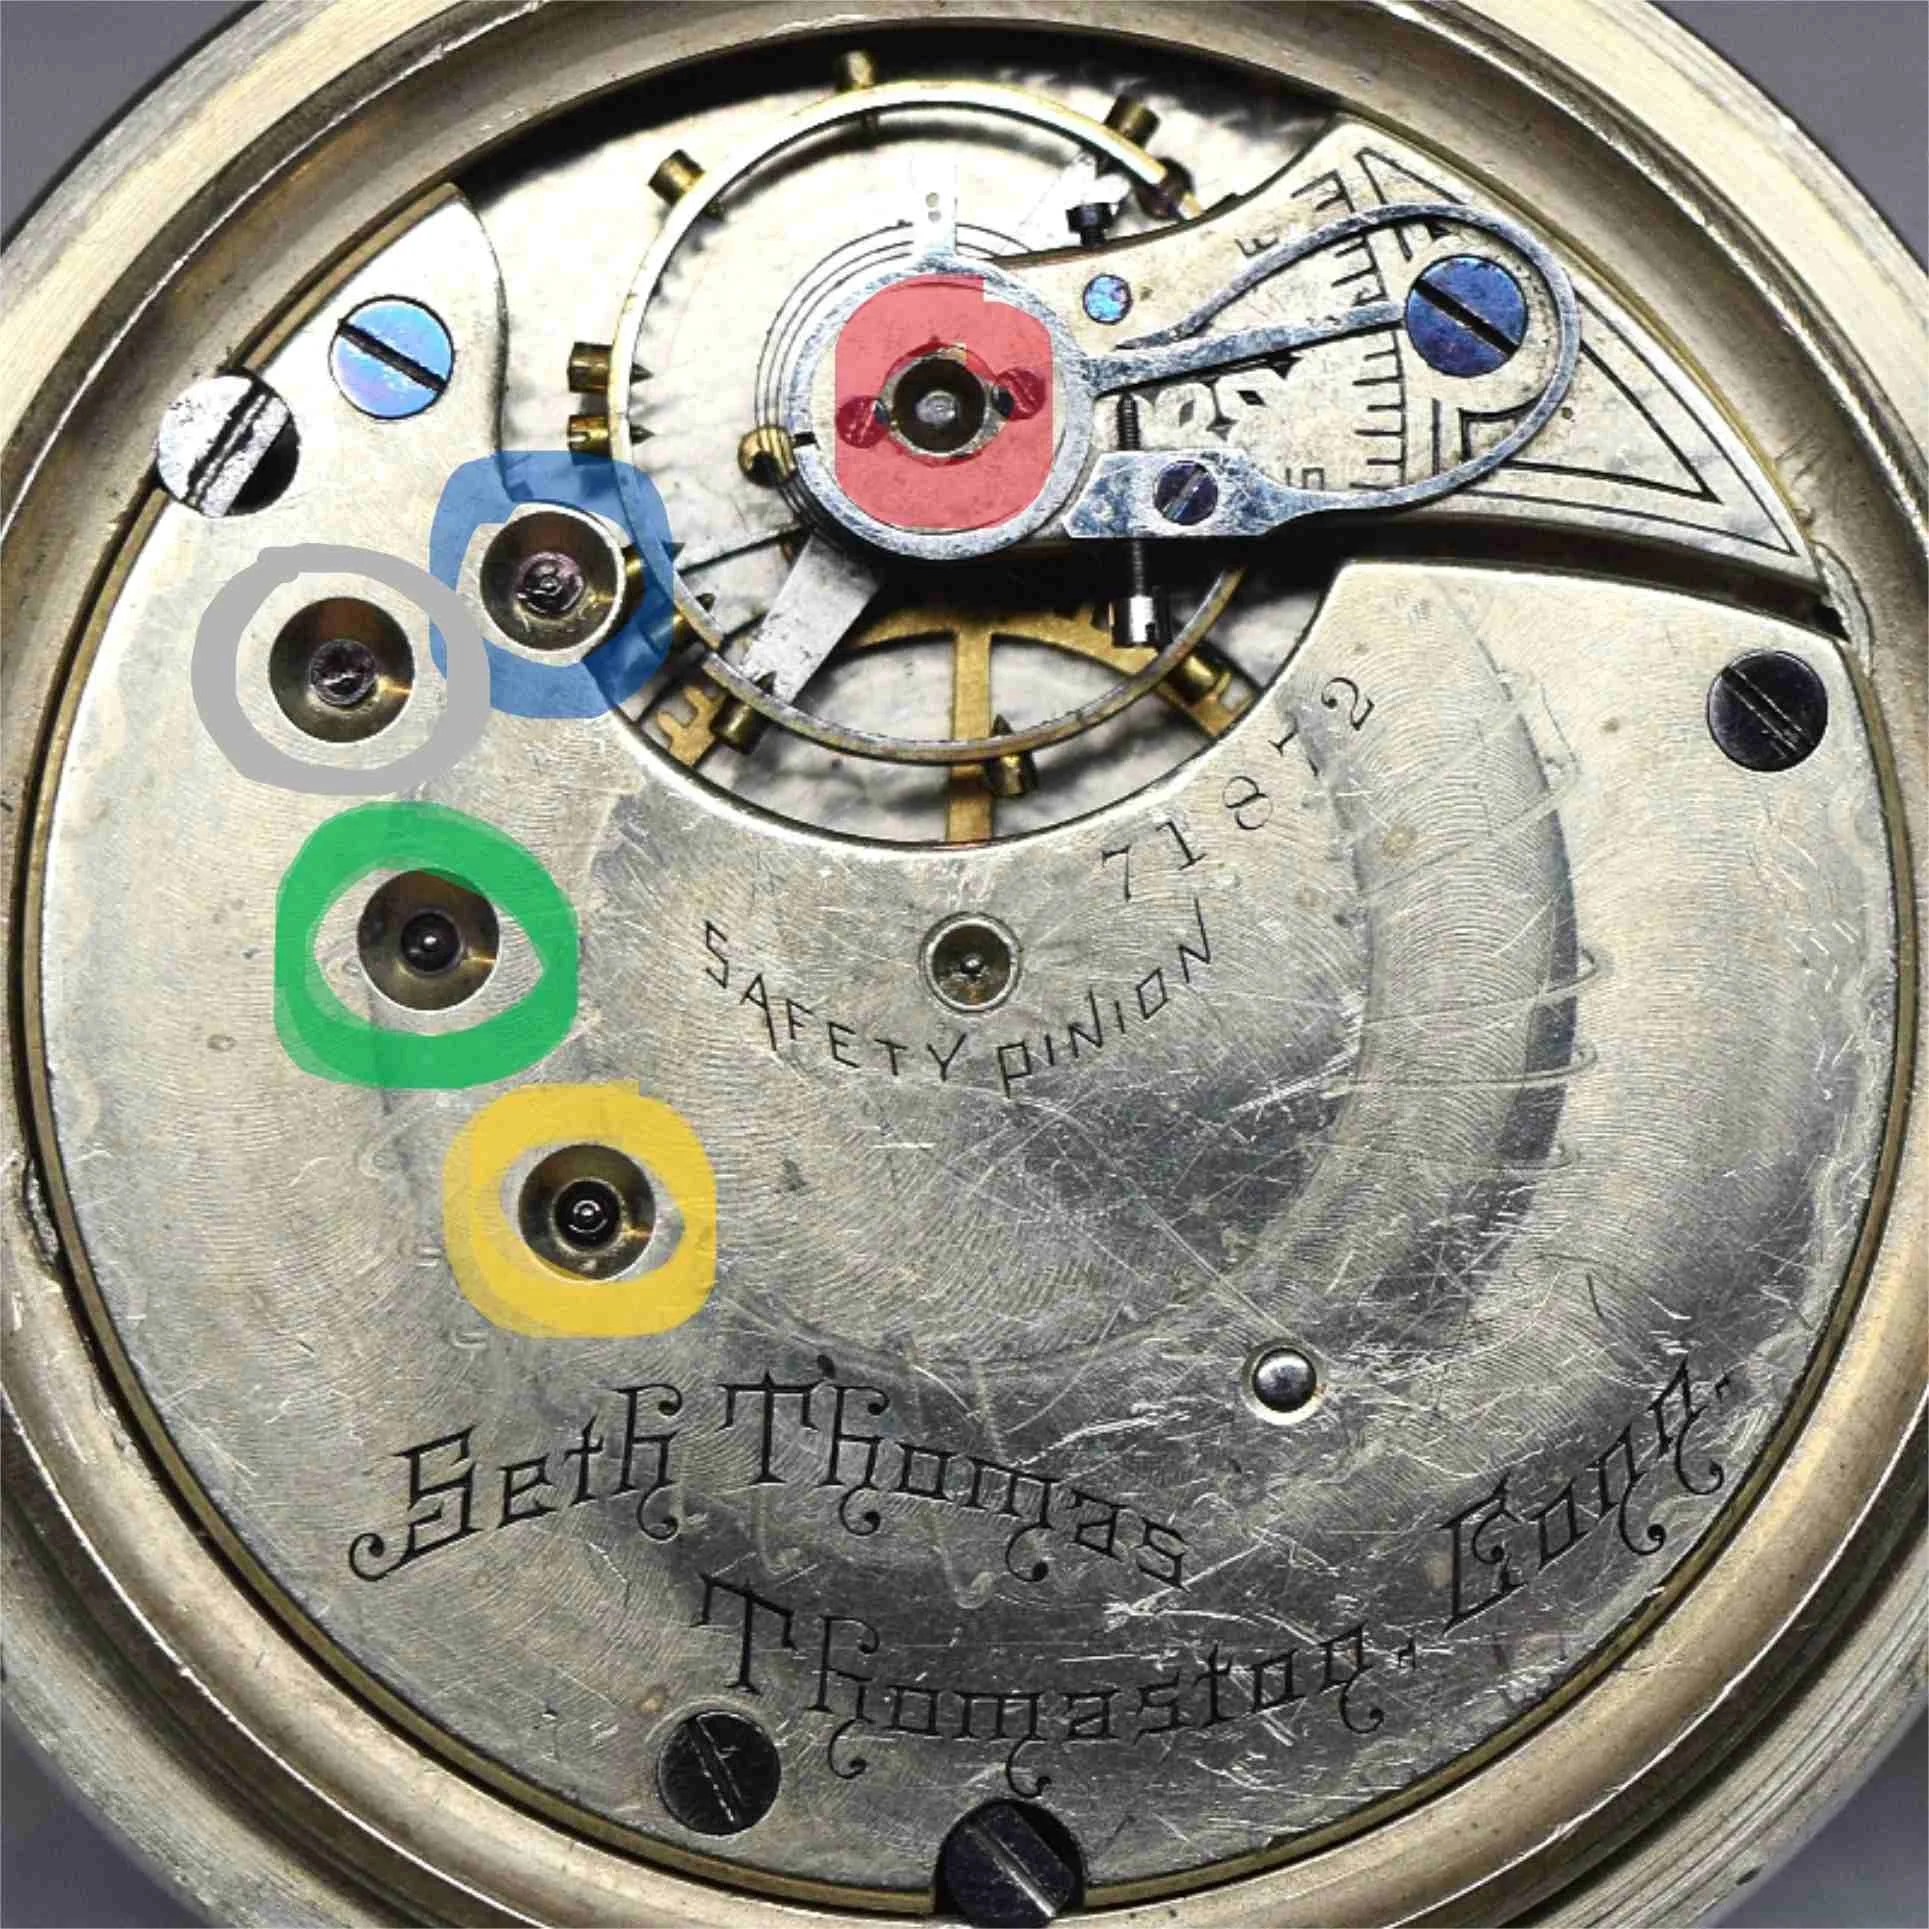
The image on the left, the Top Plate, shows the balance staff’s top cap jewel, which is protecting the balance staff’s top jewel (hole jewel) directly beneath it highlighted in red.
It shows the top pallet jewel (hole jewel) highlighted in blue. The jewel reduces friction in the movement of the pallet fork that occurs with metal pivot passing through a metal bearing.
The image shows the top escape wheel jewel (hole jewel) highlighted in white.
It shows the 3rd Wheel top jewel (hole jewel) highlighted in yellow.
The image also shows the 4th Wheel Top Jewel (hole jewel) highlighted in green.

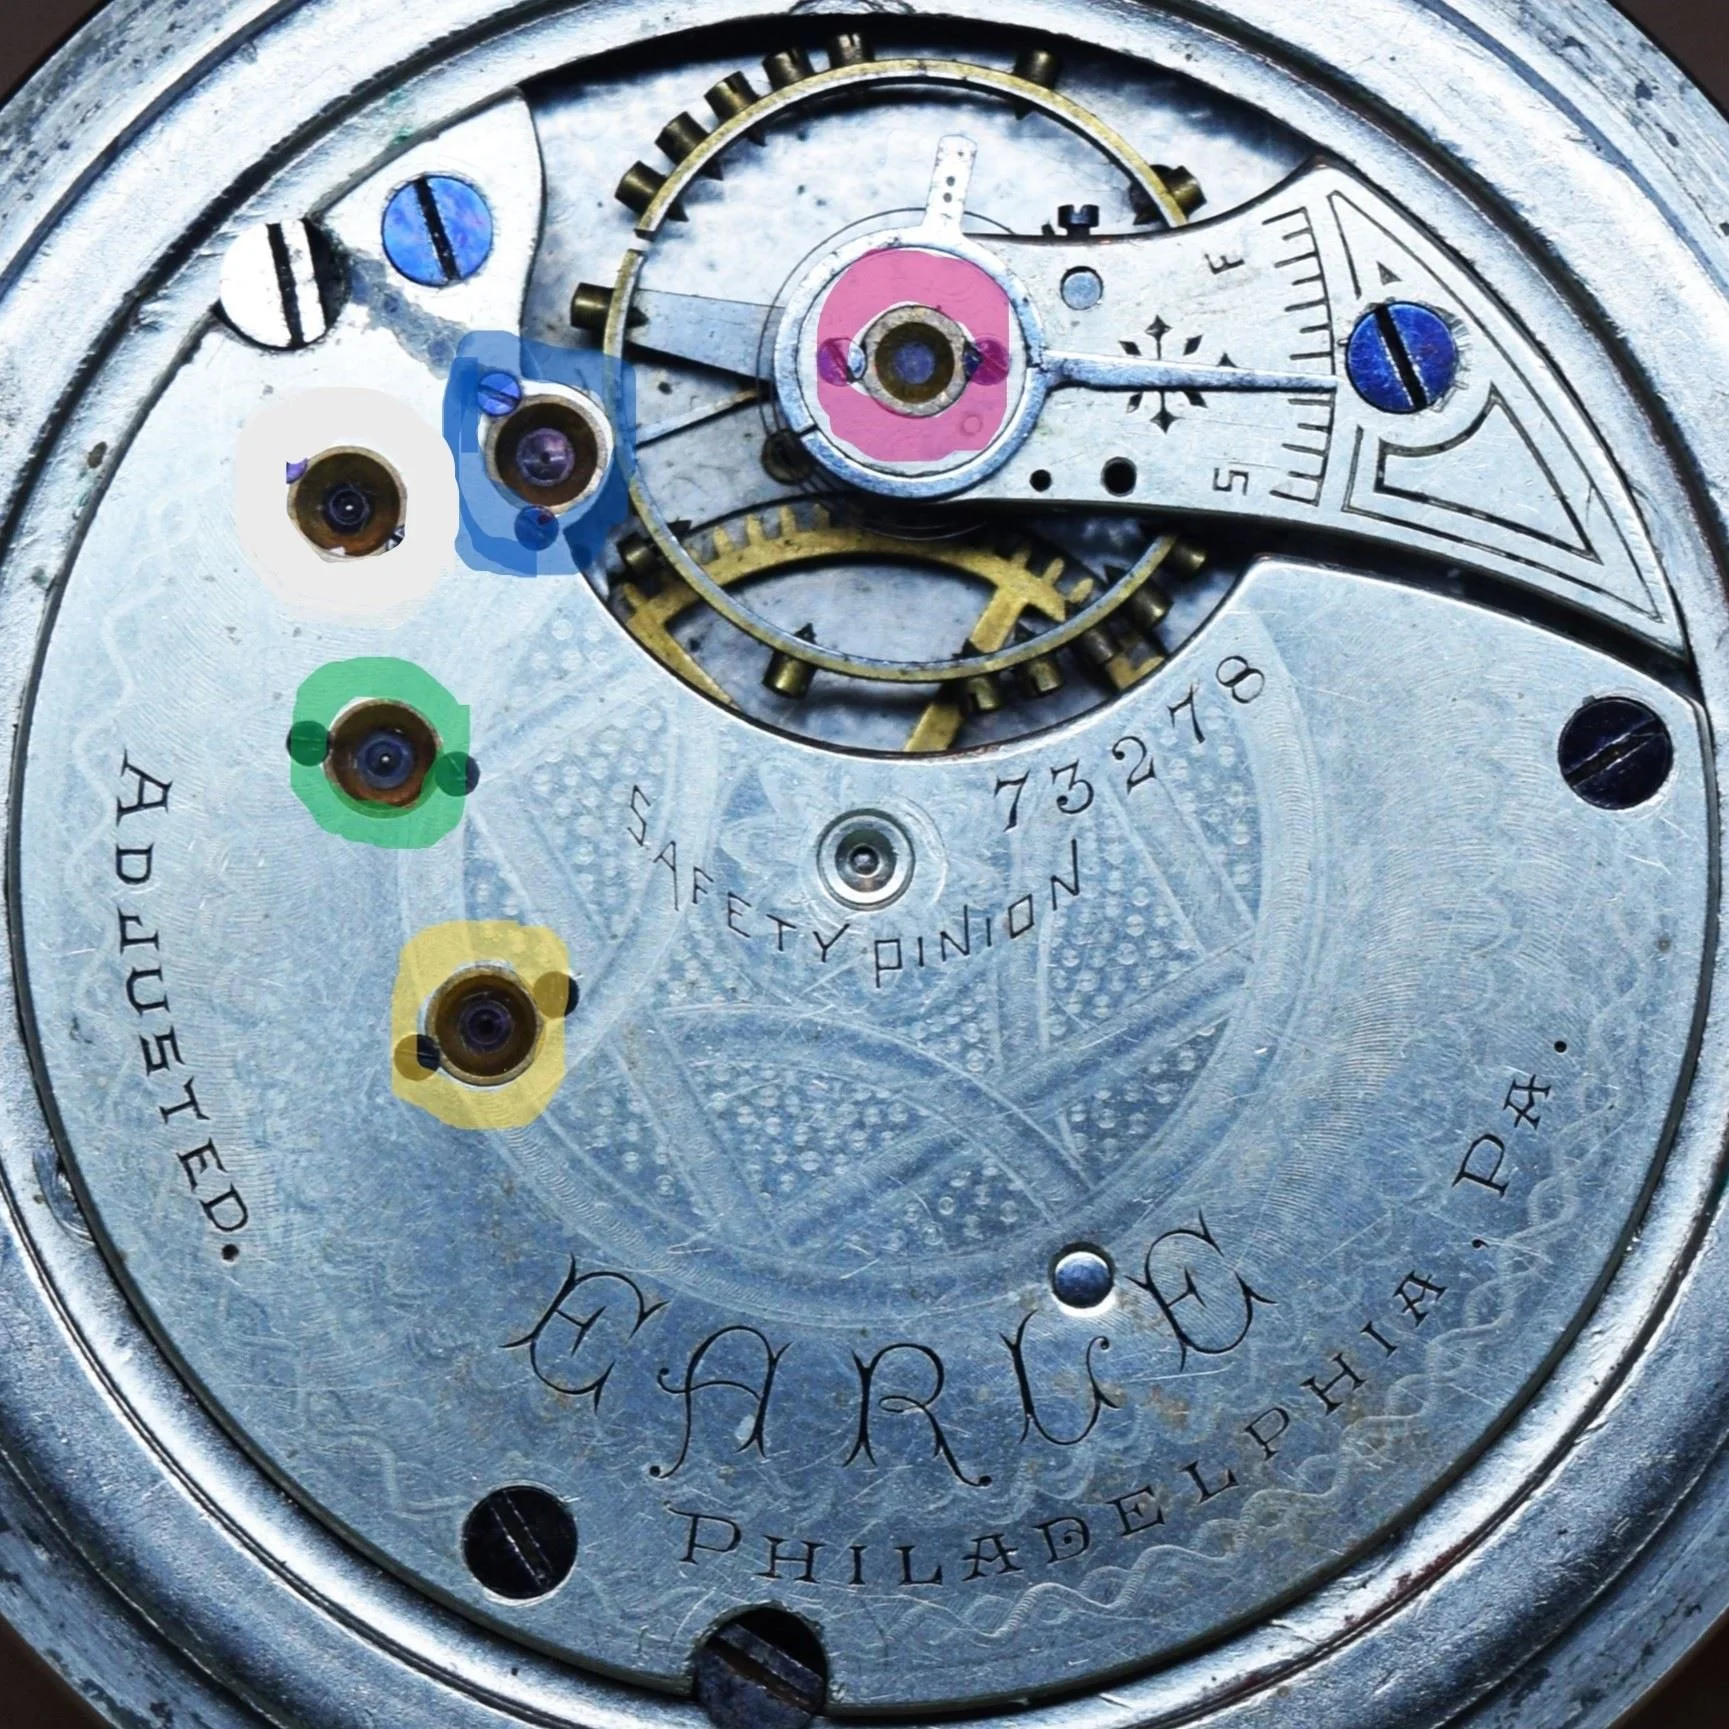
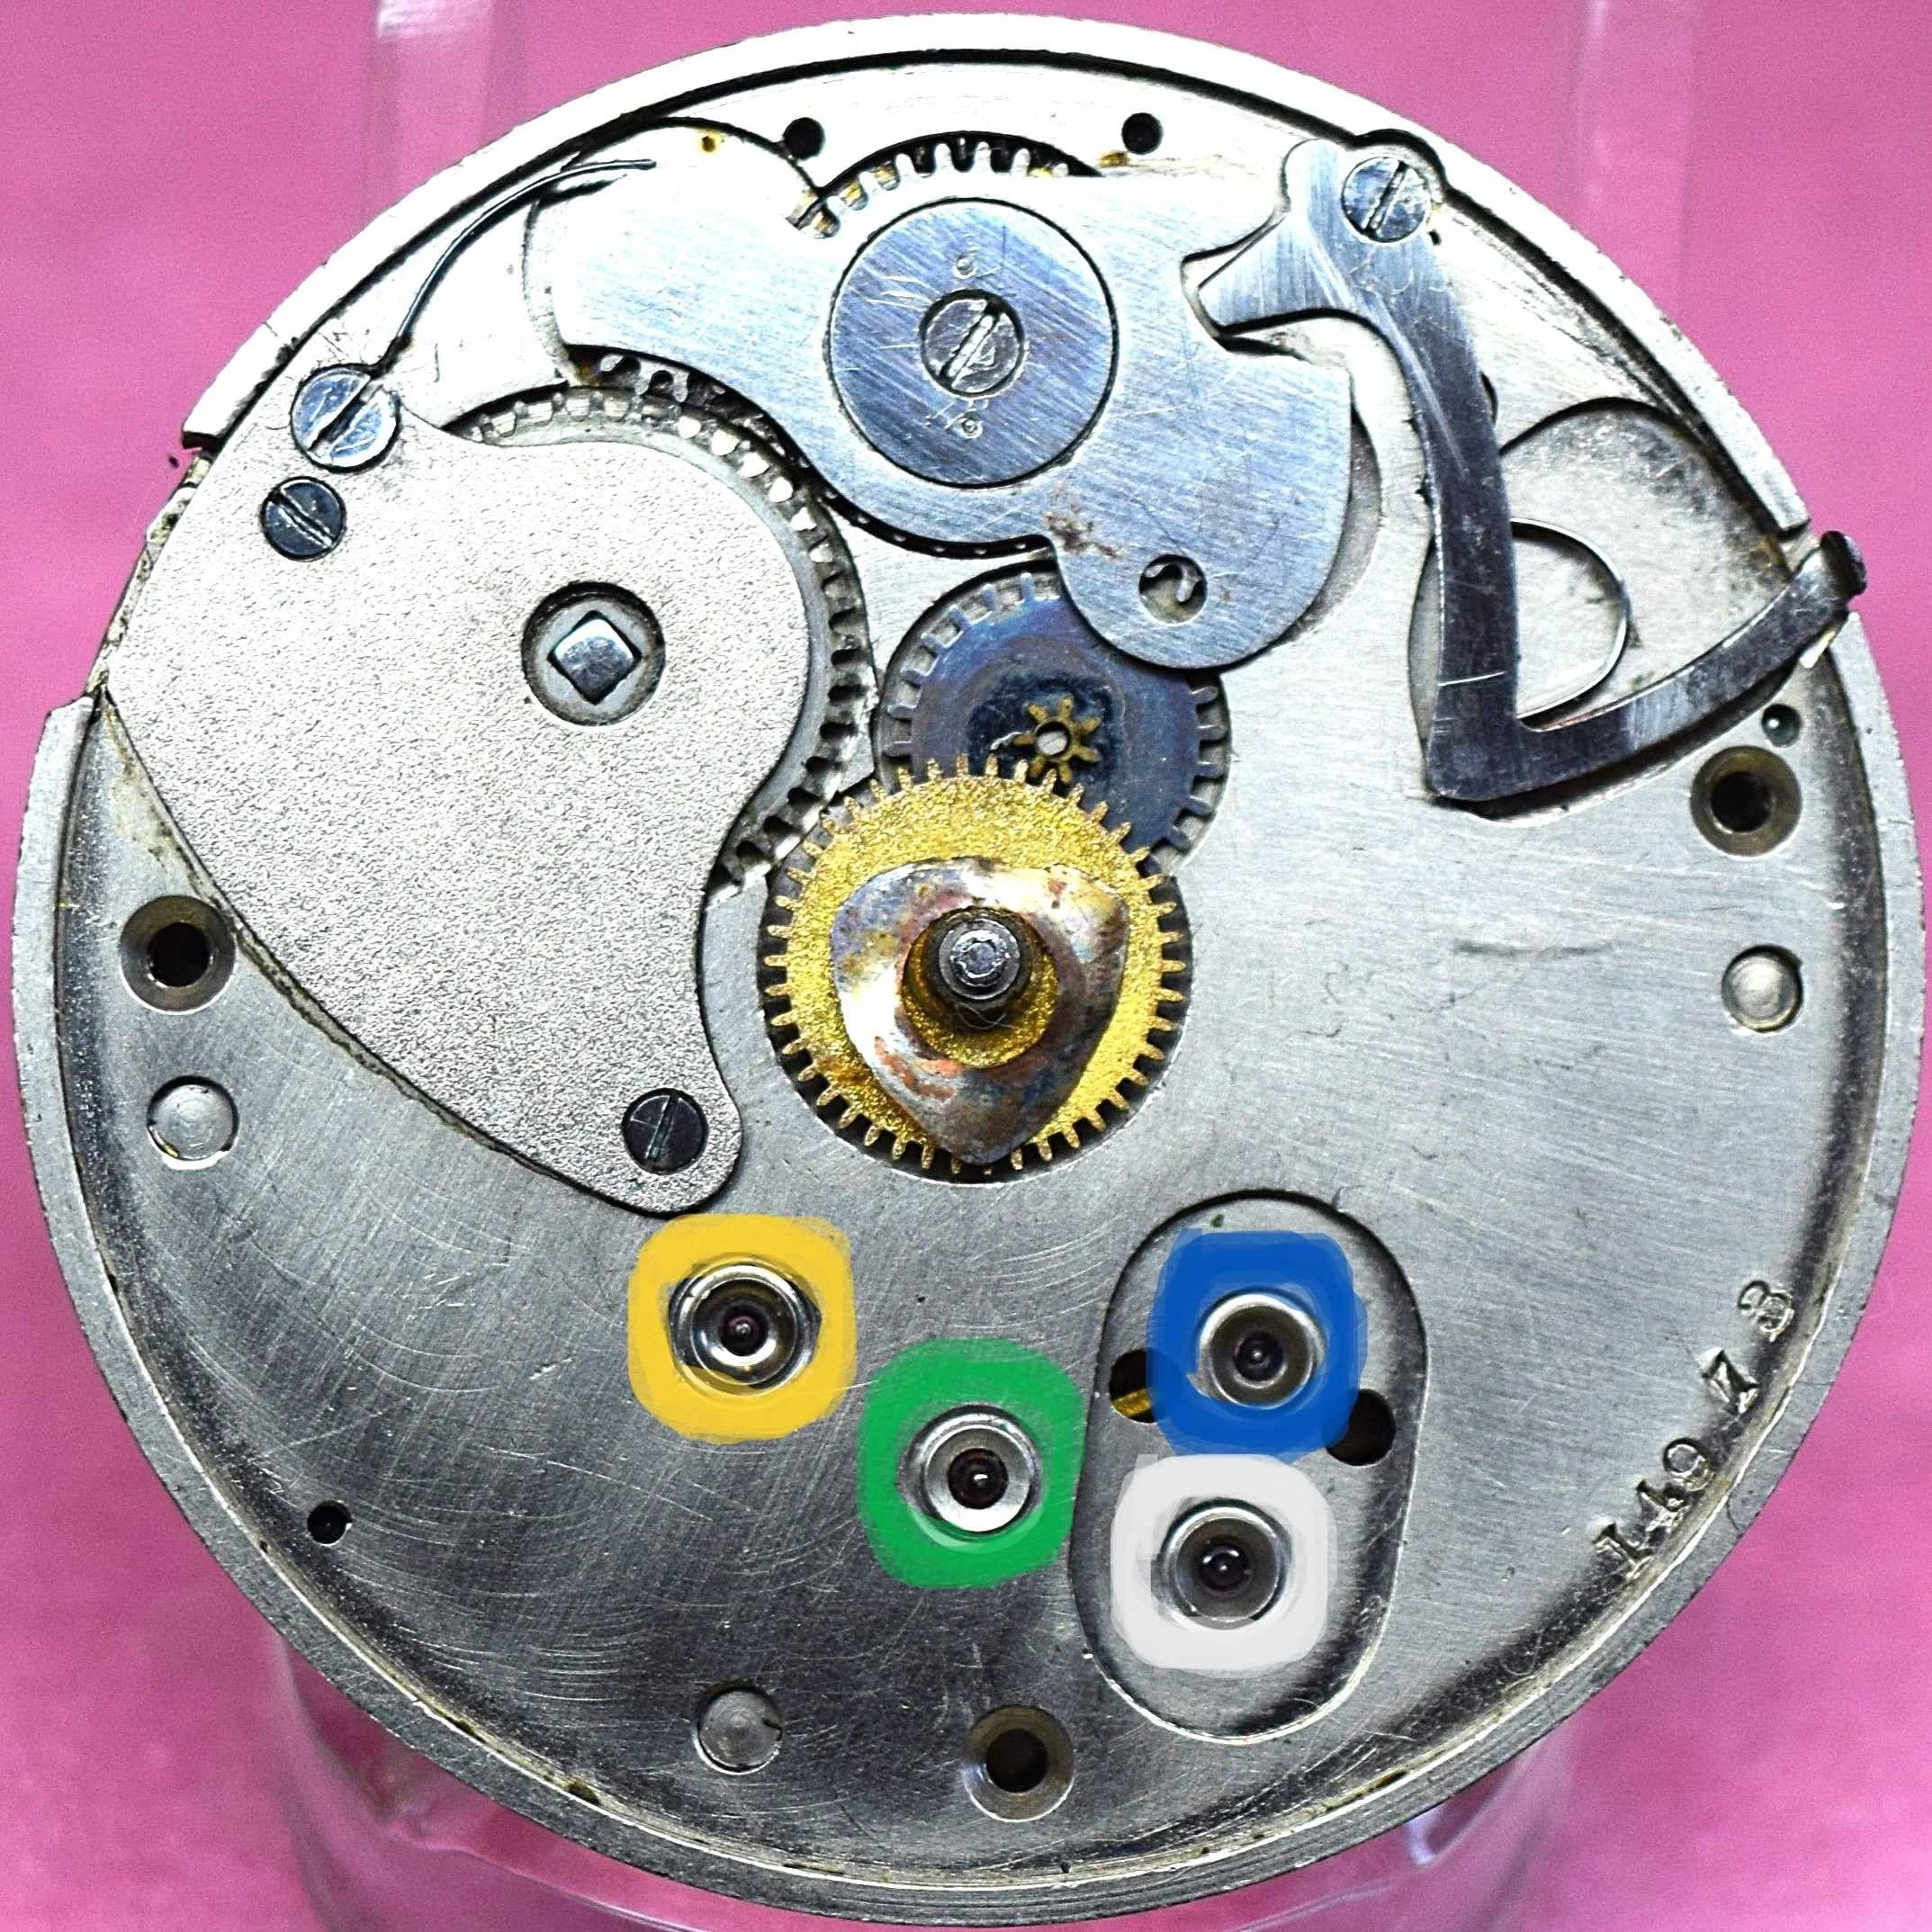
The image on the right, the Pillar Plate, shows the Balance Staff’s Bottom Cap Jewel, which is protecting the Balance Staff’s Bottom Jewel (hole jewel) directly beneath it highlighted in red.
It shows the Bottom Pallet Jewel (hole jewel) highlighted in blue. This reduces friction in the movement of the pallet fork.
The image also shows the Bottom Escape Wheel Jewel (hole jewel) highlighted in white.
It shows the 3rd Wheel Bottom Jewel (hole jewel) highlighted in yellow.
The image also shows the 4th Wheel Bottom Jewel (hole jewel) highlighted in green.
There are three more jewels that are hidden between the plates:
The two pallet jewels are on the wide end of the pallet fork that make contact with the escape wheel. As the escape wheel turns due to the release of power from the main spring it makes contact with the two pallet jewels in such a way that it causes the pallet fork to swing from side to side. This also moves the narrow end of the pallet fork from side to side making intermittent contact with the impulse jewel, pushing it from side to side.
The impulse jewel rides beneath the roller table near the bottom of the balance staff. As the tip of the pallet fork moves the impulse jewel from side to side it turns the roller table, hairspring, and balance wheel back and forth providing resistance to the power being released from the mainspring. By regulating the strength of this resistance, we are able to regulate the rate at which the power can be released from the mainspring through the gear train, and ultimately the rate at which the hands of the watch move around the dial.
17-Jewel Movements in Model 1
There have been no reported examples of a Seth Thomas Model 1 pocket watch movement with 17 Jewels.
Jewel Counts in Seth Thomas Model 2 Pocket Watches


The four most common Seth Thomas jewel counts, 7 jewels, 11 jewels, 15 jewels, and 17 jewels, are shown above from left to right respectively. The top row shows the “Top Plate” and the bottom row shows the “Pillar Plate”, which is usually covered by the dial.
7-Jewel Movements
The top two images below show the 7-jewel movement with its four visible jewels highlighted in red.
The image on the left, the Top Plate, shows the balance staff’s top cap jewel, which is protecting the balance staff’s top jewel (hole jewel) directly beneath it. A Cap Jewel acts as a barrier between the hole jewel and outside environmental contaminants that could reduce efficiency and effectiveness of a hole jewel. When a Cap Jewel is used the wheels pivot rides on the Cap Jewel and is stabilized by passing through the hole jewel.

The image on the right, the Pillar Plate, shows the balance staff’s bottom cap jewel, which is protecting the balance staff’s bottom jewel (hole jewel) directly beneath it.
There are three more jewels that are hidden between the plates:
The two pallet jewels are on the wide end of the pallet fork that make contact with the escape wheel. As the escape wheel turns due to the release of power from the main spring it makes contact with the two pallet jewels in such a way that it causes the pallet fork to swing from side to side. This also moves the narrow end of the pallet fork from side to side making intermittent contact with the impulse jewel, pushing it from side to side.
The impulse jewel rides beneath the roller table near the bottom of the balance staff. As the tip of the pallet fork moves the impulse jewel from side to side it turns the roller table, hairspring, and balance wheel back and forth providing resistance to the power being released from the mainspring. By regulating the strength of this resistance, we are able to regulate the rate at which the power can be released from the mainspring through the gear train, and ultimately the rate at which the hands of the watch move around the dial.
The second two images are of an impulse jewel and the pallet fork with its pallet jewels visible.
The bottom images show the fully exposed Pallet Bridge and how the Pallet Fork Jewels engage the Escape Wheel.
11-Jewel Movements
The two images below show the 11-jewel movement with its eight visible jewels highlighted.
The image on the left, the Top Plate, shows the balance staff’s top cap stone/jewel, which is protecting the balance staff’s top jewel (hole jewel) directly beneath it highlighted in red.
It shows the top 4th Wheel (hole jewel) highlighted in green. The jewel reduces friction in the movement of the 4th Wheel that occurs with a metal pivot passing through a metal bearing.
The image also shows the top escape wheel jewel (hole jewel) highlighted in white.
The image on the right, the Pillar Plate, shows the balance staff’s bottom cap stone/jewel, which is protecting the balance staff’s bottom jewel (hole jewel) directly beneath it highlighted in red.
It shows the bottom 4th Wheel (hole jewel) highlighted in green. This reduces friction in the movement of the 4th Wheel. The seconds hand rides on this pivot.
The image also shows the bottom escape wheel jewel (hole jewel) highlighted in white.
There are three more jewels that are hidden between the plates:
The two pallet jewels are on the wide end of the pallet fork that make contact with the escape wheel. As the escape wheel turns due to the release of power from the main spring it makes contact with the two pallet jewels in such a way that it causes the pallet fork to swing from side to side. This also moves the narrow end of the pallet fork from side to side making intermittent contact with the impulse jewel, pushing it from side to side.
The impulse jewel rides beneath the roller table near the bottom of the balance staff. As the tip of the pallet fork moves the impulse jewel from side to side it turns the roller table, hairspring, and balance wheel back and forth providing resistance to the power being released from the mainspring. By regulating the strength of this resistance, we are able to regulate the rate at which the power can be released from the mainspring through the gear train, and ultimately the rate at which the hands of the watch move around the dial.
15-Jewel Movements
The two images below show the 15-jewel movement with its twelve visible jewels highlighted.
The image on the left, the Top Plate, shows the balance staff’s top cap jewel, which is protecting the balance staff’s top jewel (hole jewel) directly beneath it highlighted in red.
It shows the top pallet jewel (hole jewel) on the pallet bridge highlighted in blue. The jewel reduces friction in the movement of the pallet fork that occurs with metal pivot passing through a metal bearing.
The image shows the top escape wheel jewel (hole jewel) highlighted in white.
It shows the 3rd Wheel top jewel (hole jewel) highlighted in yellow.
The image also shows the 4th Wheel Top Jewel (hole jewel) highlighted in green.
The image on the right, the Pillar Plate, shows the Balance Staff’s Bottom Cap Jewel, which is protecting the Balance Staff’s Bottom Jewel (hole jewel) directly beneath it highlighted in red.
It shows the Bottom Pallet Jewel (hole jewel) highlighted in blue. This reduces friction in the movement of the pallet fork.
The image also shows the Bottom Escape Wheel Jewel (hole jewel) highlighted in white.
It shows the 3rd Wheel Bottom Jewel (hole jewel) highlighted in yellow.
The image also shows the 4th Wheel Bottom Jewel (hole jewel) highlighted in green.
There are three more jewels that are hidden between the plates:
The two pallet jewels are on the wide end of the pallet fork that make contact with the escape wheel. As the escape wheel turns due to the release of power from the main spring it makes contact with the two pallet jewels in such a way that it causes the pallet fork to swing from side to side. This also moves the narrow end of the pallet fork from side to side making intermittent contact with the impulse jewel, pushing it from side to side.
The impulse jewel rides beneath the roller table near the bottom of the balance staff. As the tip of the pallet fork moves the impulse jewel from side to side it turns the roller table, hairspring, and balance wheel back and forth providing resistance to the power being released from the mainspring. By regulating the strength of this resistance, we are able to regulate the rate at which the power can be released from the mainspring through the gear train, and ultimately the rate at which the hands of the watch move around the dial.
17-Jewel Movements
The two images below show the 17-jewel movement with its fourteen visible jewels highlighted.
The image on the left, the Top Plate, shows the balance staff’s top cap jewel, which is protecting the balance staff’s top jewel (hole jewel) directly beneath it highlighted in red.
It shows the top pallet jewel (hole jewel) on the pallet bridge highlighted in blue. The jewel reduces friction in the movement of the pallet fork that occurs with metal pivot passing through a metal bearing.
The image shows the top escape wheel jewel (hole jewel) highlighted in white.
It shows the 3rd Wheel top jewel (hole jewel) highlighted in yellow.
The image also shows the 4th Wheel Top Jewel (hole jewel) highlighted in green.
It shows the Center Wheel (highlighted in orange) with the cannon pinion removed to reveal that there are no screws and no visible evidence that there is a Bottom Center Wheel Jewel. It is possible that the Top Jewel on the Center Wheel also had a Top Center Wheel Cap Stone/Jewel. Another possibility is that there is a Bottom Center Wheel Jewel set from the back of the pillar plate. I did not completely disassemble the movement to rule out that possibility.
The image on the right, the Pillar Plate, shows the Balance Staff’s Bottom Cap Jewel, which is protecting the Balance Staff’s Bottom Jewel (hole jewel) directly beneath it highlighted in red.
It shows the Bottom Pallet Jewel (hole jewel) highlighted in blue. This reduces friction in the movement of the pallet fork.
The image also shows the Bottom Escape Wheel Jewel (hole jewel) highlighted in white.
It shows the 3rd Wheel Bottom Jewel (hole jewel) highlighted in yellow.
The image also shows the 4th Wheel Bottom Jewel (hole jewel) highlighted in green.
It shows the Center Wheel Jewel (highlighted in orange) with the cannon pinion removed.
There are three more jewels that are hidden between the plates:
The two pallet jewels are on the wide end of the pallet fork that make contact with the escape wheel. As the escape wheel turns due to the release of power from the main spring it makes contact with the two pallet jewels in such a way that it causes the pallet fork to swing from side to side. This also moves the narrow end of the pallet fork from side to side making intermittent contact with the impulse jewel, pushing it from side to side.
The impulse jewel rides beneath the roller table near the bottom of the balance staff. As the tip of the pallet fork moves the impulse jewel from side to side it turns the roller table, hairspring, and balance wheel back and forth providing resistance to the power being released from the mainspring. By regulating the strength of this resistance, we are able to regulate the rate at which the power can be released from the mainspring through the gear train, and ultimately the rate at which the hands of the watch move around the dial.
Jewel Counts in Seth Thomas Model 3 Pocket Watches


The four most common Seth Thomas jewel counts, 7 jewels, 11 jewels, 15 jewels, and 17 jewels, are shown above from left to right respectively. The top row shows the “Top Plate” and the bottom row shows the “Pillar Plate”, which is usually covered by the dial.
7-Jewel Movements
The top two images below show the 7-jewel movement with its four visible jewels highlighted in red.
The image on the left, the Top Plate, shows the balance staff’s top cap jewel, which is protecting the balance staff’s top jewel (hole jewel) directly beneath it. A Cap Jewel acts as a barrier between the hole jewel and outside environmental contaminants that could reduce efficiency and effectiveness of a hole jewel. When a Cap Jewel is used the wheel’s pivot rides on the Cap Jewel and is stabilized by passing through the hole jewel.
The image on the right, the Pillar Plate, shows the balance staff’s bottom cap jewel, which is protecting the balance staff’s bottom jewel (hole jewel) directly beneath it.
There are three more jewels that are hidden between the plates:
The two pallet jewels are on the wide end of the pallet fork that make contact with the escape wheel. As the escape wheel turns due to the release of power from the main spring it makes contact with the two pallet jewels in such a way that it causes the pallet fork to swing from side to side. This also moves the narrow end of the pallet fork from side to side making intermittent contact with the impulse jewel, pushing it from side to side.
The impulse jewel rides beneath the roller table near the bottom of the balance staff. As the tip of the pallet fork moves the impulse jewel from side to side it turns the roller table, hairspring, and balance wheel back and forth providing resistance to the power being released from the mainspring. By regulating the strength of this resistance, we are able to regulate the rate at which the power can be released from the mainspring through the gear train, and ultimately the rate at which the hands of the watch move around the dial.
The second two images are of an impulse jewel and two pallet forks with their pallet jewels visible.
The bottom image shows how the Pallet Fork Jewels engage the Escape Wheel.
11-Jewel Movements in Model 3 - Configuration 1
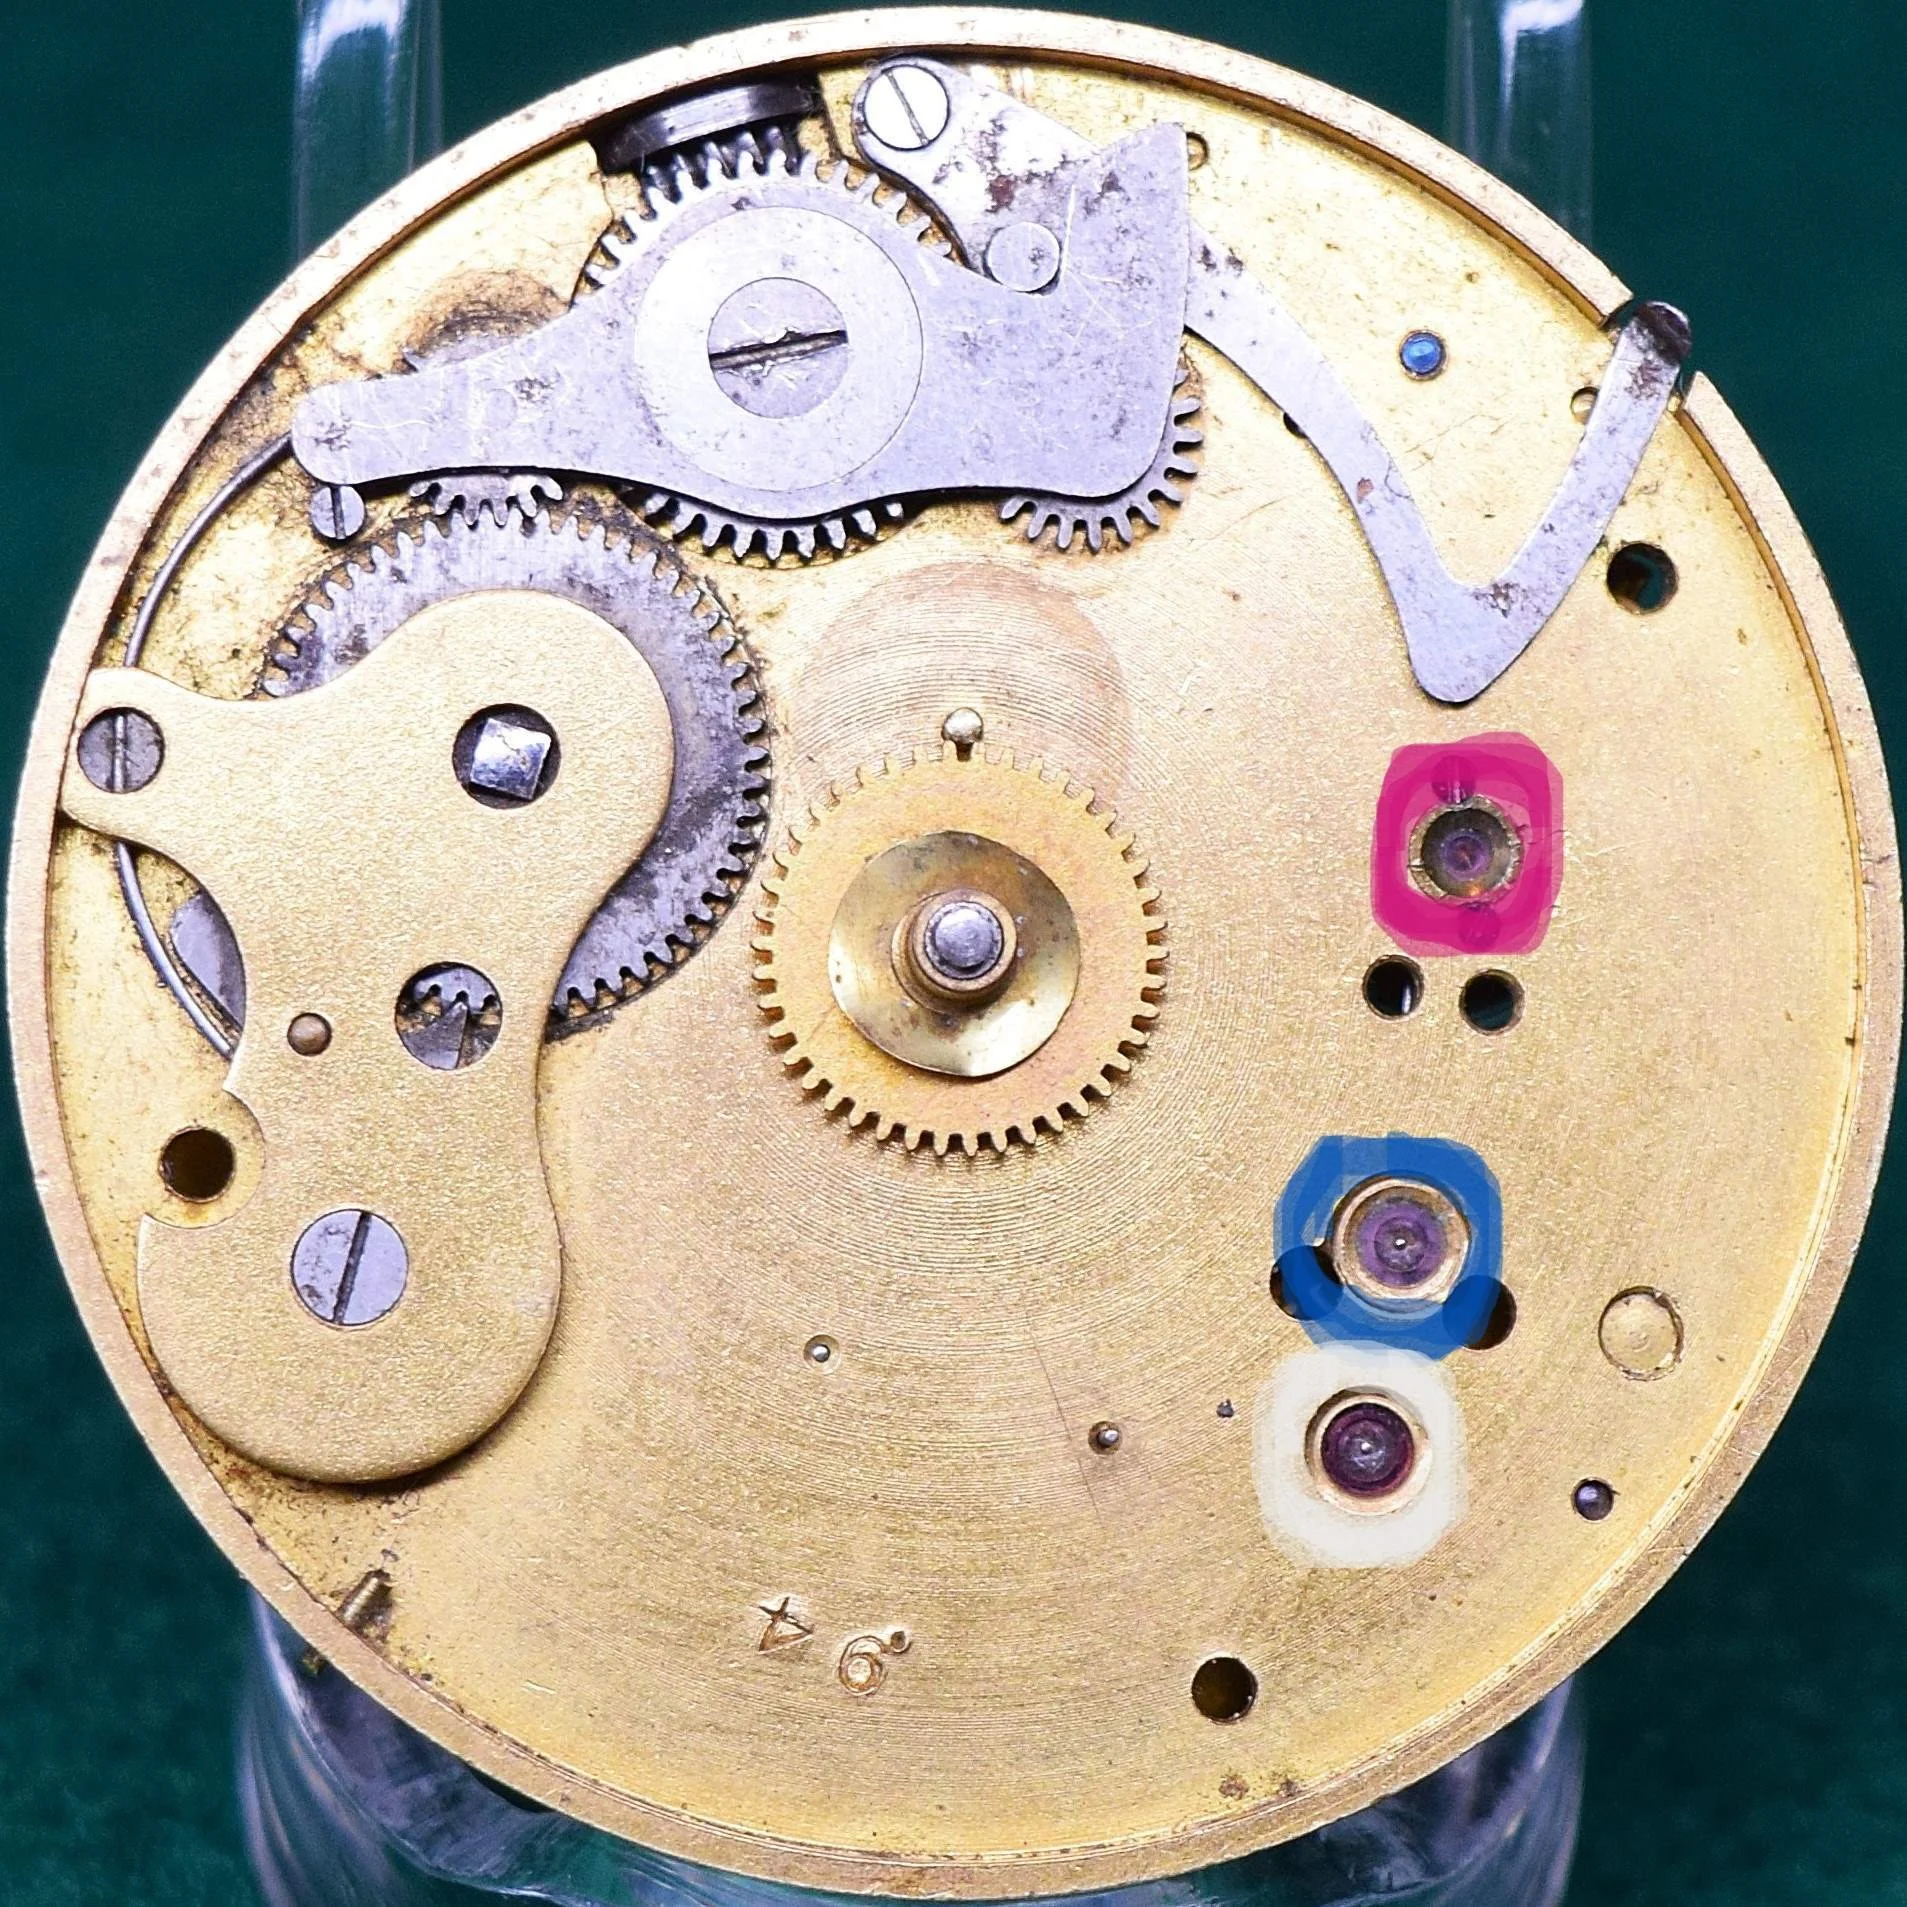
The two images below show the 11-jewel movement with its eight visible jewels highlighted.
The image on the left, the Top Plate, shows the balance staff’s top cap stone/jewel, which is protecting the balance staff’s top jewel (hole jewel) directly beneath it highlighted in red.
It shows the top pallet jewel (hole jewel) highlighted in blue. The jewel reduces friction in the movement of the pallet fork that occurs with metal pivot passing through a metal bearing.
The image also shows the top escape wheel jewel (hole jewel) highlighted in white.
The image on the right, the Pillar Plate, shows the balance staff’s bottom cap stone/jewel, which is protecting the balance staff’s bottom jewel (hole jewel) directly beneath it highlighted in red.
It shows the bottom pallet jewel (hole jewel) highlighted in blue. This reduces friction in the movement of the pallet fork.
The image also shows the bottom escape wheel jewel (hole jewel) highlighted in white.
There are three more jewels that are hidden between the plates:
The two pallet jewels are on the wide end of the pallet fork that make contact with the escape wheel. As the escape wheel turns due to the release of power from the main spring it makes contact with the two pallet jewels in such a way that it causes the pallet fork to swing from side to side. This also moves the narrow end of the pallet fork from side to side making intermittent contact with the impulse jewel, pushing it from side to side.
The impulse jewel rides beneath the roller table near the bottom of the balance staff. As the tip of the pallet fork moves the impulse jewel from side to side it turns the roller table, hairspring, and balance wheel back and forth providing resistance to the power being released from the mainspring. By regulating the strength of this resistance, we are able to regulate the rate at which the power can be released from the mainspring through the gear train, and ultimately the rate at which the hands of the watch move around the dial.
11-Jewel Movements in Model 3 - Configuration 2
The two images below show the 11-jewel movement with its eight visible jewels highlighted.
The image on the left, the Top Plate, shows the balance staff’s top cap jewel, which is protecting the balance staff’s top jewel (hole jewel) directly beneath it highlighted in red. Notice that all settings for hole jewels on the top plate of the 11-jewel movement are pressed, instead of screw-set. This is quick way to tell Seth Thomas 11-jewel movements from 15-jewel movements in this model.
It shows the top pallet jewel (hole jewel) highlighted in blue. The jewel reduces friction in the movement of the pallet fork that occurs with metal pivot passing through a metal bearing.
The image shows the top escape wheel jewel (hole jewel) highlighted in white.
It shows the 3rd Wheel top jewel (hole jewel) highlighted in yellow.
The image also shows the 4th Wheel Top Jewel (hole jewel) highlighted in green.

The image on the right, the Pillar Plate, shows the balance staff’s bottom cap jewel, which is protecting the balance staff’s bottom jewel (hole jewel) directly beneath it.
There are three more jewels that are hidden between the plates:
The two pallet jewels are on the wide end of the pallet fork that make contact with the escape wheel. As the escape wheel turns due to the release of power from the main spring it makes contact with the two pallet jewels in such a way that it causes the pallet fork to swing from side to side. This also moves the narrow end of the pallet fork from side to side making intermittent contact with the impulse jewel, pushing it from side to side.
The impulse jewel rides beneath the roller table near the bottom of the balance staff. As the tip of the pallet fork moves the impulse jewel from side to side it turns the roller table, hairspring, and balance wheel back and forth providing resistance to the power being released from the mainspring. By regulating the strength of this resistance, we are able to regulate the rate at which the power can be released from the mainspring through the gear train, and ultimately the rate at which the hands of the watch move around the dial.
15-Jewel Movements
The two images below show the 15-jewel movement with its twelve visible jewels highlighted.
The image on the left, the Top Plate, shows the balance staff’s top cap jewel, which is protecting the balance staff’s top jewel (hole jewel) directly beneath it highlighted in red.
It shows the top pallet jewel (hole jewel) highlighted in blue. The jewel reduces friction in the movement of the pallet fork that occurs with metal pivot passing through a metal bearing.
The image shows the top escape wheel jewel (hole jewel) highlighted in white.
It shows the 3rd Wheel top jewel (hole jewel) highlighted in yellow.
The image also shows the 4th Wheel Top Jewel (hole jewel) highlighted in green.
The image on the right, the Pillar Plate, shows the Balance Staff’s Bottom Cap Jewel, which is protecting the Balance Staff’s Bottom Jewel (hole jewel) directly beneath it highlighted in red.
It shows the Bottom Pallet Jewel (hole jewel) highlighted in blue. This reduces friction in the movement of the pallet fork.
The image also shows the Bottom Escape Wheel Jewel (hole jewel) highlighted in white.
It shows the 3rd Wheel Bottom Jewel (hole jewel) highlighted in yellow.
The image also shows the 4th Wheel Bottom Jewel (hole jewel) highlighted in green.
There are three more jewels that are hidden between the plates:
The two pallet jewels are on the wide end of the pallet fork that make contact with the escape wheel. As the escape wheel turns due to the release of power from the main spring it makes contact with the two pallet jewels in such a way that it causes the pallet fork to swing from side to side. This also moves the narrow end of the pallet fork from side to side making intermittent contact with the impulse jewel, pushing it from side to side.
The impulse jewel rides beneath the roller table near the bottom of the balance staff. As the tip of the pallet fork moves the impulse jewel from side to side it turns the roller table, hairspring, and balance wheel back and forth providing resistance to the power being released from the mainspring. By regulating the strength of this resistance, we are able to regulate the rate at which the power can be released from the mainspring through the gear train, and ultimately the rate at which the hands of the watch move around the dial.
17-Jewel Movements
The two images below show the 17-jewel movement with its fourteen visible jewels highlighted.
The image on the left, the Top Plate, shows the balance staff’s top cap jewel, which is protecting the balance staff’s top jewel (hole jewel) directly beneath it highlighted in red.
It shows the top pallet jewel (hole jewel) highlighted in blue. The jewel reduces friction in the movement of the pallet fork that occurs with metal pivot passing through a metal bearing.
The image shows the top escape wheel jewel (hole jewel) highlighted in white.
It shows the 3rd Wheel top jewel (hole jewel) highlighted in yellow.
The image also shows the 4th Wheel Top Jewel (hole jewel) highlighted in green.
It shows the Center Wheel highlighted in orange.
The image on the right, the Pillar Plate, shows the Balance Staff’s Bottom Cap Jewel, which is protecting the Balance Staff’s Bottom Jewel (hole jewel) directly beneath it highlighted in red.
It shows the Bottom Pallet Jewel (hole jewel) highlighted in blue. This reduces friction in the movement of the pallet fork.
The image also shows the Bottom Escape Wheel Jewel (hole jewel) highlighted in white.
It shows the 3rd Wheel Bottom Jewel (hole jewel) highlighted in yellow.
The image also shows the 4th Wheel Bottom Jewel (hole jewel) highlighted in green.
It shows the Center Wheel (highlighted in orange) with the cannon pinion removed to reveal that there are no screws and no visible evidence that there is a Bottom Center Wheel Jewel.
There are three more jewels that are hidden between the plates:
The two pallet jewels are on the wide end of the pallet fork that make contact with the escape wheel. As the escape wheel turns due to the release of power from the main spring it makes contact with the two pallet jewels in such a way that it causes the pallet fork to swing from side to side. This also moves the narrow end of the pallet fork from side to side making intermittent contact with the impulse jewel, pushing it from side to side.
The impulse jewel rides beneath the roller table near the bottom of the balance staff. As the tip of the pallet fork moves the impulse jewel from side to side it turns the roller table, hairspring, and balance wheel back and forth providing resistance to the power being released from the mainspring. By regulating the strength of this resistance, we are able to regulate the rate at which the power can be released from the mainspring through the gear train, and ultimately the rate at which the hands of the watch move around the dial.
Jewel Counts in Seth Thomas Model 4 Pocket Watches


The four most common Seth Thomas jewel counts, 7 jewels, 11 jewels, 15 jewels, and 17 jewels. Model 4 was only produced with 7 Jewels as illustrated above. The top row shows the “Top Plate” and the bottom row shows the “Pillar Plate”, which is usually covered by the dial.
7-Jewel Movements
The top two images below show the 7-jewel movement with its four visible jewels highlighted in red.
The image on the left, the Top Plate, shows the balance staff’s top cap jewel, which is protecting the balance staff’s top jewel (hole jewel) directly beneath it. A Cap Jewel acts as a barrier between the hole jewel and outside environmental contaminants that could reduce efficiency and effectiveness of a hole jewel. When a Cap Jewel is used the wheels pivot rides on the Cap Jewel and is stabilized by passing through the hole jewel.
The image on the right, the Pillar Plate, shows the balance staff’s bottom cap jewel, which is protecting the balance staff’s bottom jewel (hole jewel) directly beneath it.
There are three more jewels that are hidden between the plates:
The two pallet jewels are on the wide end of the pallet fork that make contact with the escape wheel. As the escape wheel turns due to the release of power from the main spring it makes contact with the two pallet jewels in such a way that it causes the pallet fork to swing from side to side. This also moves the narrow end of the pallet fork from side to side making intermittent contact with the impulse jewel, pushing it from side to side.
The impulse jewel rides beneath the roller table near the bottom of the balance staff. As the tip of the pallet fork moves the impulse jewel from side to side it turns the roller table, hairspring, and balance wheel back and forth providing resistance to the power being released from the mainspring. By regulating the strength of this resistance, we are able to regulate the rate at which the power can be released from the mainspring through the gear train, and ultimately the rate at which the hands of the watch move around the dial.
The second two images are of an impulse jewel and the Model 4 pallet fork with its pallet jewels visible.
The bottom image shows how the Pallet Fork Jewels engage the Escape Wheel in Model 4.
Jewel Counts in Seth Thomas Model 5 Pocket Watches


The four most common Seth Thomas jewel counts, 7 jewels, 11 jewels, 15 jewels, and 17 jewels, are shown above from left to right respectively. The top row shows the “Top Plate” and the bottom row shows the “Pillar Plate”, which is usually covered by the dial.
7-Jewel Movements
The top two images below show the 7-jewel movement with its two visible jewels highlighted in red.
The image on the left, the Top Plate, shows the balance staff’s top cap stone/jewel, which is protecting the balance staff’s top jewel (hole jewel) directly beneath it. A Cap Jewel acts as a barrier between the hole jewel and outside environmental contaminants that could reduce efficiency and effectiveness of a hole jewel. When a Cap Jewel is used the wheels pivot rides on the Cap Jewel and is stabilized by passing through the hole jewel.

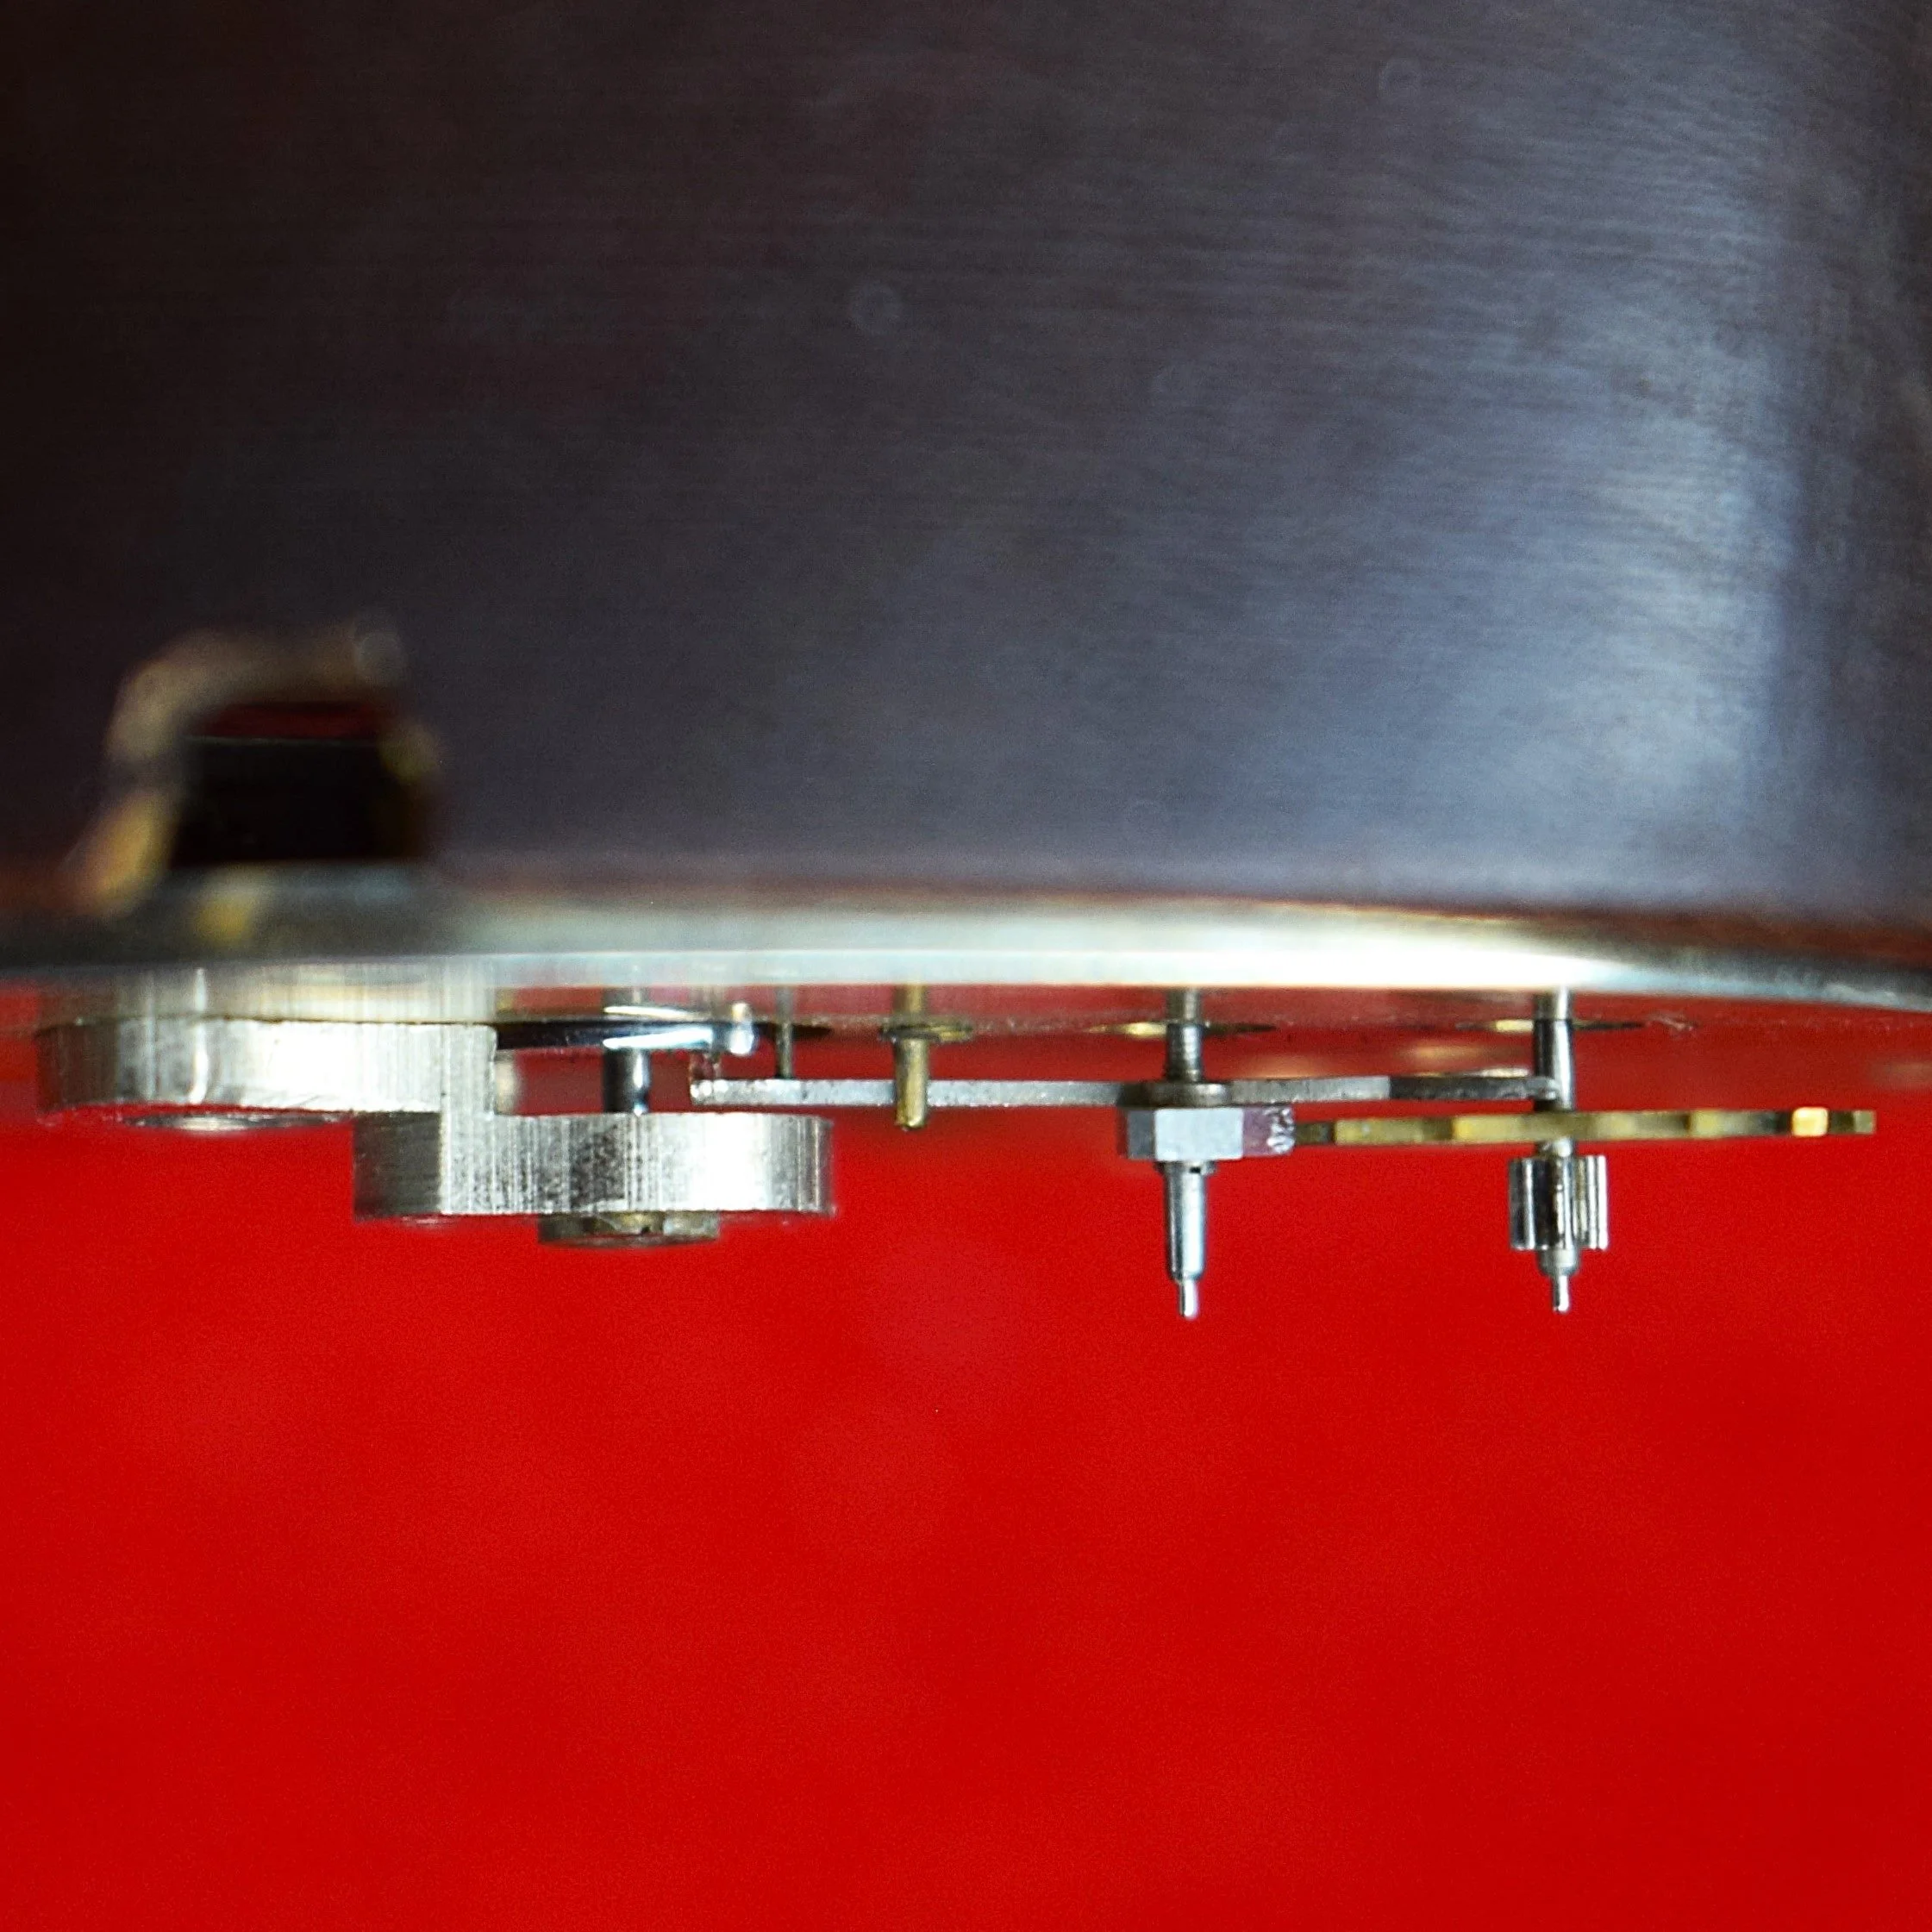
The image on the right, the Pillar Plate, does not show the balance staff’s bottom cap jewel on Seth Thomas Model 5. Because the balance bridge is on top of the full plate a potance is attached to the back of the top plate holding the hole jewel and the balance staff’s bottom cap stone/jewel. The potance can be seen in the second set of two photos below. There are no jewels visible on Model 5’s 7-jewel movements.
There are five more jewels that are hidden between the plates:
In Seth Thomas Model 5 movements the Bottom Balance Staff Jewel and the Bottom Balance Staff Cap Stone/Jewel are between the plates.
The two pallet jewels are on the wide end of the pallet fork that make contact with the escape wheel. As the escape wheel turns due to the release of power from the main spring it makes contact with the two pallet jewels in such a way that it causes the pallet fork to swing from side to side. This also moves the narrow end of the pallet fork from side to side making intermittent contact with the impulse jewel, pushing it from side to side.
The impulse jewel rides beneath the roller table near the bottom of the balance staff. As the tip of the pallet fork moves the impulse jewel from side to side it turns the roller table, hairspring, and balance wheel back and forth providing resistance to the power being released from the mainspring. By regulating the strength of this resistance, we are able to regulate the rate at which the power can be released from the mainspring through the gear train, and ultimately the rate at which the hands of the watch move around the dial.
The second two images are of an impulse jewel, a pallet fork with their pallet jewels visible, and the potance.
The bottom image shows how the Pallet Fork Jewels engage the Escape Wheel.

11-Jewel Movements
The two images below show the 11-jewel movement with its six visible jewels highlighted.
The image on the left, the Top Plate, shows the balance staff’s top cap stone/jewel, which is protecting the balance staff’s top jewel (hole jewel) directly beneath it highlighted in red. Notice that all settings for hole jewels on the top plate of the 11-jewel movement are pressed, instead of screw-set. This is quick way to tell Seth Thomas 11-jewel movements from 15-jewel movements in this model.
It shows the top pallet jewel (hole jewel) highlighted in blue. The jewel reduces friction in the movement of the pallet fork that occurs with metal pivot passing through a metal bearing.
The image also shows the top escape wheel jewel (hole jewel) highlighted in white.

The image on the right, the Pillar Plate, does not show any jewels in Model 5’s 11-jewel movements.
There are five more jewels that are hidden between the plates:
In Seth Thomas Model 5 movements the Bottom Balance Staff Jewel and the Bottom Balance Staff Cap Stone/Jewel are between the plates.
The two pallet jewels are on the wide end of the pallet fork that make contact with the escape wheel. As the escape wheel turns due to the release of power from the main spring it makes contact with the two pallet jewels in such a way that it causes the pallet fork to swing from side to side. This also moves the narrow end of the pallet fork from side to side making intermittent contact with the impulse jewel, pushing it from side to side.
The impulse jewel rides beneath the roller table near the bottom of the balance staff. As the tip of the pallet fork moves the impulse jewel from side to side it turns the roller table, hairspring, and balance wheel back and forth providing resistance to the power being released from the mainspring. By regulating the strength of this resistance, we are able to regulate the rate at which the power can be released from the mainspring through the gear train, and ultimately the rate at which the hands of the watch move around the dial.
15-Jewel Movements
The two images below show the 15-jewel movement with its ten visible jewels highlighted.
The image on the left, the Top Plate, shows the balance staff’s top cap jewel, which is protecting the balance staff’s top jewel (hole jewel) directly beneath it highlighted in red.
It shows the top pallet jewel (hole jewel) highlighted in blue. The jewel reduces friction in the movement of the pallet fork that occurs with metal pivot passing through a metal bearing.
The image shows the top escape wheel jewel (hole jewel) highlighted in white.
It shows the 3rd Wheel top jewel (hole jewel) highlighted in yellow.
The image also shows the 4th Wheel Top Jewel (hole jewel) highlighted in green.
The image on the right, the Pillar Plate, shows the Bottom Pallet Jewel (hole jewel) highlighted in blue. This jewel reduces friction in the movement of the pallet fork.
The image also shows the Bottom Escape Wheel Jewel (hole jewel) highlighted in white.
It shows the 3rd Wheel Bottom Jewel (hole jewel) highlighted in yellow.
The image also shows the 4th Wheel Bottom Jewel (hole jewel) highlighted in green.
There are five more jewels that are hidden between the plates:
In Seth Thomas Model 5 movements the Bottom Balance Staff Jewel and the Bottom Balance Staff Cap Stone/Jewel are between the plates.
The two pallet jewels are on the wide end of the pallet fork that make contact with the escape wheel. As the escape wheel turns due to the release of power from the main spring it makes contact with the two pallet jewels in such a way that it causes the pallet fork to swing from side to side. This also moves the narrow end of the pallet fork from side to side making intermittent contact with the impulse jewel, pushing it from side to side.
The impulse jewel rides beneath the roller table near the bottom of the balance staff. As the tip of the pallet fork moves the impulse jewel from side to side it turns the roller table, hairspring, and balance wheel back and forth providing resistance to the power being released from the mainspring. By regulating the strength of this resistance, we are able to regulate the rate at which the power can be released from the mainspring through the gear train, and ultimately the rate at which the hands of the watch move around the dial.
17-Jewel Movements
The two images below show the 17-jewel movement with its twelve visible jewels highlighted.
The image on the left, the Top Plate, shows the balance staff’s top cap jewel, which is protecting the balance staff’s top jewel (hole jewel) directly beneath it highlighted in red.
It shows the top pallet jewel (hole jewel) highlighted in blue. The jewel reduces friction in the movement of the pallet fork that occurs with metal pivot passing through a metal bearing.
The image shows the top escape wheel jewel (hole jewel) highlighted in white.
It shows the 3rd Wheel top jewel (hole jewel) highlighted in yellow.
The image also shows the 4th Wheel Top Jewel (hole jewel) highlighted in green.
It shows the Center Wheel Jewel highlighted in orange.


The image on the right, the Pillar Plate, shows the Bottom Pallet Jewel (hole jewel) highlighted in blue. This jewel reduces friction in the movement of the pallet fork.
The image also shows the Bottom Escape Wheel Jewel (hole jewel) highlighted in white.
It shows the 3rd Wheel Bottom Jewel (hole jewel) highlighted in yellow.
The image also shows the 4th Wheel Bottom Jewel (hole jewel) highlighted in green.
It shows the Center Wheel Jewel with the cannon pinion removed and the Bottom Center Wheel Jewel is visible highlighted in orange.
There are five more jewels that are hidden between the plates:
In Seth Thomas Model 5 movements the Bottom Balance Staff Jewel and the Bottom Balance Staff Cap Stone/Jewel are between the plates.
The two pallet jewels are on the wide end of the pallet fork that make contact with the escape wheel. As the escape wheel turns due to the release of power from the main spring it makes contact with the two pallet jewels in such a way that it causes the pallet fork to swing from side to side. This also moves the narrow end of the pallet fork from side to side making intermittent contact with the impulse jewel, pushing it from side to side.
The impulse jewel rides beneath the roller table near the bottom of the balance staff. As the tip of the pallet fork moves the impulse jewel from side to side it turns the roller table, hairspring, and balance wheel back and forth providing resistance to the power being released from the mainspring. By regulating the strength of this resistance, we are able to regulate the rate at which the power can be released from the mainspring through the gear train, and ultimately the rate at which the hands of the watch move around the dial.
21-Jewel Movements
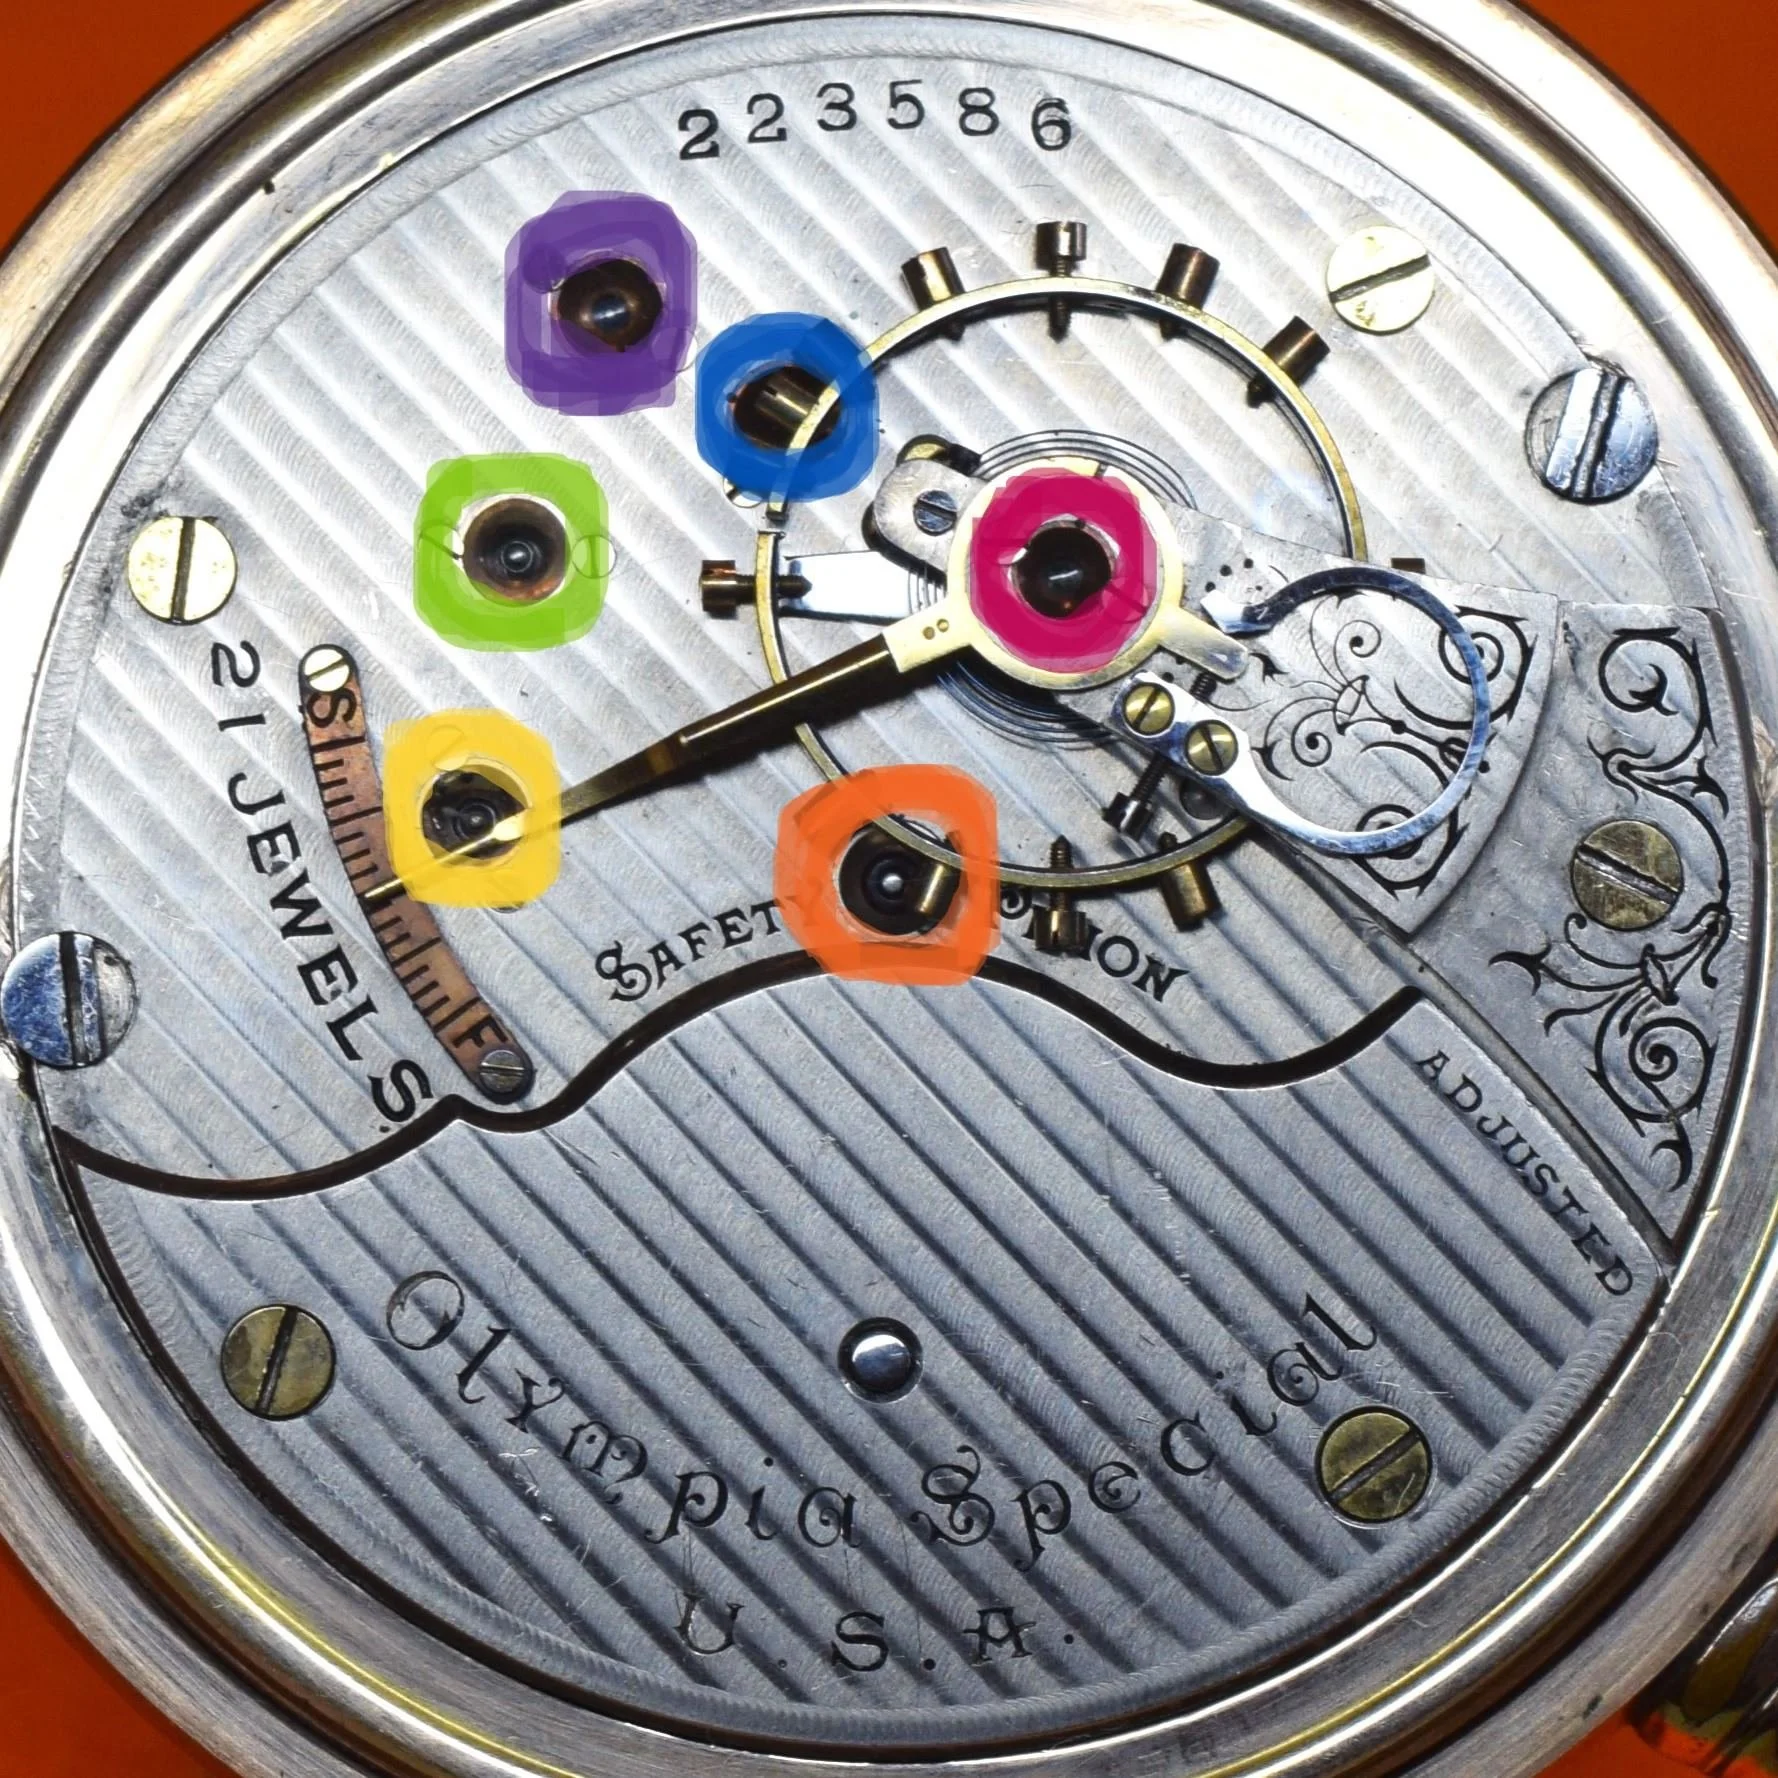
The two images below show the 21-jewel movement with its sixteen visible jewels highlighted.
The image on the left, the Top Plate, shows the balance staff’s top cap jewel, which is protecting the balance staff’s top jewel (hole jewel) directly beneath it highlighted in red.
It shows the top pallet jewel (hole jewel) and a top cap jewel highlighted in blue. These jewels reduce friction in the movement of the pallet fork that occurs with metal pivot passing through a metal bearing.
The image shows the top escape wheel jewel (hole jewel) and a top cap jewel highlighted in white.
It shows the 3rd Wheel top jewel (hole jewel) highlighted in yellow.
The image also shows the 4th Wheel Top Jewel (hole jewel) highlighted in green.
It shows the Center Wheel Jewel highlighted in orange.
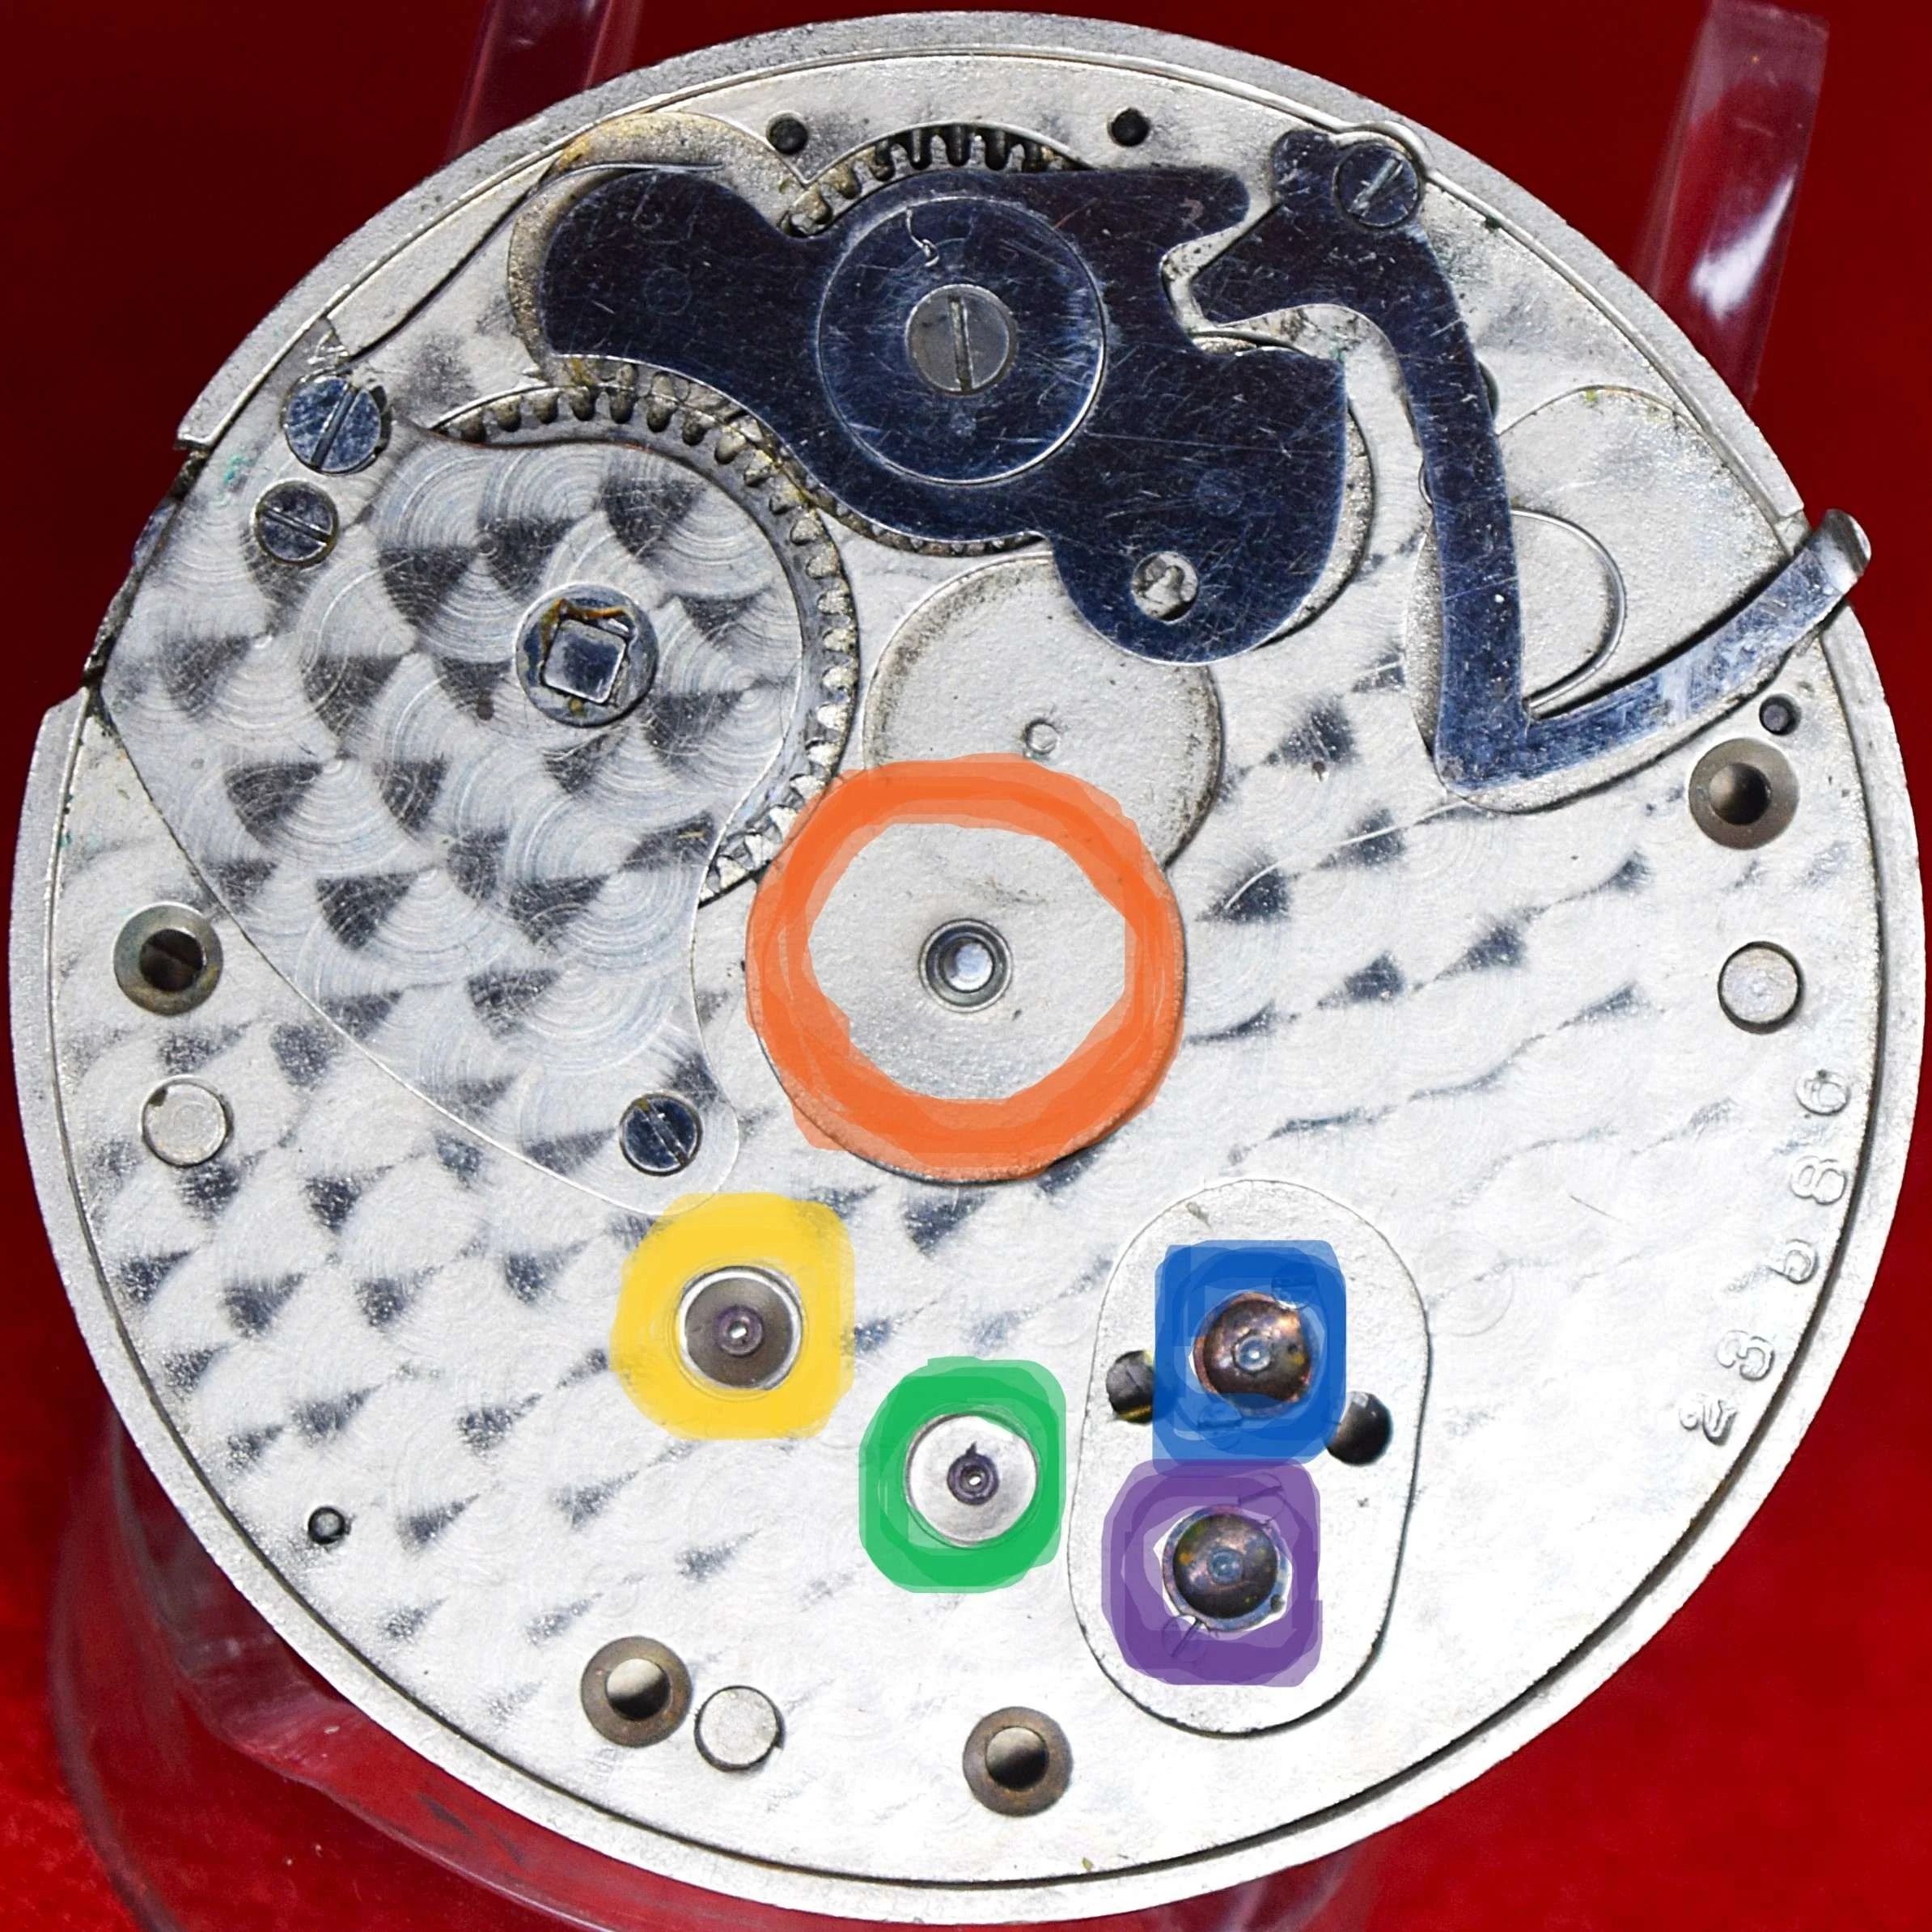
The image on the right, the Pillar Plate, shows the Bottom Pallet Jewel (hole jewel) and a bottom cap jewel highlighted in blue. These jewels reduce friction in the movement of the pallet fork.
The image also shows the Bottom Escape Wheel Jewel (hole jewel) and a bottom cap jewel highlighted in white.
It shows the 3rd Wheel Bottom Jewel (hole jewel) highlighted in yellow.
The image also shows the 4th Wheel Bottom Jewel (hole jewel) highlighted in green.
It shows the Center Wheel Jewel with the cannon pinion removed and the Bottom Center Wheel Jewel is visible highlighted in orange.
There are five more jewels that are hidden between the plates:
In Seth Thomas Model 5 movements the Bottom Balance Staff Jewel and the Bottom Balance Staff Cap Stone/Jewel are between the plates.
The two pallet jewels are on the wide end of the pallet fork that make contact with the escape wheel. As the escape wheel turns due to the release of power from the main spring it makes contact with the two pallet jewels in such a way that it causes the pallet fork to swing from side to side. This also moves the narrow end of the pallet fork from side to side making intermittent contact with the impulse jewel, pushing it from side to side.
The impulse jewel rides beneath the roller table near the bottom of the balance staff. As the tip of the pallet fork moves the impulse jewel from side to side it turns the roller table, hairspring, and balance wheel back and forth providing resistance to the power being released from the mainspring. By regulating the strength of this resistance, we are able to regulate the rate at which the power can be released from the mainspring through the gear train, and ultimately the rate at which the hands of the watch move around the dial.
Selected Jewel Counts in Model 6 Pocket Watches


The four most common Seth Thomas jewel counts, 7 jewels, 11 jewels, 15 jewels, and 17 jewels, are shown above from left to right respectively. The top row shows the “Top Plate” and the bottom row shows the “Pillar Plate”, which is usually covered by the dial.
7-Jewel Movements in Model 6
The top two images below show the 7-jewel movement with its four visible jewels highlighted in red.
The image on the left, the Top Plate, shows the balance staff’s top cap jewel, which is protecting the balance staff’s top jewel (hole jewel) directly beneath it. A Cap Jewel acts as a barrier between the hole jewel and outside environmental contaminants that could reduce efficiency and effectiveness of a hole jewel. When a Cap Jewel is used the wheel’s pivot rides on the Cap Jewel and is stabilized by passing through the hole jewel.
The image on the right, the Pillar Plate, shows the balance staff’s bottom cap jewel, which is protecting the balance staff’s bottom jewel (hole jewel) directly beneath it.
There are three more jewels that are hidden between the plates:
The two pallet jewels are on the wide end of the pallet fork that make contact with the escape wheel. As the escape wheel turns due to the release of power from the main spring it makes contact with the two pallet jewels in such a way that it causes the pallet fork to swing from side to side. This also moves the narrow end of the pallet fork from side to side making intermittent contact with the impulse jewel, pushing it from side to side.
The impulse jewel rides beneath the roller table near the bottom of the balance staff. As the tip of the pallet fork moves the impulse jewel from side to side it turns the roller table, hairspring, and balance wheel back and forth providing resistance to the power being released from the mainspring. By regulating the strength of this resistance, we are able to regulate the rate at which the power can be released from the mainspring through the gear train, and ultimately the rate at which the hands of the watch move around the dial.
The second two images are of an impulse jewel and two pallet forks with their pallet jewels visible.
The bottom image shows how the Pallet Fork Jewels engage the Escape Wheel.
11-Jewel Movements in Model 6
The two images below show the 11-jewel movement with its eight visible jewels highlighted.
The image on the left, the Top Plate, shows the balance staff’s top cap jewel, which is protecting the balance staff’s top jewel (hole jewel) directly beneath it highlighted in red.
It shows the top pallet jewel (hole jewel) highlighted in blue. The jewel reduces friction in the movement of the pallet fork that occurs with metal pivot passing through a metal bearing.
The image shows the top escape wheel jewel (hole jewel) highlighted in white.
It shows the 3rd Wheel top jewel (hole jewel) highlighted in yellow.
The image also shows the 4th Wheel Top Jewel (hole jewel) highlighted in green.
The image on the right, the Pillar Plate, shows the balance staff’s bottom cap jewel, which is protecting the balance staff’s bottom jewel (hole jewel) directly beneath it.
There are three more jewels that are hidden between the plates:
The two pallet jewels are on the wide end of the pallet fork that make contact with the escape wheel. As the escape wheel turns due to the release of power from the main spring it makes contact with the two pallet jewels in such a way that it causes the pallet fork to swing from side to side. This also moves the narrow end of the pallet fork from side to side making intermittent contact with the impulse jewel, pushing it from side to side.
The impulse jewel rides beneath the roller table near the bottom of the balance staff. As the tip of the pallet fork moves the impulse jewel from side to side it turns the roller table, hairspring, and balance wheel back and forth providing resistance to the power being released from the mainspring. By regulating the strength of this resistance, we are able to regulate the rate at which the power can be released from the mainspring through the gear train, and ultimately the rate at which the hands of the watch move around the dial.
15-Jewel Movements in Model 6
The two images below show the 15-jewel movement with its twelve visible jewels highlighted.
The image on the left, the Top Plate, shows the balance staff’s top cap jewel, which is protecting the balance staff’s top jewel (hole jewel) directly beneath it highlighted in red.
It shows the top pallet jewel (hole jewel) highlighted in blue. The jewel reduces friction in the movement of the pallet fork that occurs with metal pivot passing through a metal bearing.
The image shows the top escape wheel jewel (hole jewel) highlighted in white.
It shows the 3rd Wheel top jewel (hole jewel) highlighted in yellow.
The image also shows the 4th Wheel Top Jewel (hole jewel) highlighted in green.
The image on the right, the Pillar Plate, shows the Balance Staff’s Bottom Cap Jewel, which is protecting the Balance Staff’s Bottom Jewel (hole jewel) directly beneath it highlighted in red.
It shows the Bottom Pallet Jewel (hole jewel) highlighted in blue. This reduces friction in the movement of the pallet fork.
The image also shows the Bottom Escape Wheel Jewel (hole jewel) highlighted in white.
It shows the 3rd Wheel Bottom Jewel (hole jewel) highlighted in yellow.
The image also shows the 4th Wheel Bottom Jewel (hole jewel) highlighted in green.
There are three more jewels that are hidden between the plates:
The two pallet jewels are on the wide end of the pallet fork that make contact with the escape wheel. As the escape wheel turns due to the release of power from the main spring it makes contact with the two pallet jewels in such a way that it causes the pallet fork to swing from side to side. This also moves the narrow end of the pallet fork from side to side making intermittent contact with the impulse jewel, pushing it from side to side.
The impulse jewel rides beneath the roller table near the bottom of the balance staff. As the tip of the pallet fork moves the impulse jewel from side to side it turns the roller table, hairspring, and balance wheel back and forth providing resistance to the power being released from the mainspring. By regulating the strength of this resistance, we are able to regulate the rate at which the power can be released from the mainspring through the gear train, and ultimately the rate at which the hands of the watch move around the dial.
17-Jewel Movements in Model 6
The two images below show a similar 17-jewel Model 3 movement with its fourteen visible jewels highlighted.
The image on the left, the Top Plate, shows the balance staff’s top cap jewel, which is protecting the balance staff’s top jewel (hole jewel) directly beneath it highlighted in red.
It shows the top pallet jewel (hole jewel) highlighted in blue. The jewel reduces friction in the movement of the pallet fork that occurs with metal pivot passing through a metal bearing.
The image shows the top escape wheel jewel (hole jewel) highlighted in white.
It shows the 3rd Wheel top jewel (hole jewel) highlighted in yellow.
The image also shows the 4th Wheel Top Jewel (hole jewel) highlighted in green.
It shows the Center Wheel highlighted in orange.
The image on the right, the Pillar Plate, shows the Balance Staff’s Bottom Cap Jewel, which is protecting the Balance Staff’s Bottom Jewel (hole jewel) directly beneath it highlighted in red.
It shows the Bottom Pallet Jewel (hole jewel) highlighted in blue. This reduces friction in the movement of the pallet fork.
The image also shows the Bottom Escape Wheel Jewel (hole jewel) highlighted in white.
It shows the 3rd Wheel Bottom Jewel (hole jewel) highlighted in yellow.
The image also shows the 4th Wheel Bottom Jewel (hole jewel) highlighted in green.
It shows the Center Wheel (highlighted in orange) with the cannon pinion removed to reveal that there are no screws and no visible evidence that there is a Bottom Center Wheel Jewel.
There are three more jewels that are hidden between the plates:
The two pallet jewels are on the wide end of the pallet fork that make contact with the escape wheel. As the escape wheel turns due to the release of power from the main spring it makes contact with the two pallet jewels in such a way that it causes the pallet fork to swing from side to side. This also moves the narrow end of the pallet fork from side to side making intermittent contact with the impulse jewel, pushing it from side to side.
The impulse jewel rides beneath the roller table near the bottom of the balance staff. As the tip of the pallet fork moves the impulse jewel from side to side it turns the roller table, hairspring, and balance wheel back and forth providing resistance to the power being released from the mainspring. By regulating the strength of this resistance, we are able to regulate the rate at which the power can be released from the mainspring through the gear train, and ultimately the rate at which the hands of the watch move around the dial.